提示:
这里面给出的代码都是我第一次配置的使用的,有完全复制别人的代码,也有根据别人的代码改写的
但随着配置的增多,我自己个人使用各种美化的配置和下文的会有所不同
所以按照的
我的仓库中的配置
为准
基础搭建#
安装 Hugo#
官网:
Quick start
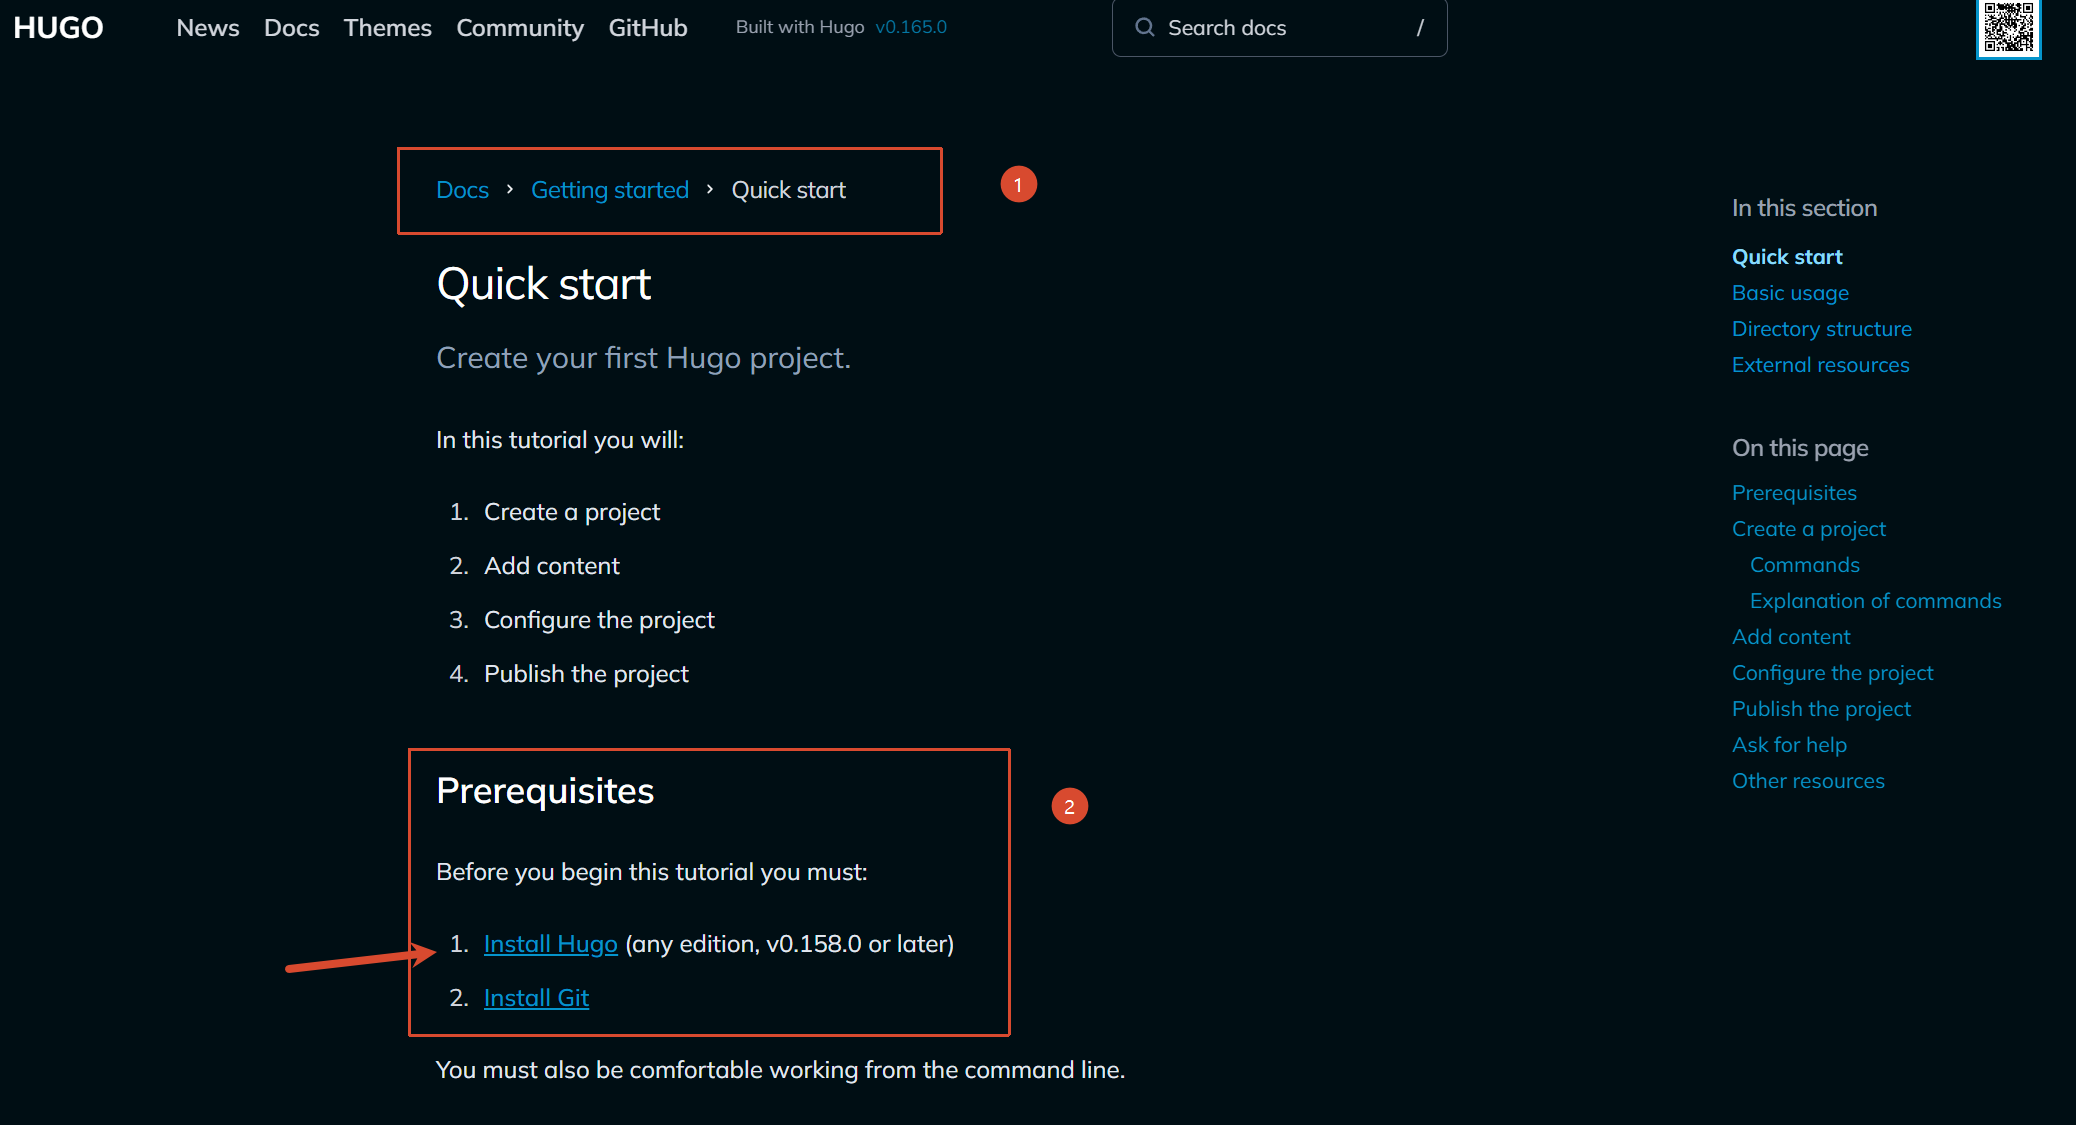
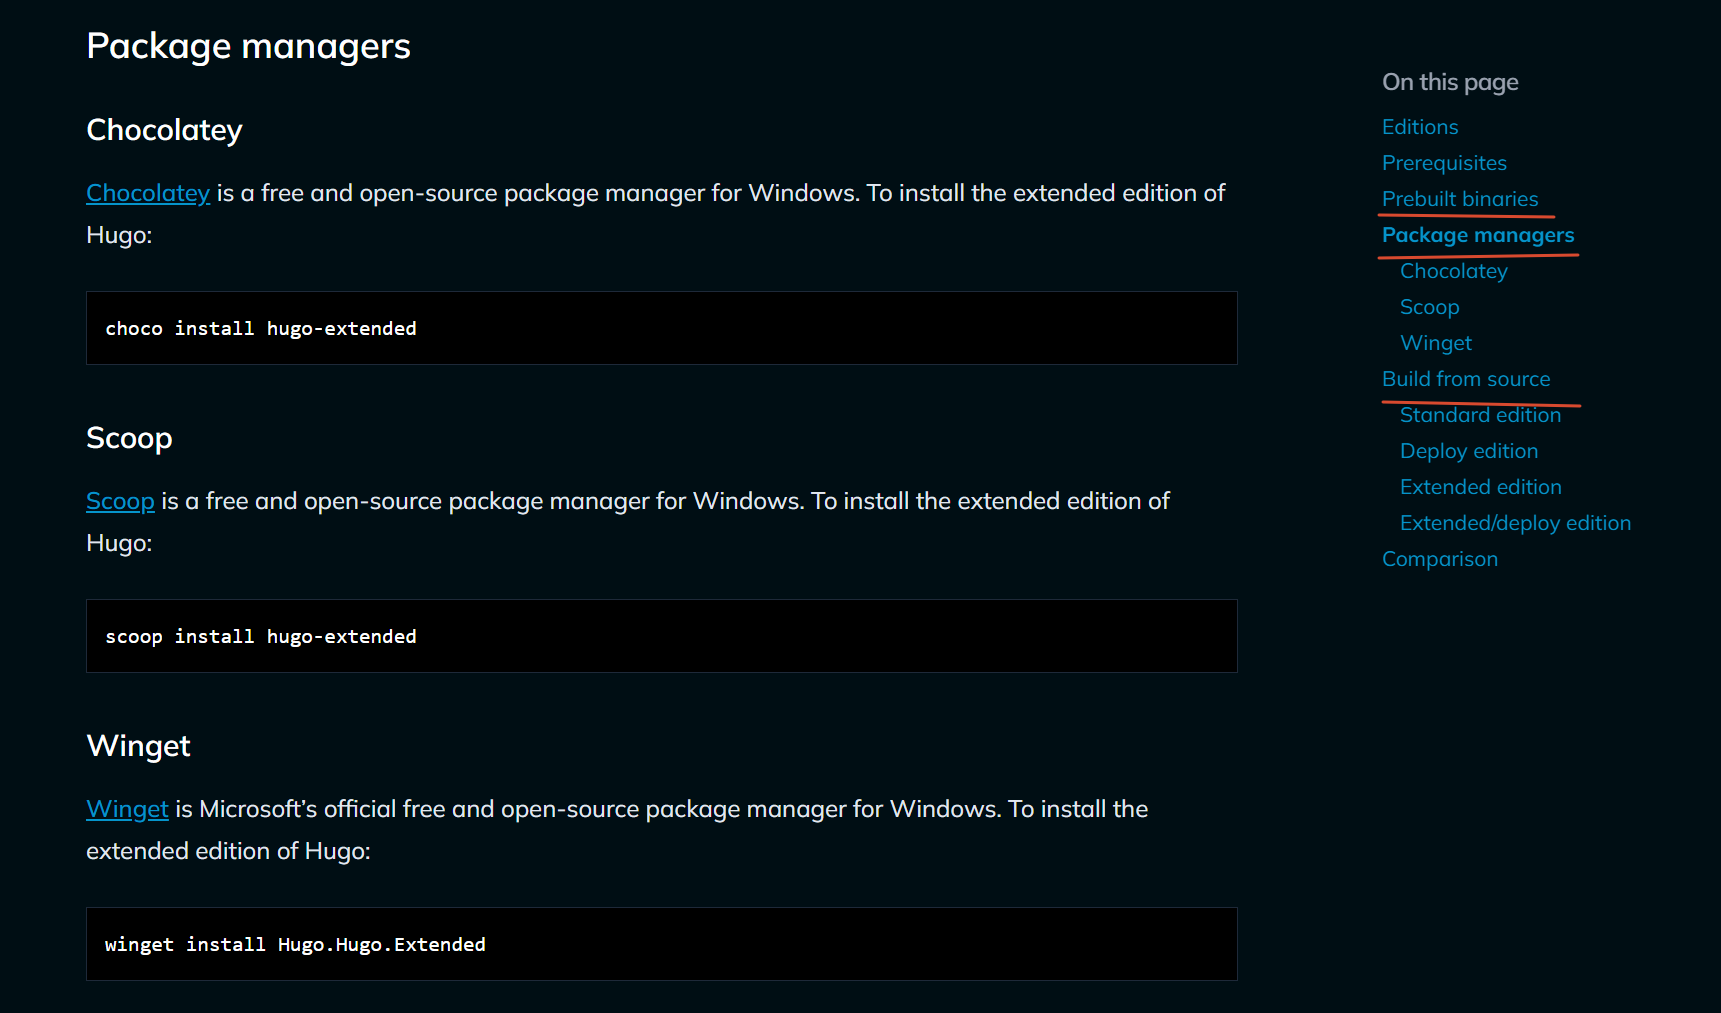
官方文档有有三种安装方式:
- Prebuilt binaries,预构建二进制文件
- Package managers,包管理器
- Build from source,从源代码开始构建
我这里使用winget安装
创建项目与目录结构#
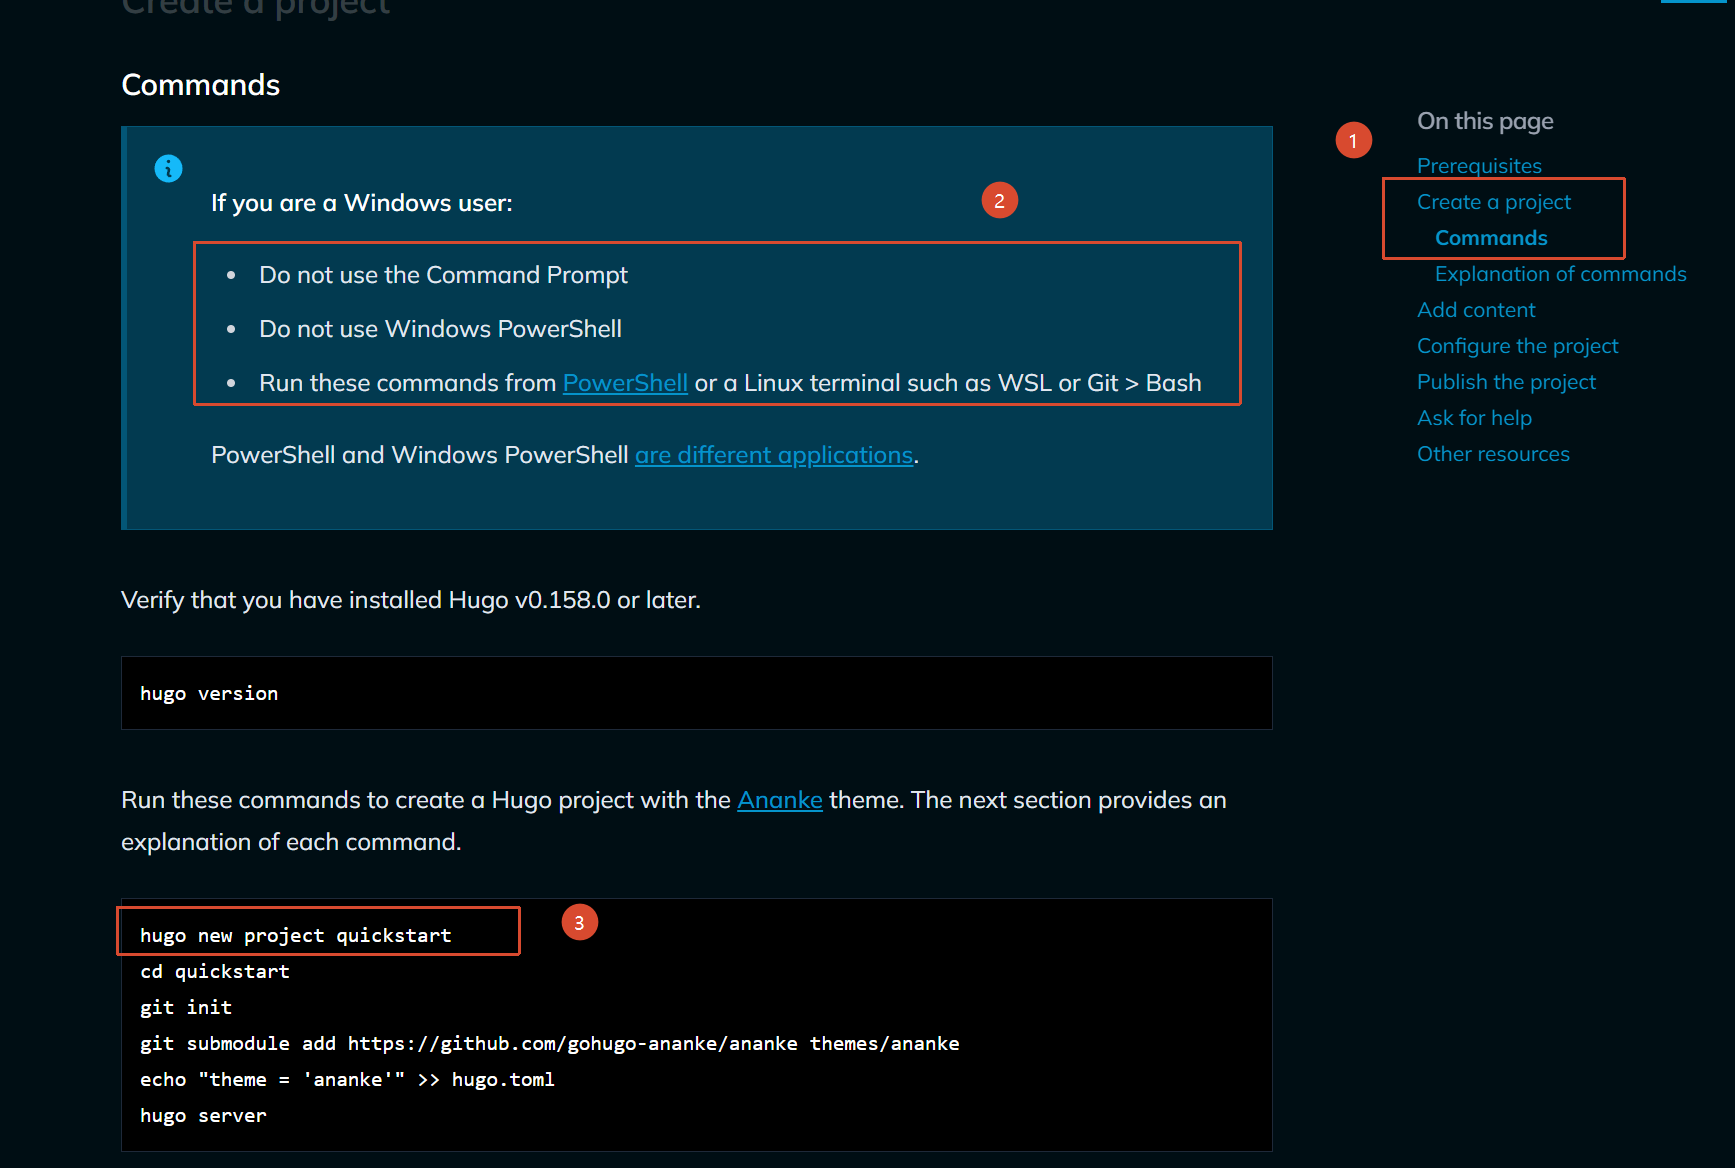
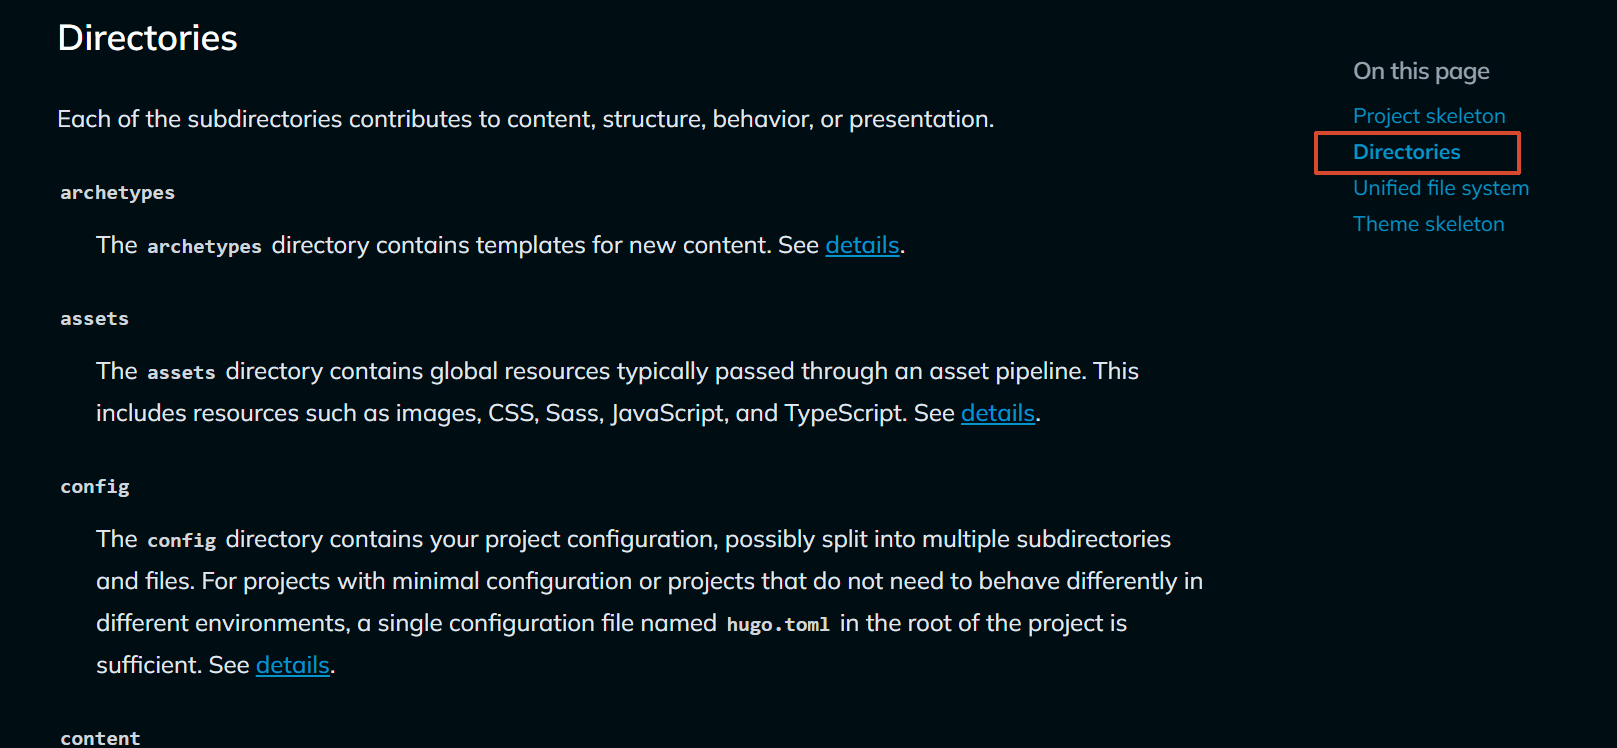
官方文档进行说明,不要使用cmd,使用pwsh或者Linux终端
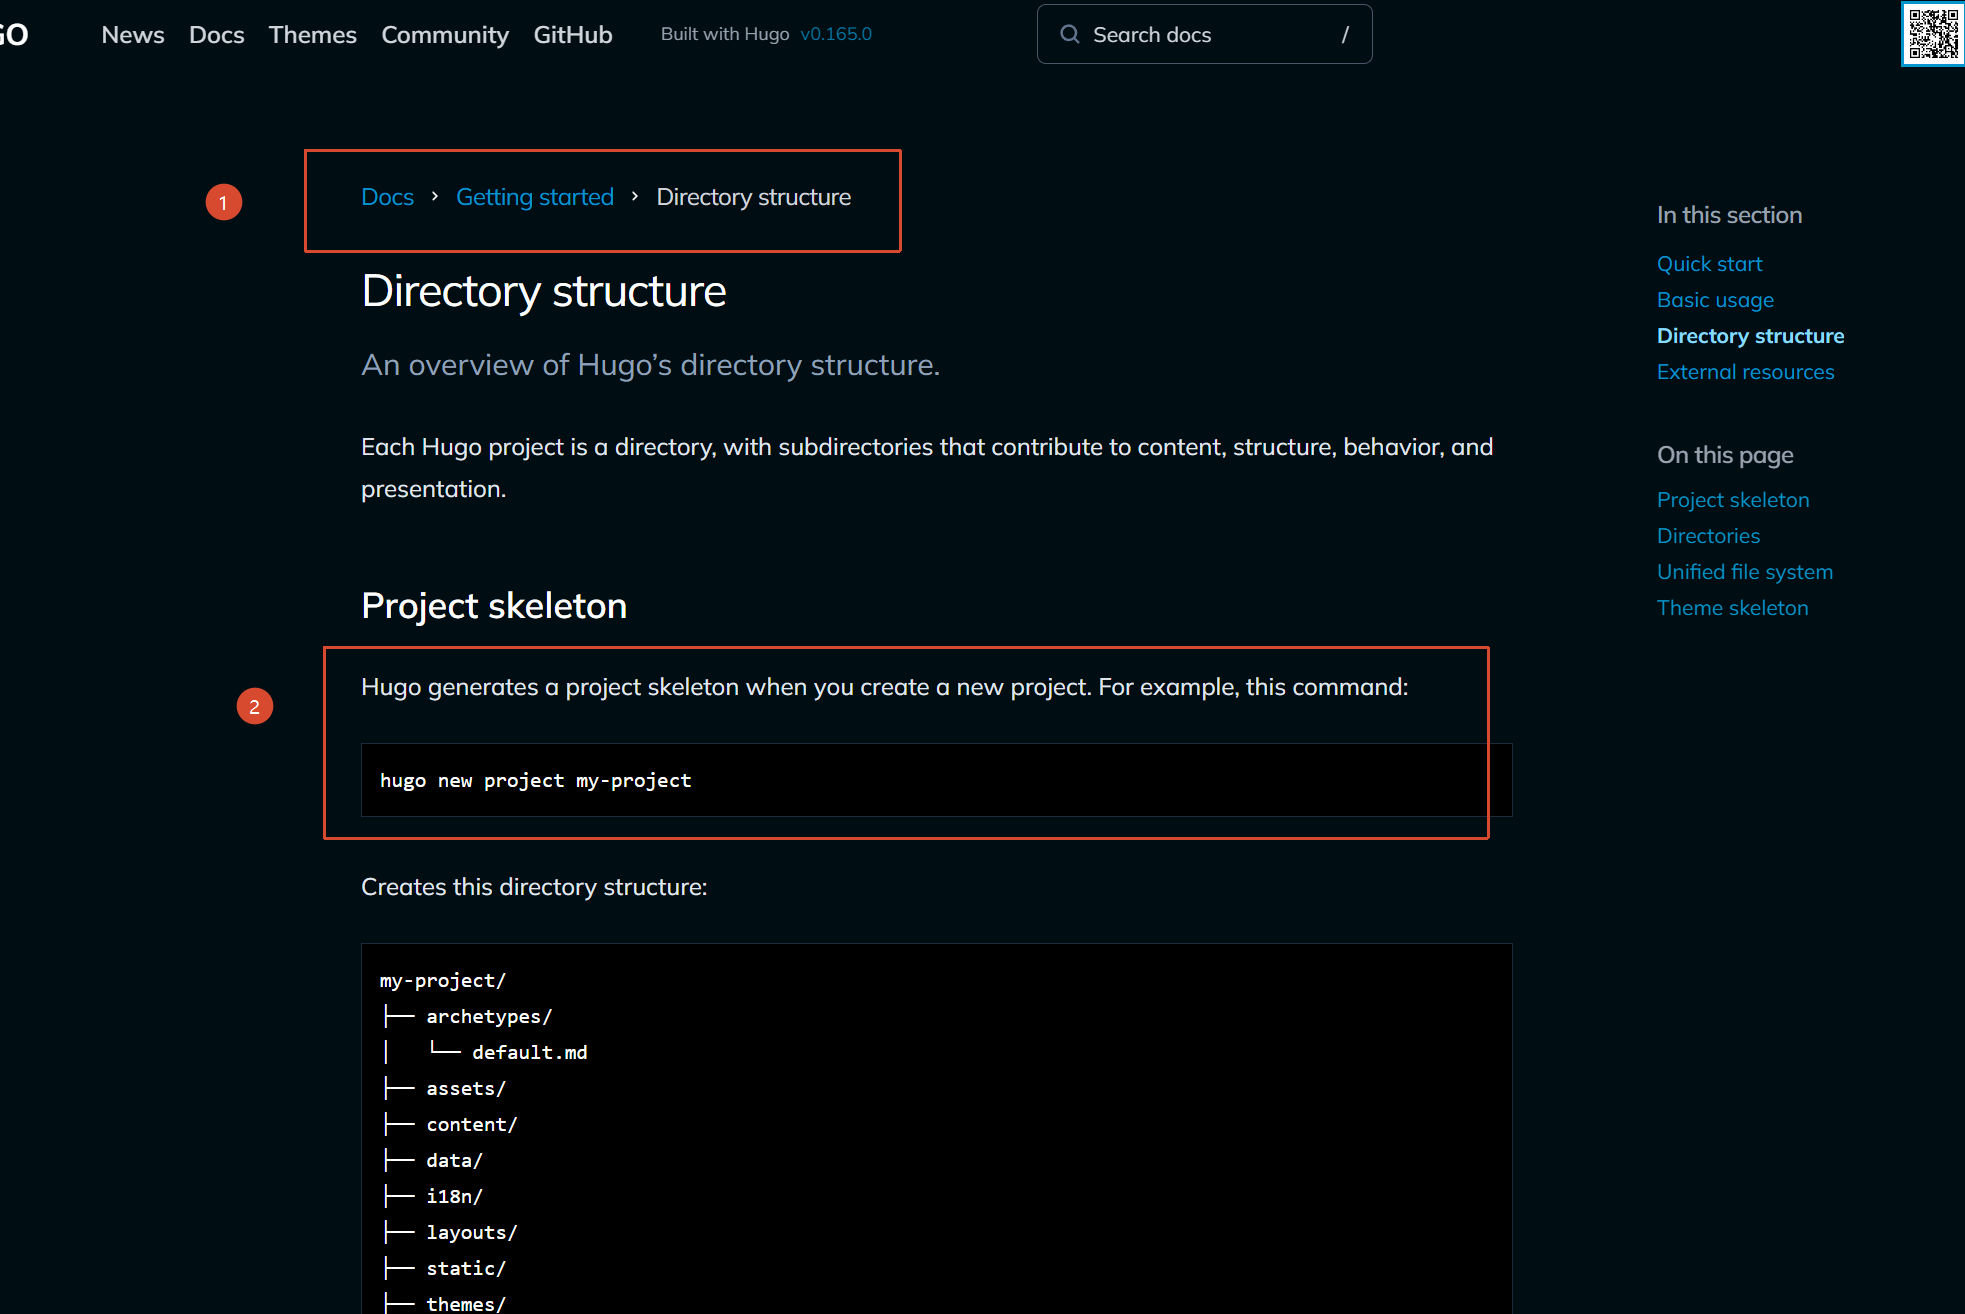
Directory structure
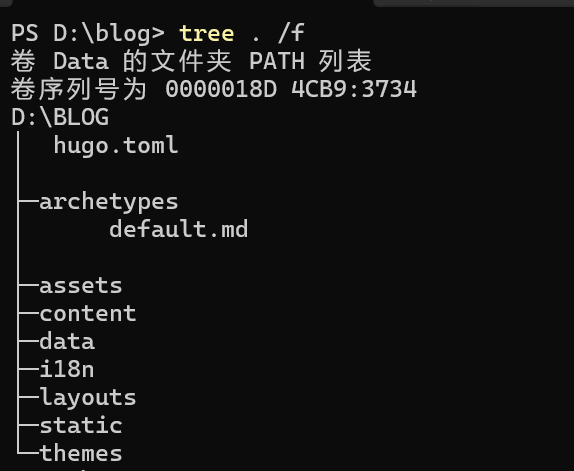
命令用于生成项目骨架
1
2
| # 比如 hugo new project blog
hugo new project <项目名>
|
目录说明:
| 文件名称 | 简要说明 |
|---|
| archetypes | 博客内容的模板,默认只有default.md,可以根据个人的主题配置添加自定义头部信息 |
| assets | 需要 Hugo Pipes 处理的全局资源,如 images, CSS, Sass, JavaScript, and TypeScript |
| content | 个人博客所有内容 |
| data | 生成站点时候所需要的配置文件 |
| layouts | 以为.html形式存储模板,将博客内容呈现为静态页面 |
| resources | 保存运行 hugo build 或 hugo server 命令时生成的缓存输出文件,用来加速站点生成 |
| static | 在构建项目时,这些文件会被复制到 public 目录中。例如: favicon.ico 、 robots.txt 等文件,还有一些用于验证网站所有权的文件 |
| themes | 使用的第三方主题,每个主题都有自己的layouts、static等。使用主题后,hugo先从这里主题加载,再加载自定义的覆盖文件 |
| hugo.toml | 个人博客主题样式配置文件 |
引入 PaperMod 主题#
这里我使用PaperMod
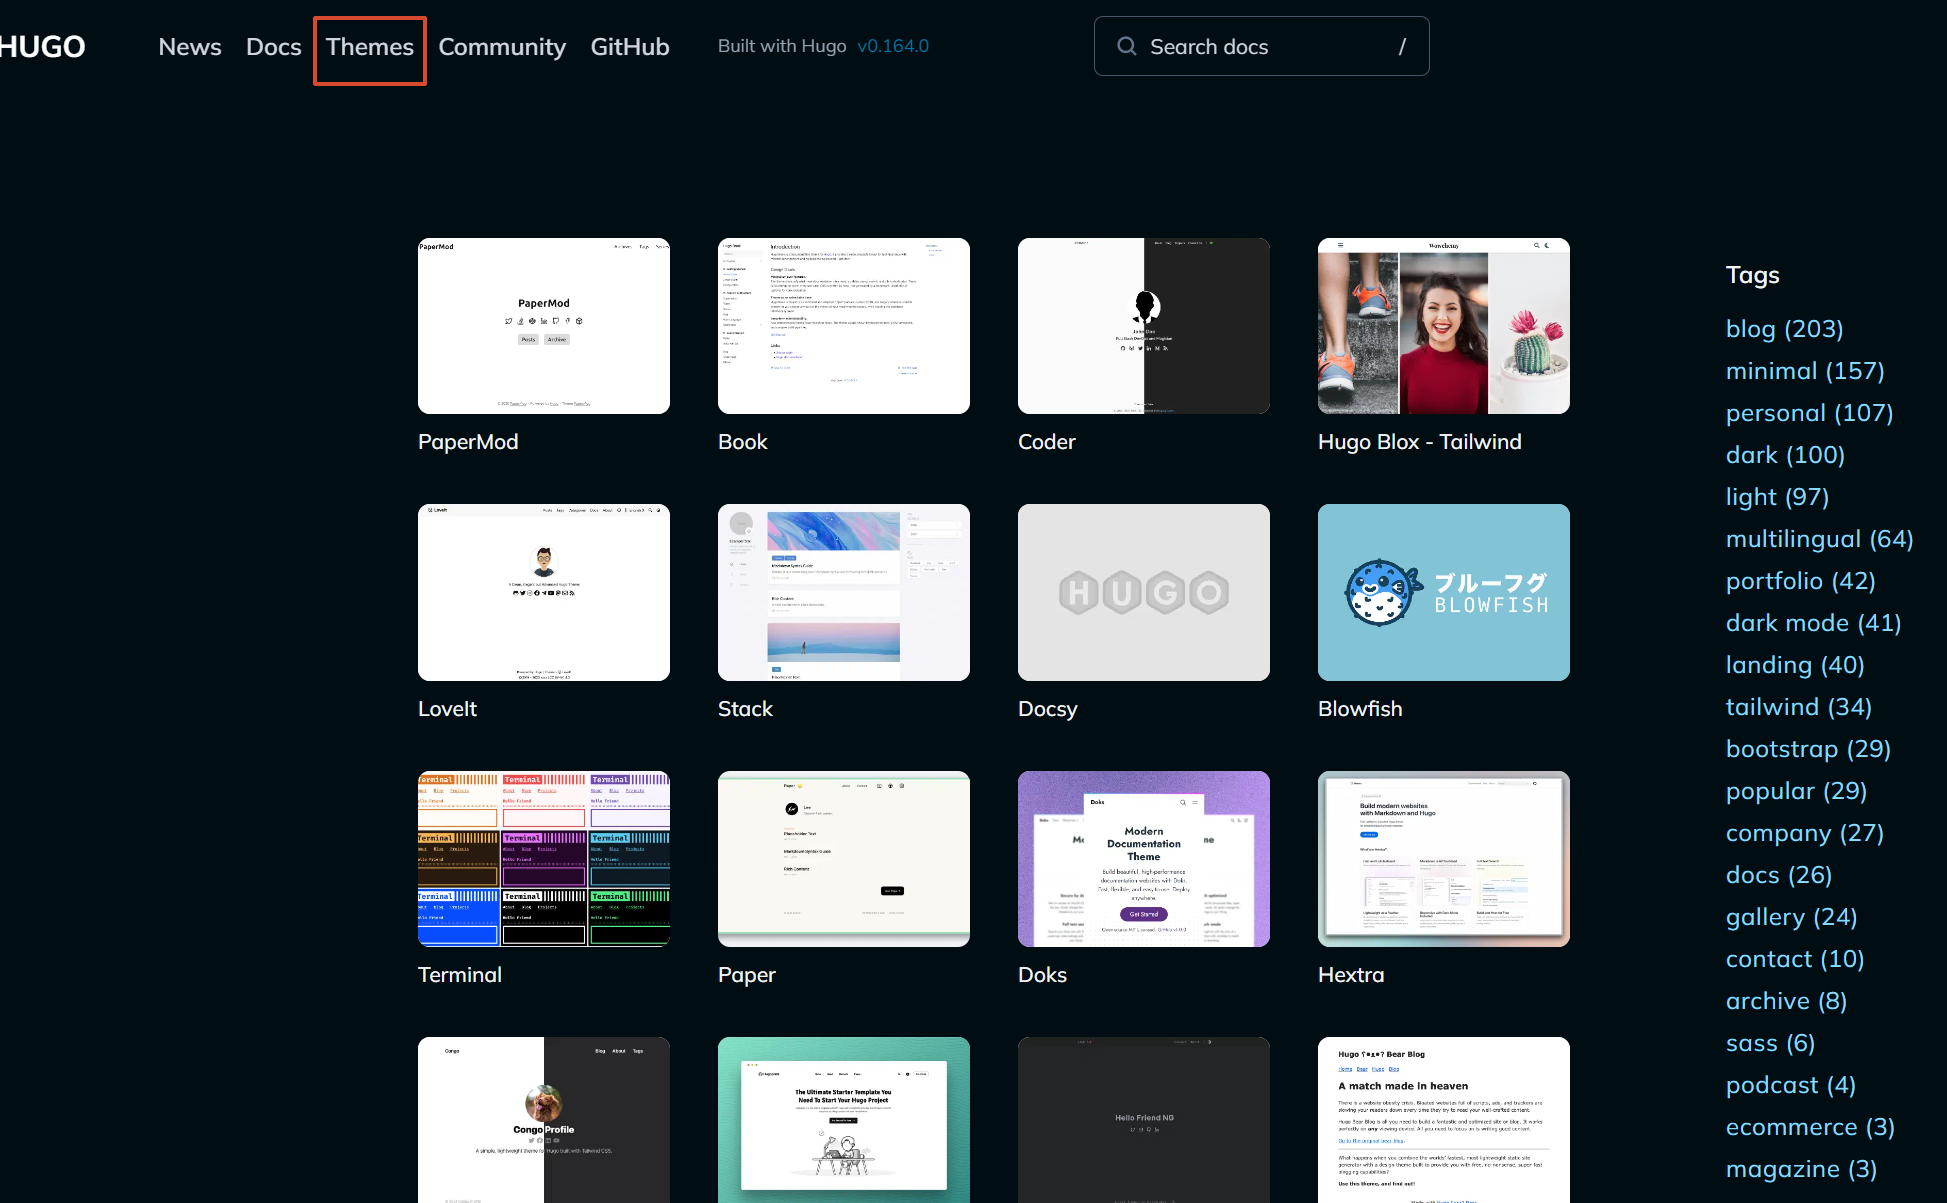
点进去跳转对应的github仓库
然后查看安装指南
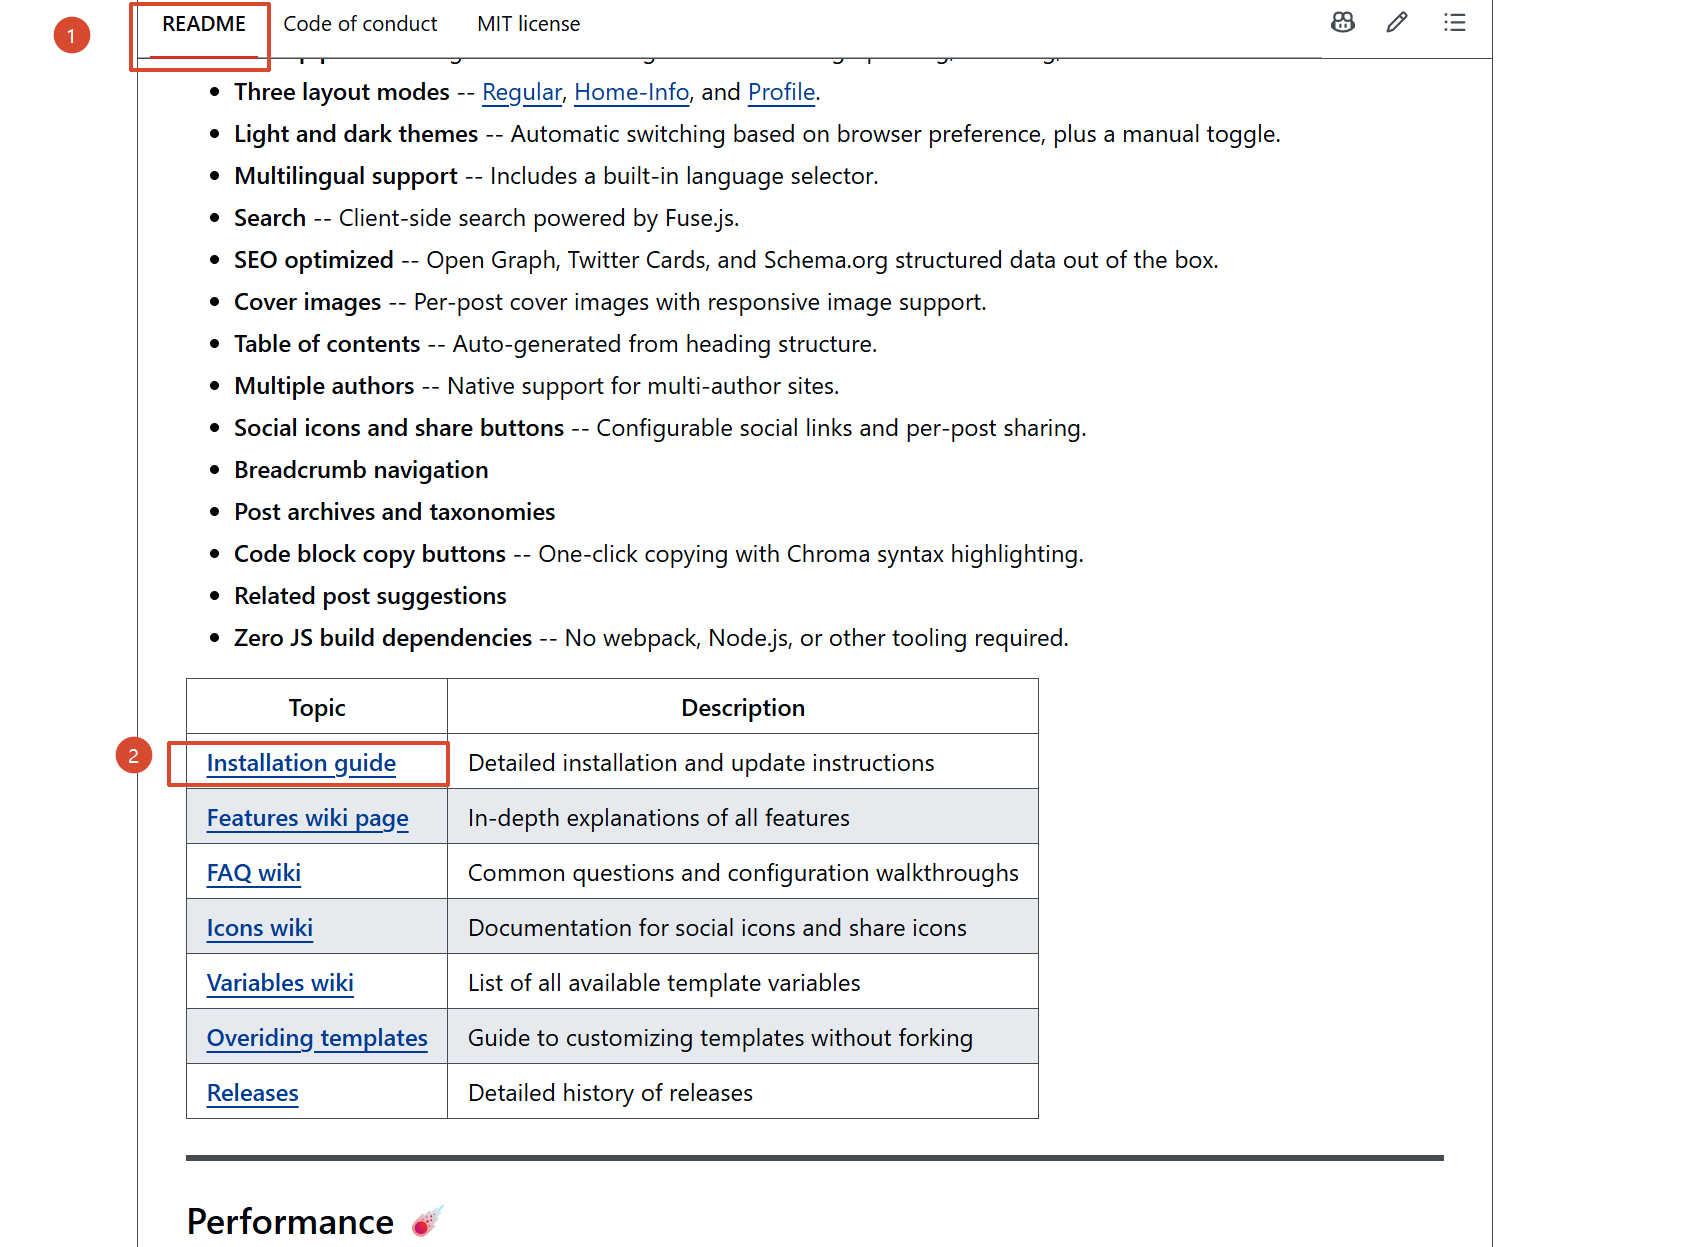
这里有四种安装主题的方式:
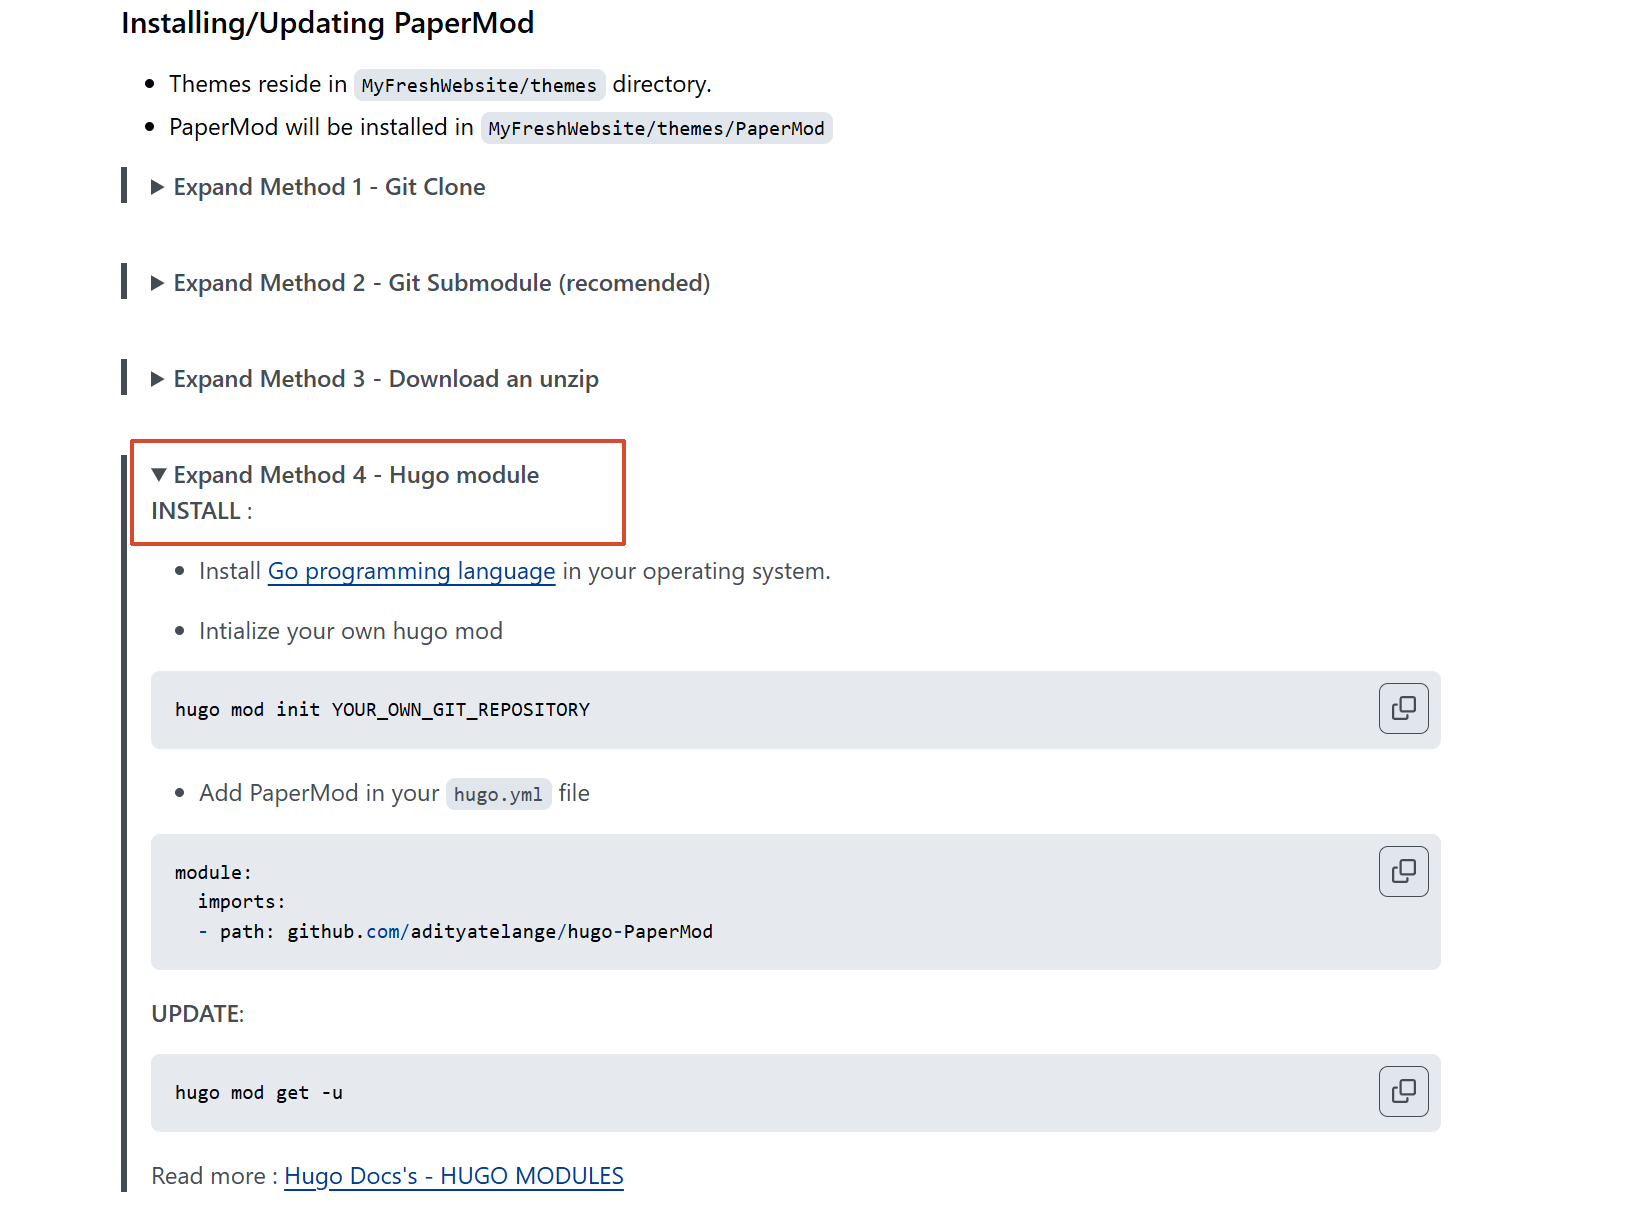
Git Clone和Download an unzip都是安装主题到本地themes目录下
| 维度 | Git Submodule | Hugo Module |
|---|
| 本质 | Git 原生的子仓库机制,把另一个 Git 仓库嵌到当前仓库的子目录 | Hugo 内置的模块系统,基于 Go Modules,是 Hugo 自己的依赖管理方案 |
| 版本管理 | 锁定到具体 commit hash,手动 git submodule update 升级 | 通过 go.mod / go.sum 管理,支持版本范围(如 v7.x),hugo mod get -u 一键升级 |
| 安装位置 | 物理文件在 themes/PaperMod/ 目录下,是真实的子目录 | 模块缓存在本地($HUGO_CACHEDIR),项目目录里看不到主题文件,是虚拟挂载 |
| Git 仓库体积 | 子模块文件不占主仓库体积,但 clone 时需 --recursive | 项目仓库里完全没有主题文件,体积最小 |
| 协作成本 | 协作者必须知道 git submodule init && git submodule update,容易忘 | 协作者只需装好 Hugo,hugo 命令自动拉取依赖,零心智负担 |
| 多主题 / 组件 | 每个主题一个 submodule,手动管理 | 支持声明多个模块,Hugo 自动合并 assets /layouts/static |
| 适用场景 | 需要深度修改主题源码、团队熟悉 Git 子模块操作 | 纯使用主题、不想把主题文件塞进仓库、追求简洁的依赖管理,简单定制直接覆盖文件就行了 |
我使用hugo module
初始化hugo mod
如果使用Github Page部署博客,仓库一定是<你的用户名.github.io>
1
2
| # github仓库:github.com/你的github用户名/你的仓库名
hugo mod init <你的github仓库>
|
添加PaperMod到hugo.toml
1
2
3
| [module]
[[module.imports]]
path = "github.com/adityatelange/hugo-PaperMod"
|
更新
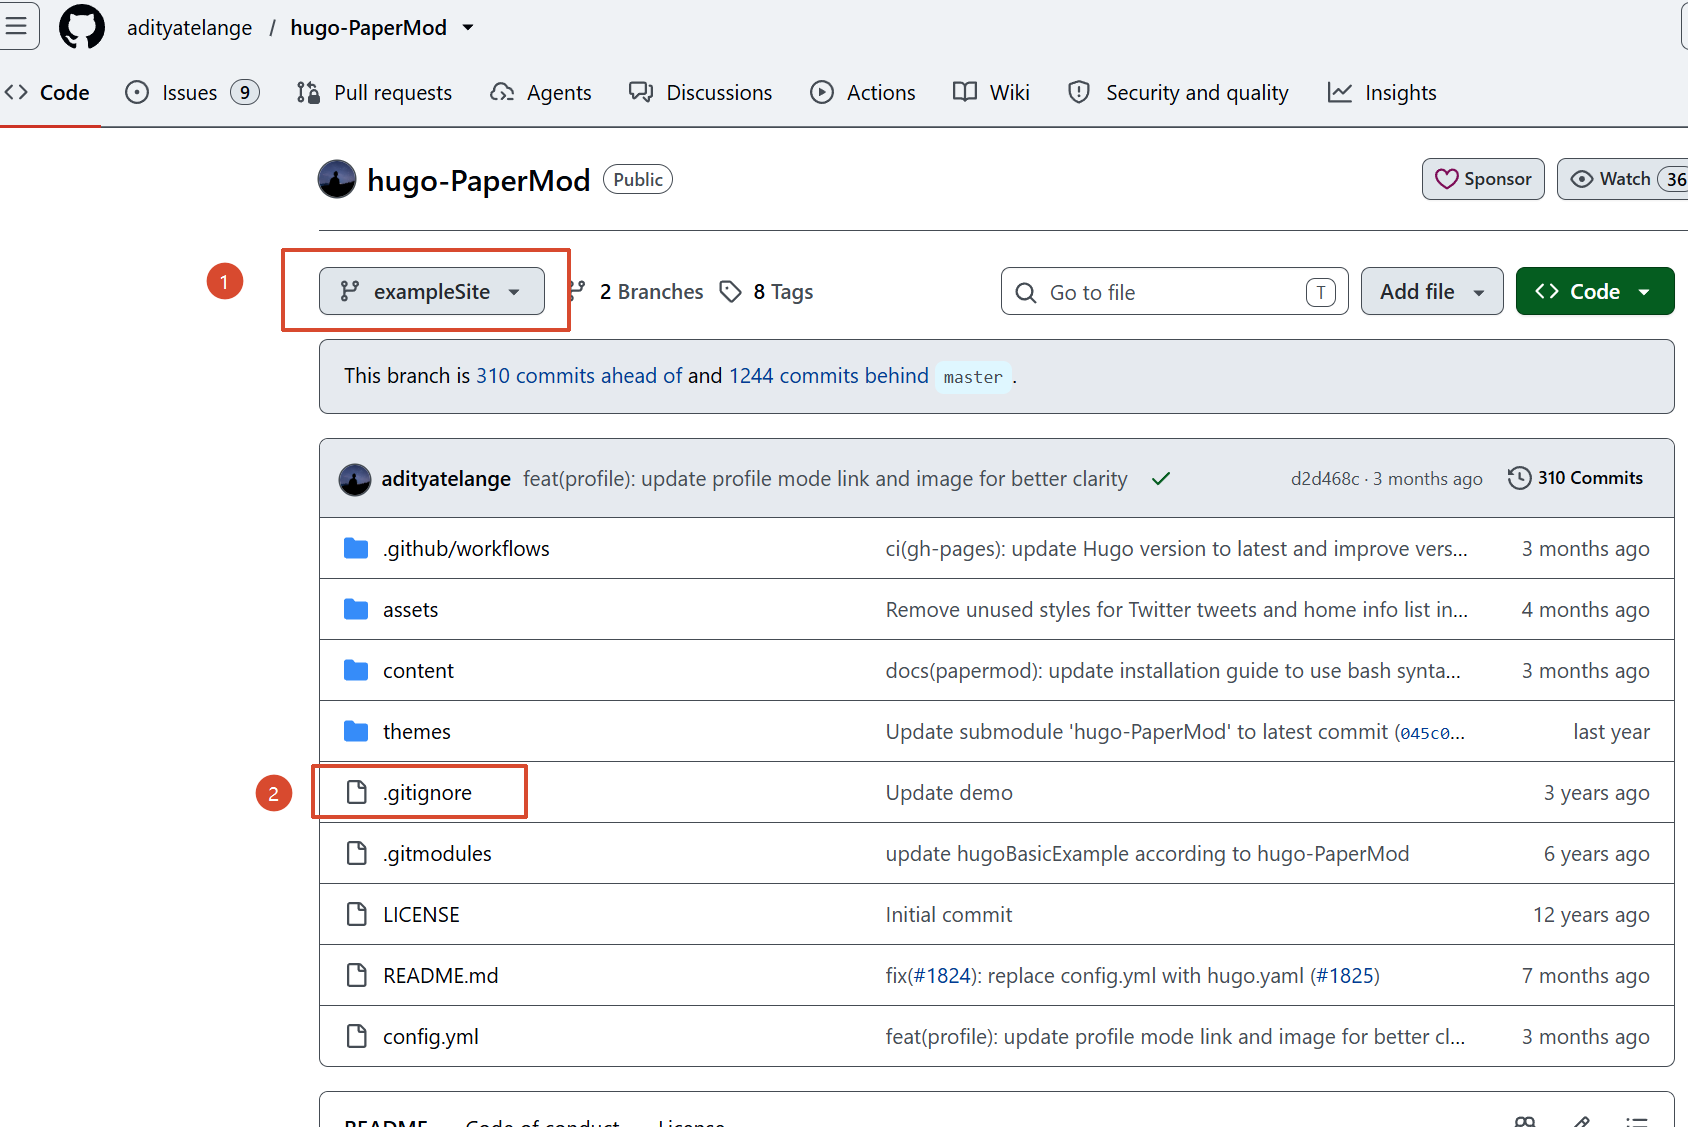
创建.gitignore
排除不必要文件,让git管理和推送到仓库的文件更加清晰
直接用官方主题的忽略文件
创建文章与本地预览#
Quick start
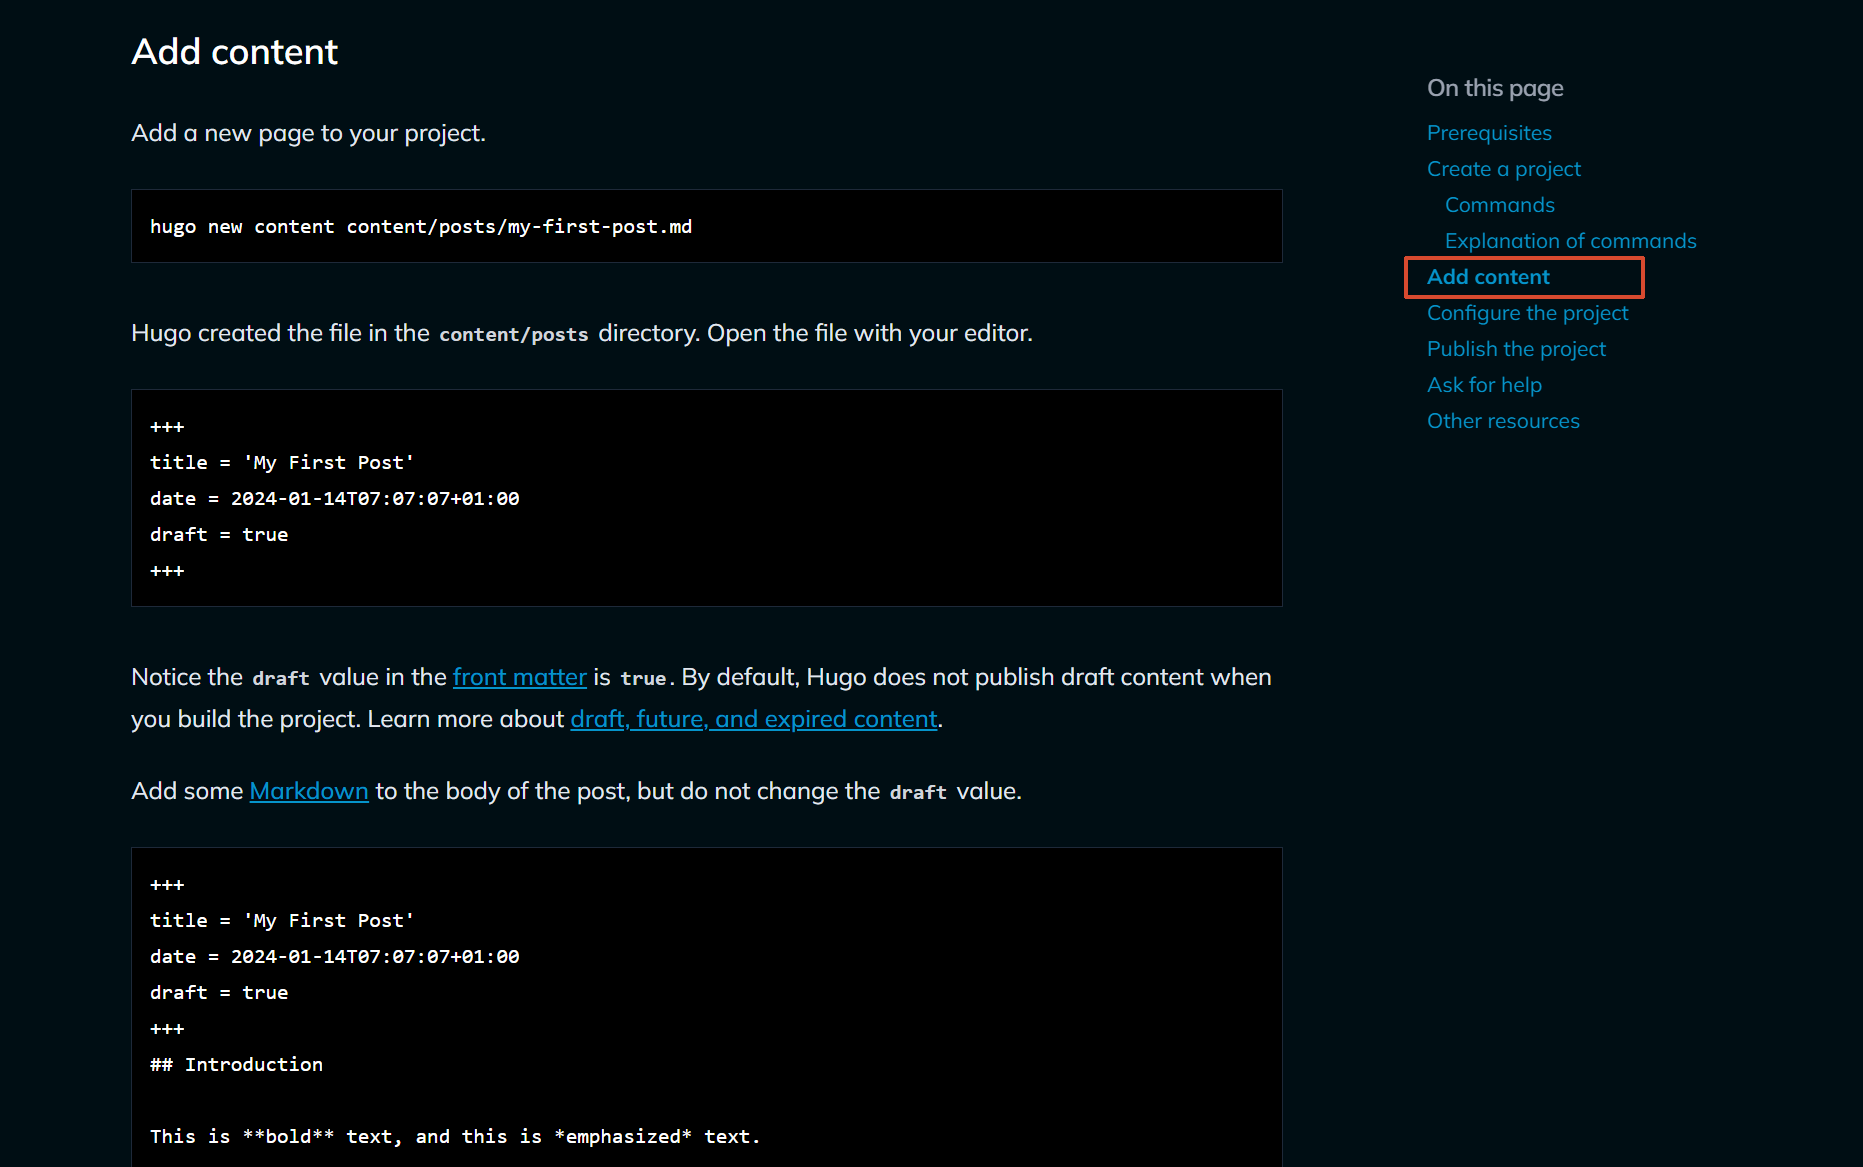
创建文章
hugo new content content/posts/<标题名字>.md
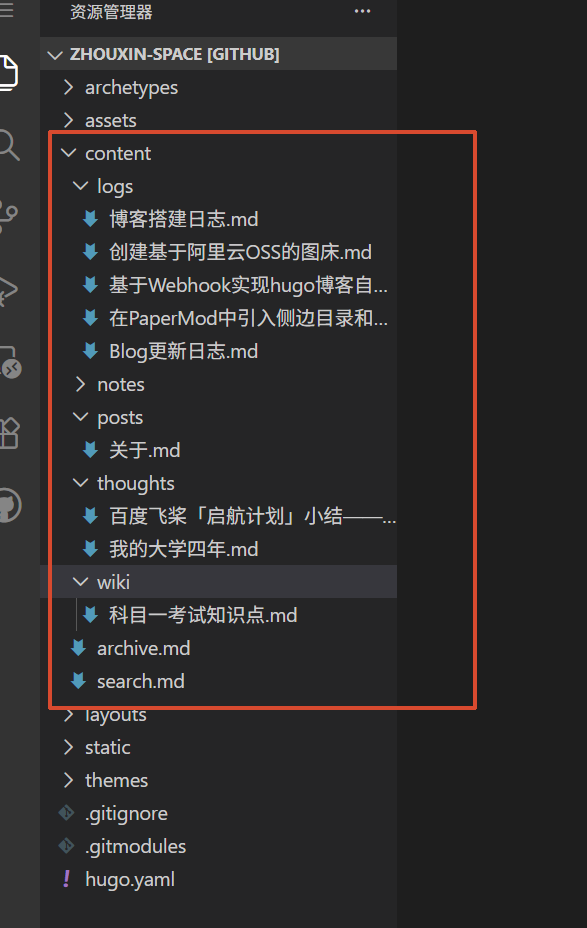
首先content目录是存放所有的博客内容的
posts只是我习惯放文章的地方,你甚至可以在根目录下创建md,只是用文件夹好分类
下图是我看
别人的博客
的目录结构
运行
1
2
3
| hugo server --buildDrafts
或
hugo server -D
|
hugo server → 不构建草稿(draft: true 的文章会被跳过,网站上看不到)
hugo server -D(即 --buildDrafts)→ 连草稿一起构建,本地预览时能看到
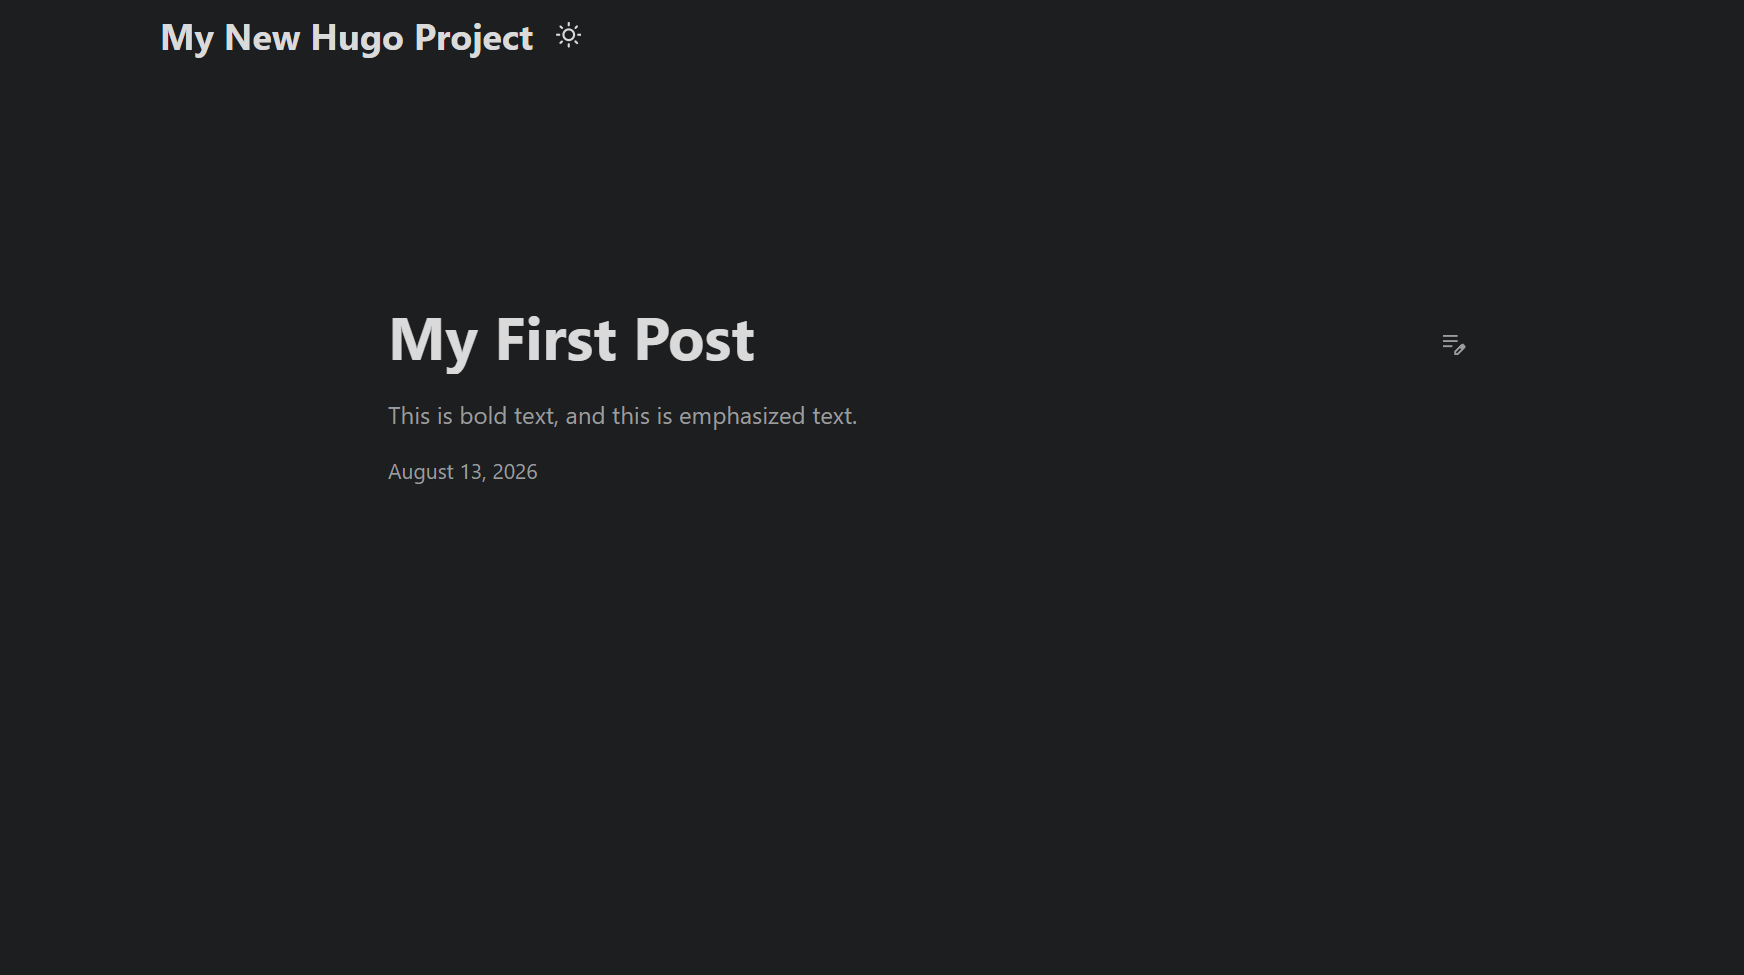
样式太简陋
可以看到,目前网站什么都没有,所以需要配置
站点核心配置与页面#
完整 hugo.toml 配置文件#
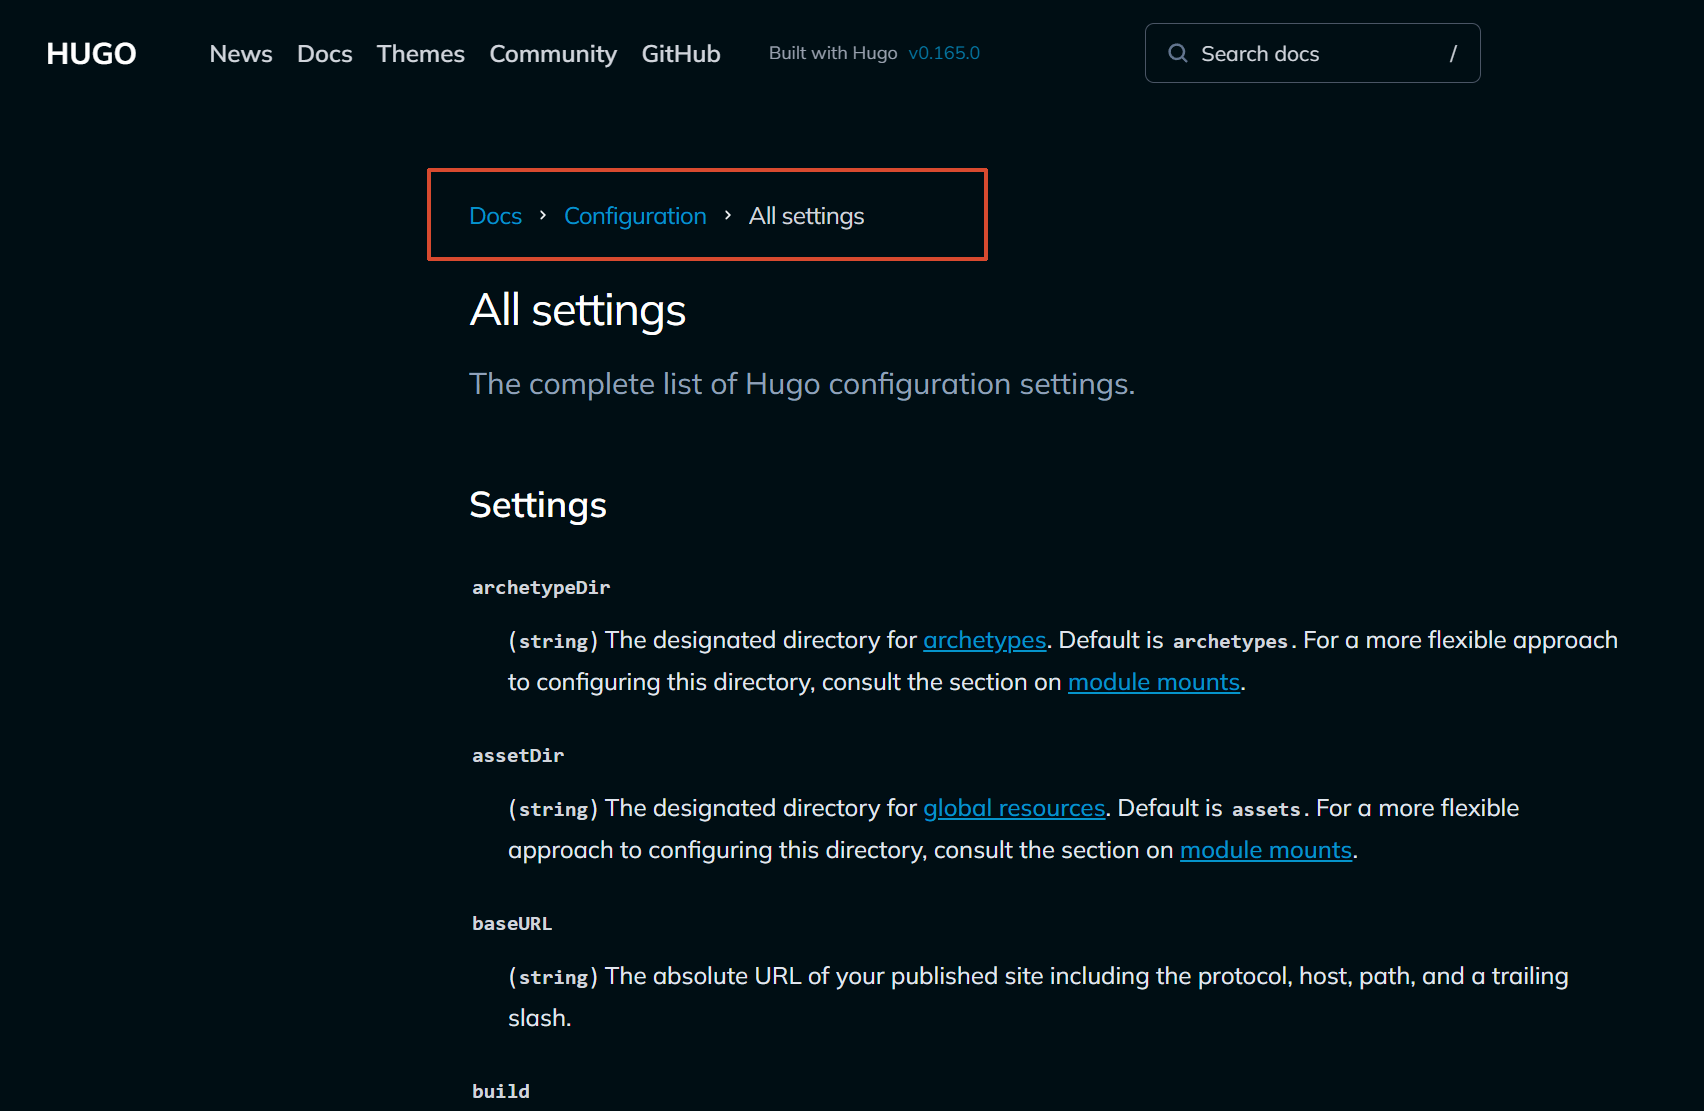
hugo官方的配置,什么主题都通用
All settings
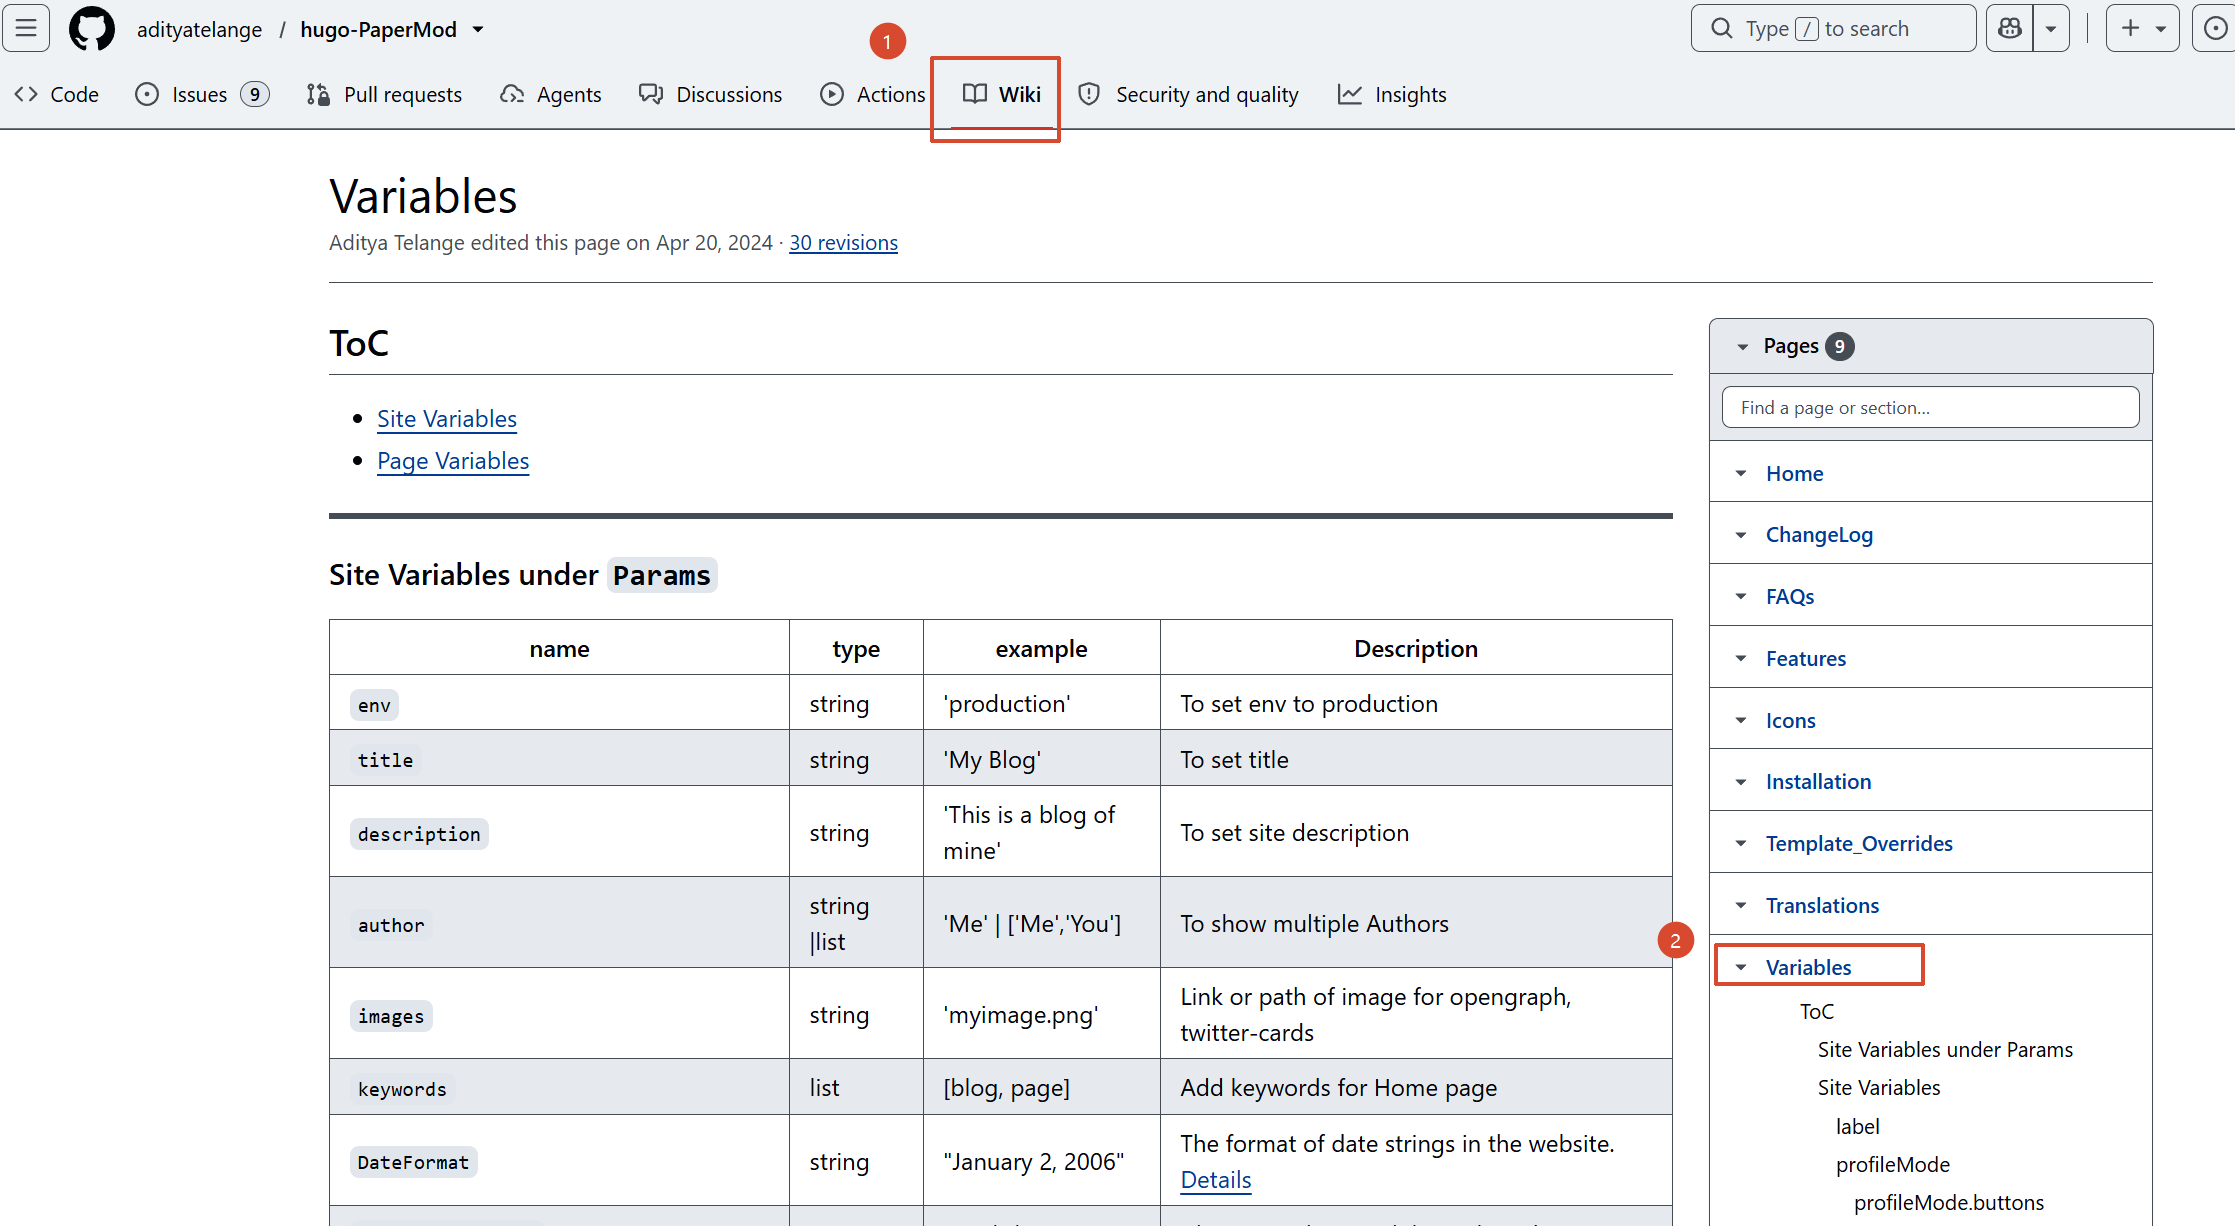
主题自定义参数
Variables · adityatelange/hugo-PaperMod Wiki
1
2
3
4
5
6
7
8
9
10
11
12
13
14
15
16
17
18
19
20
21
22
23
24
25
26
27
28
29
30
31
32
33
34
35
36
37
38
39
40
41
42
43
44
45
46
47
48
49
50
51
52
53
54
55
56
57
58
59
60
61
62
63
64
65
66
67
68
69
70
71
72
73
74
75
76
77
78
79
80
81
82
83
84
85
86
87
88
89
90
91
92
93
94
95
96
97
98
99
100
101
102
103
104
105
106
107
108
109
110
111
112
113
114
115
116
117
118
119
120
121
122
123
124
125
126
127
128
129
130
131
132
133
134
135
136
137
138
139
140
141
142
143
144
145
146
147
148
149
150
151
152
153
154
155
156
157
158
159
160
161
162
163
164
165
166
167
168
169
170
171
172
173
| # ==========================================
# 站点基本信息配置
# ==========================================
# 网站根域名
baseURL = "https://zhiwu.github.io/"
# 网站标题(显示在浏览器标签页和首页 Header)
title = "知兀的博客"
# 站点区域语言设置(设置 HTML 的 <html lang="zh-cn"> 属性)
locale = "zh-cn"
# 默认内容语言(Hugo 会自动加载 PaperMod 自带的中文语言包)
defaultContentLanguage = "zh"
# 开启中日韩(CJK)字符精准统计(解决中文文章字数与预计阅读时间统计偏少的问题)
hasCJKLanguage = true
# 首页及文章列表页每页显示的文章数量
paginate = 10
# 自动生成 robots.txt 文件(引导搜索引擎爬虫收录文章,有利于 SEO)
enableRobotsTXT = true
# 开启 Git 信息读取,用于自动获取最后修改时间
enableGitInfo = true
# 配置 Frontmatter 获取时间的优先级(支持本地文件实时修改预览)
[frontmatter]
lastmod = [":git", ":fileModTime", "lastmod", "date"]
# 主题导入 (Hugo Module)
[module]
  [[module.imports]]
    path = "github.com/adityatelange/hugo-PaperMod"
# 输出控制(JSON 用于站内搜索)
[outputs]
home = ["HTML", "RSS", "JSON"]
# ==========================================
# PaperMod 主题自定义参数
# ==========================================
[params]
env = "production"
description = "知兀的个人博客"
keywords = ["Blog", "知兀", "PaperMod"]
author = "知兀"
DateFormat = "2006年01月02日"
defaultTheme = "auto"
# 文章元信息与功能开关
ShowReadingTime = true
ShowWordCount = true
ShowPostNavLinks = true
ShowBreadCrumbs = true
ShowCodeCopyButtons = true
comments = true # 全局开启评论功能
# 文章目录 (TOC) 设置
ShowToc = true
TocOpen = true
# 封面图片设置 (Cover)
[params.cover]
responsiveImages = false
linkFullImages = true
# Giscus 评论系统配置
[params.giscus]
repo = "zhiwu215/zhiwu215.github.io" # 你的 GitHub 博客仓库(或专门放 Discussion 的仓库)
repoId = "xxx" # 从 giscus.app 生成获取的 repoId
category = "Announcements" # Discussion 的分类
categoryId = "xxx" # 从 giscus.app 生成获取的 categoryId
mapping = "pathname" # 匹配方式:pathname
strict = "0"
reactionsEnabled = "1"
emitMetadata = "0"
inputPosition = "top"
lightTheme = "light" # 浅色模式对应的 Giscus 主题
darkTheme = "dark" # 深色模式对应的 Giscus 主题
lang = "zh-CN"
loading = "lazy"
# 站点图标 (Favicon)
[params.assets]
favicon = "/favicon.jpg"
favicon16x16 = "/favicon.jpg"
favicon32x32 = "/favicon.jpg"
apple_touch_icon = "/favicon.jpg"
# 首页欢迎信息模式 (Home Info)
[params.homeInfoParams]
Title = "知兀"
ImageUrl = "/avatar.jpg"
Content = "print(\"Hello, World\")"
# 社交媒体链接
[[params.socialIcons]]
name = "bilibili"
url = "https://space.bilibili.com/3546704263514722"
[[params.socialIcons]]
name = "github"
url = "https://github.com/zhiwu215"
[[params.socialIcons]]
name = "x"
url = "https://x.com/zhiwu215"
[[params.socialIcons]]
name = "email"
url = "mailto:zhiwu215@gmail.com"
# ==========================================
# 分类法 (Taxonomies) 配置
# ==========================================
[taxonomies]
tag = "tags"
series = "series"
# ==========================================
# 顶部主导航菜单配置(纯文字,无 Emoji 图标)
# ==========================================
[[menu.main]]
identifier = "search"
name = "搜索"
url = "/search/"
weight = 1
[[menu.main]]
identifier = "series"
name = "合集"
url = "/series/"
weight = 2
[[menu.main]]
identifier = "tags"
name = "标签"
url = "/tags/"
weight = 3
[[menu.main]]
identifier = "archives"
name = "归档"
url = "/archives/"
weight = 4
[[menu.main]]
identifier = "about"
name = "关于"
url = "/about/"
weight = 5
# ==========================================
# Markdown 与渲染设置
# ==========================================
# 使用 CSS 类名控制代码高亮(配合 PaperMod 实现深/浅色模式代码颜色自动切换)
pygmentsUseClasses = true
[markup]
# Goldmark Markdown 渲染器设置
[markup.goldmark.renderer]
# 允许在 Markdown 中内嵌原生 HTML 代码(如 <br>、居中标签或视频/音频组件)
unsafe = true
# 代码高亮语法器设置 (Chroma)
[markup.highlight]
# 默认给所有代码块左侧加上 1, 2, 3... 行号
lineNos = true
# 使用 CSS 类名控制代码高亮(避免硬编码内联样式 style="background-color:...")
noClasses = false
|
首页欢迎模式#
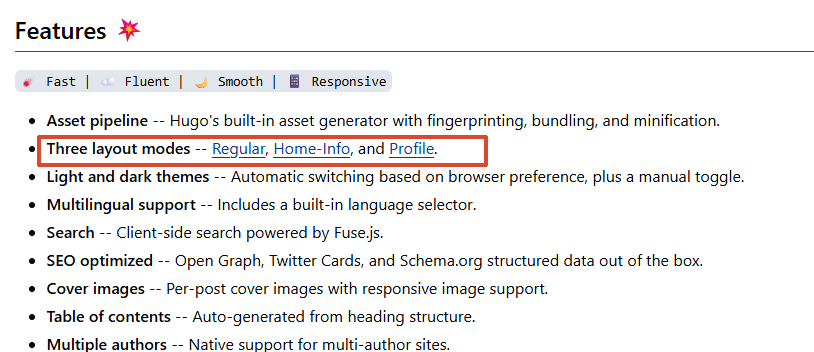
adityatelange/hugo-PaperMod: A fast, clean, responsive Hugo theme.
PaperMod文档说有三种模式,我使用Home-Info
支持图标:

1
2
3
4
5
6
7
8
9
10
11
12
13
14
15
16
17
18
19
20
21
22
23
| [params]
# 首页欢迎信息模式 (Home Info)
[params.homeInfoParams]
Title = "你的标题"
Content = "你的欢迎语"
# 社交媒体链接
[[params.socialIcons]]
name = "bilibili"
url = "xxxx"
[[params.socialIcons]]
name = "github"
url = "xxx"
[[params.socialIcons]]
name = "x"
url = "xxx"
[[params.socialIcons]]
name = "email"
url = "mailto:xxx"
|
导航栏配置#
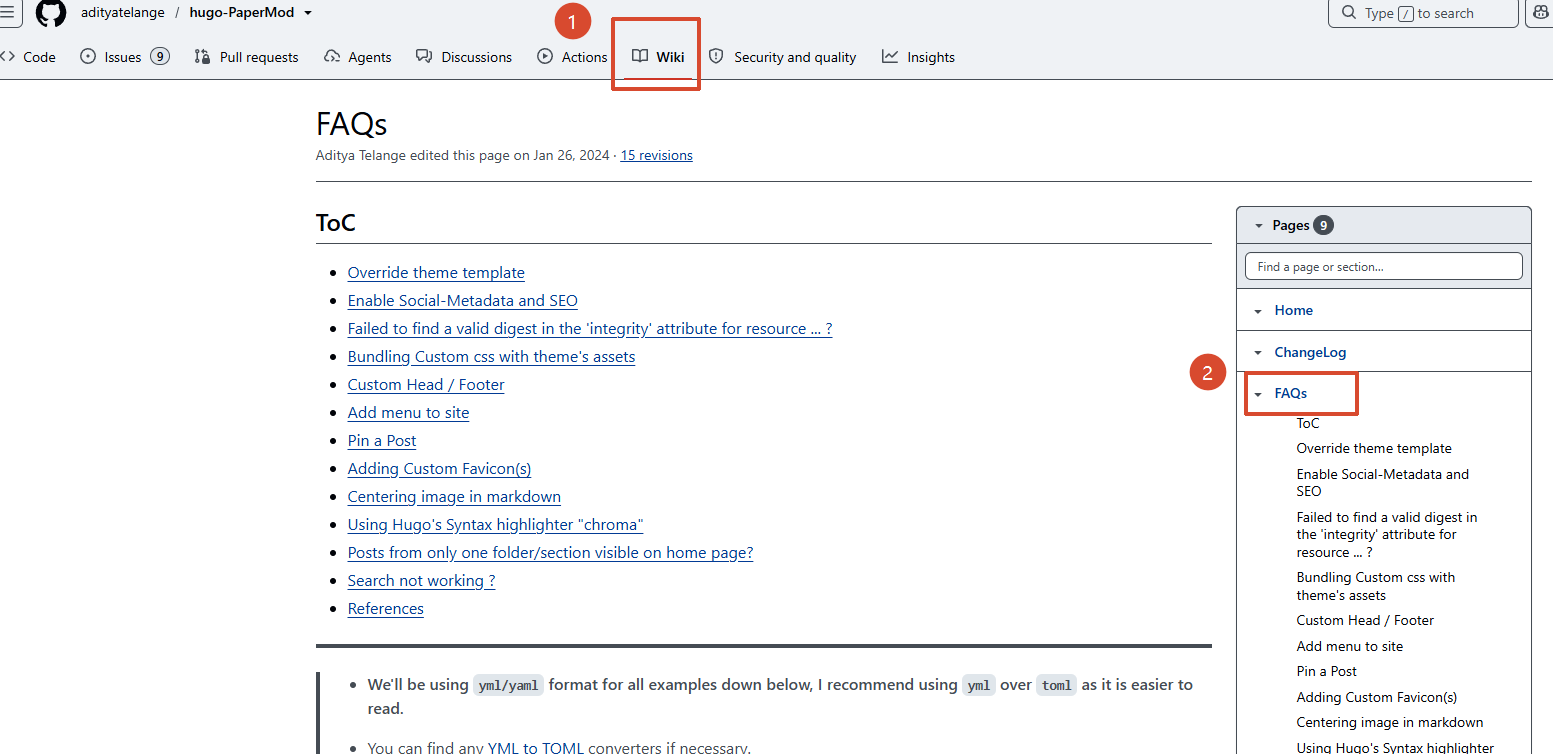
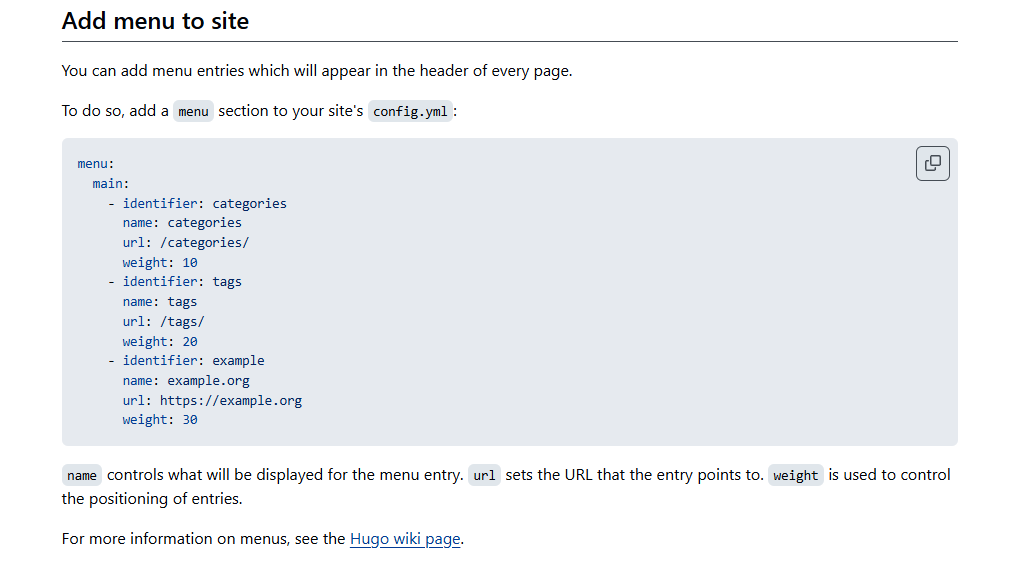
PaperMod官方github仓库的「Wiki」的「FAQs」
归档页面#
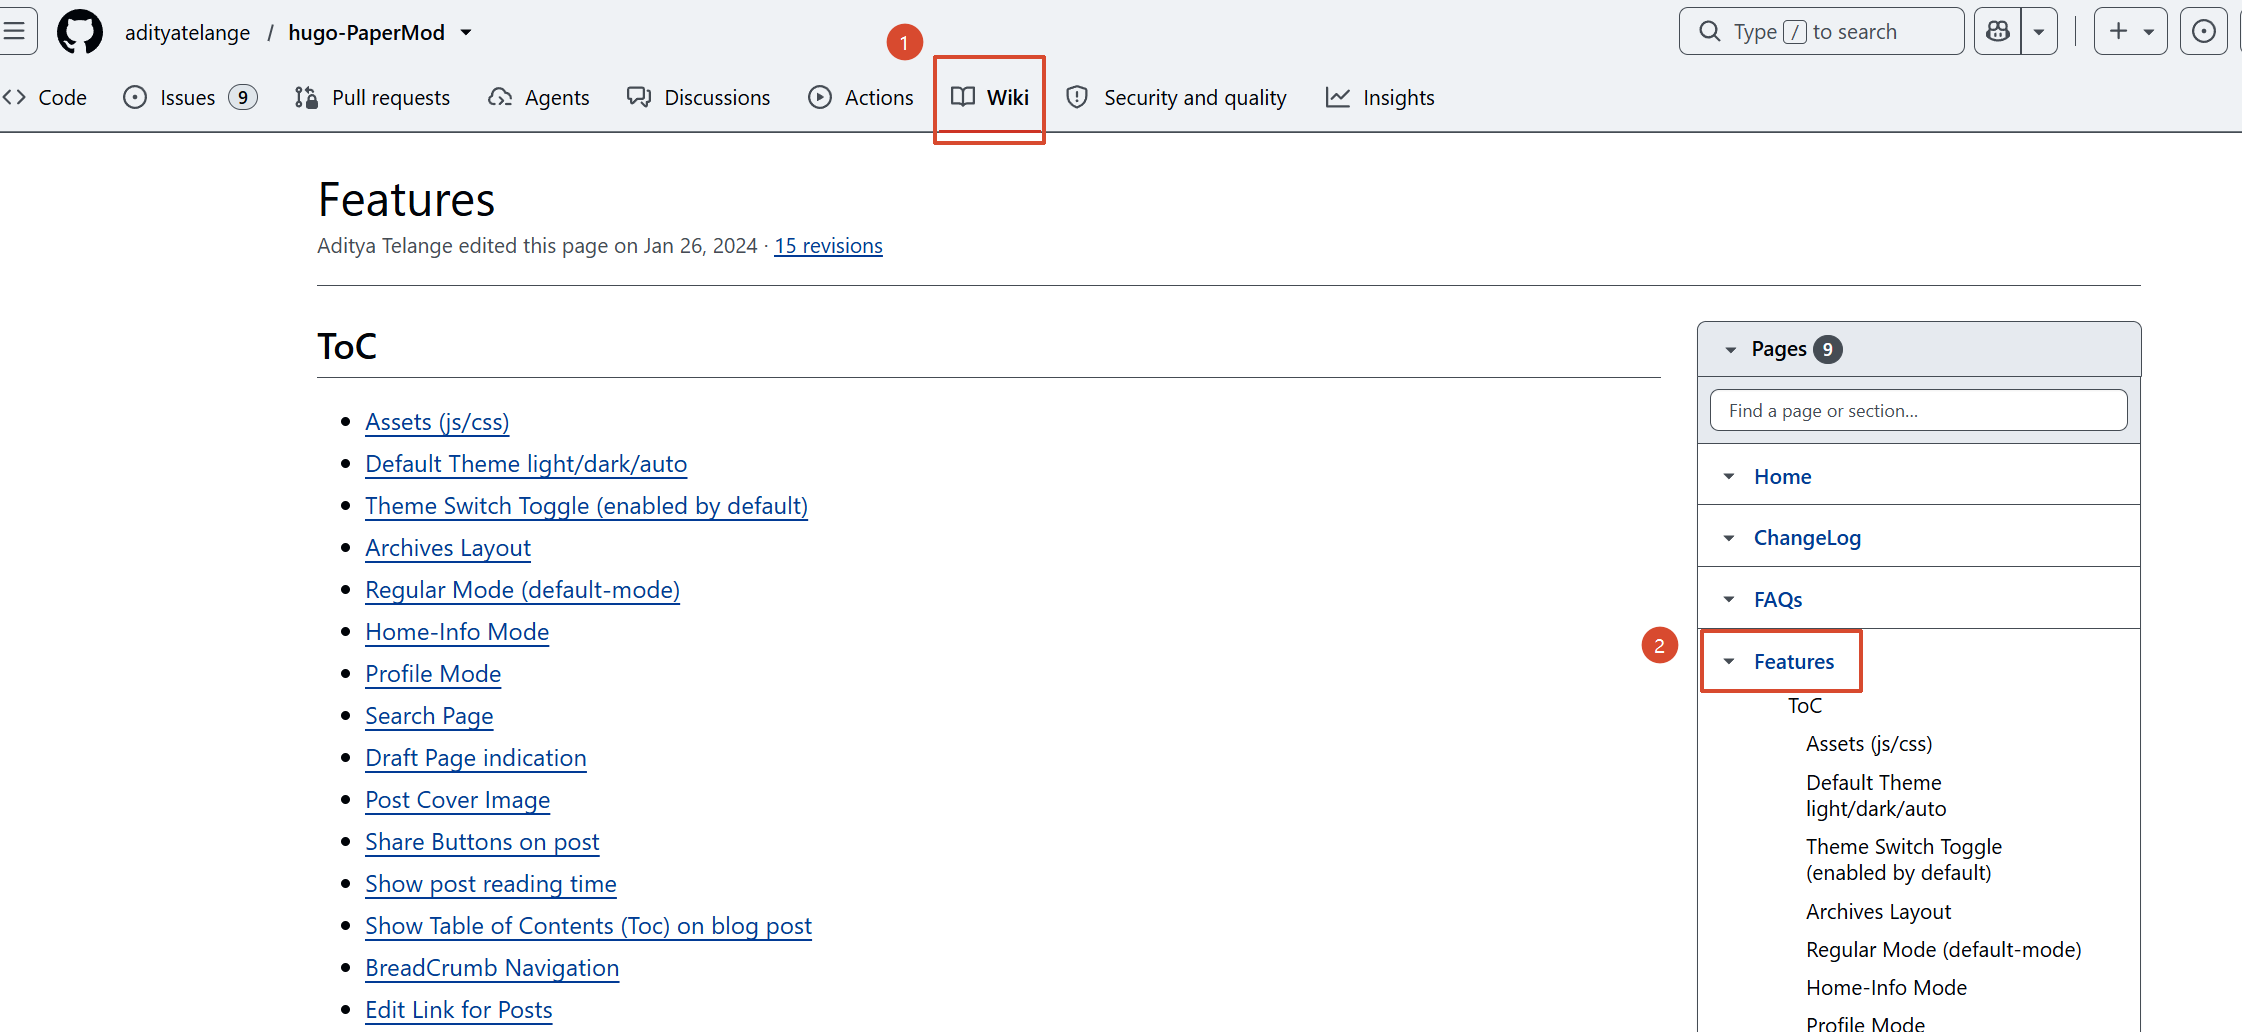
PaperMod官方github仓库的「Wiki」的「Feature」
Features · adityatelange/hugo-PaperMod Wiki
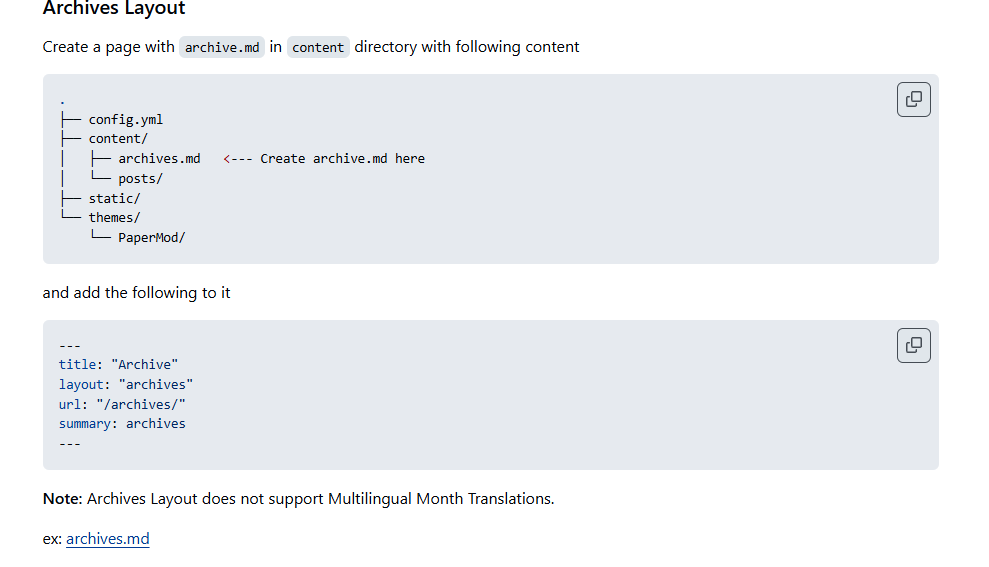
content/archives.md
---
title: "归档"
layout: "archives"
---
搜索页面#
Features · adityatelange/hugo-PaperMod Wiki
PaperMod官方github仓库的「Wiki」的「Feature」
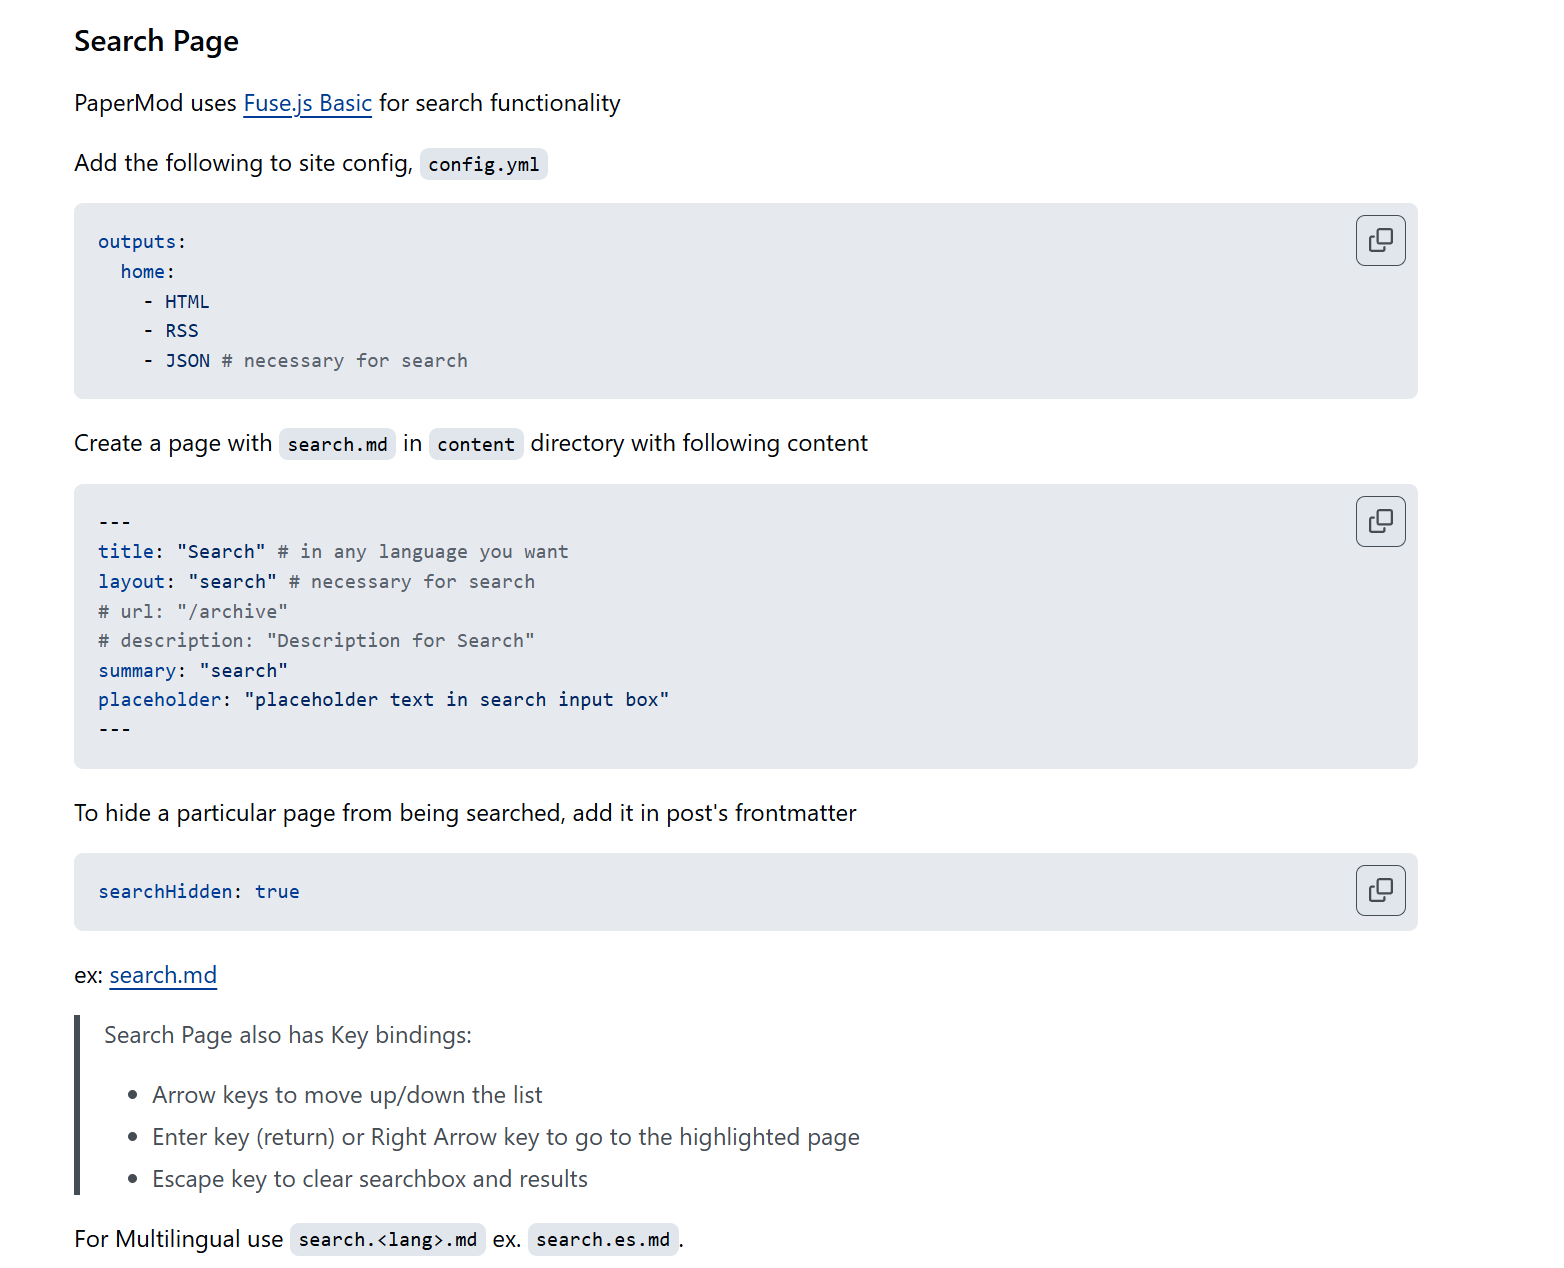
content/search.md
1
2
3
4
5
| ---
title: "搜索" # 页面标题(显示在浏览器标签页与页面头部)
layout: "search" # 核心配置:指定使用 PaperMod 内置的 search 搜索交互模板
placeholder: "支持搜索标题、文章、标签等" # 搜索输入框内的默认淡灰色提示文字
---
|
文章分类(自定义 Taxonomies)#
hugo自带的分类的标签是categories和tags
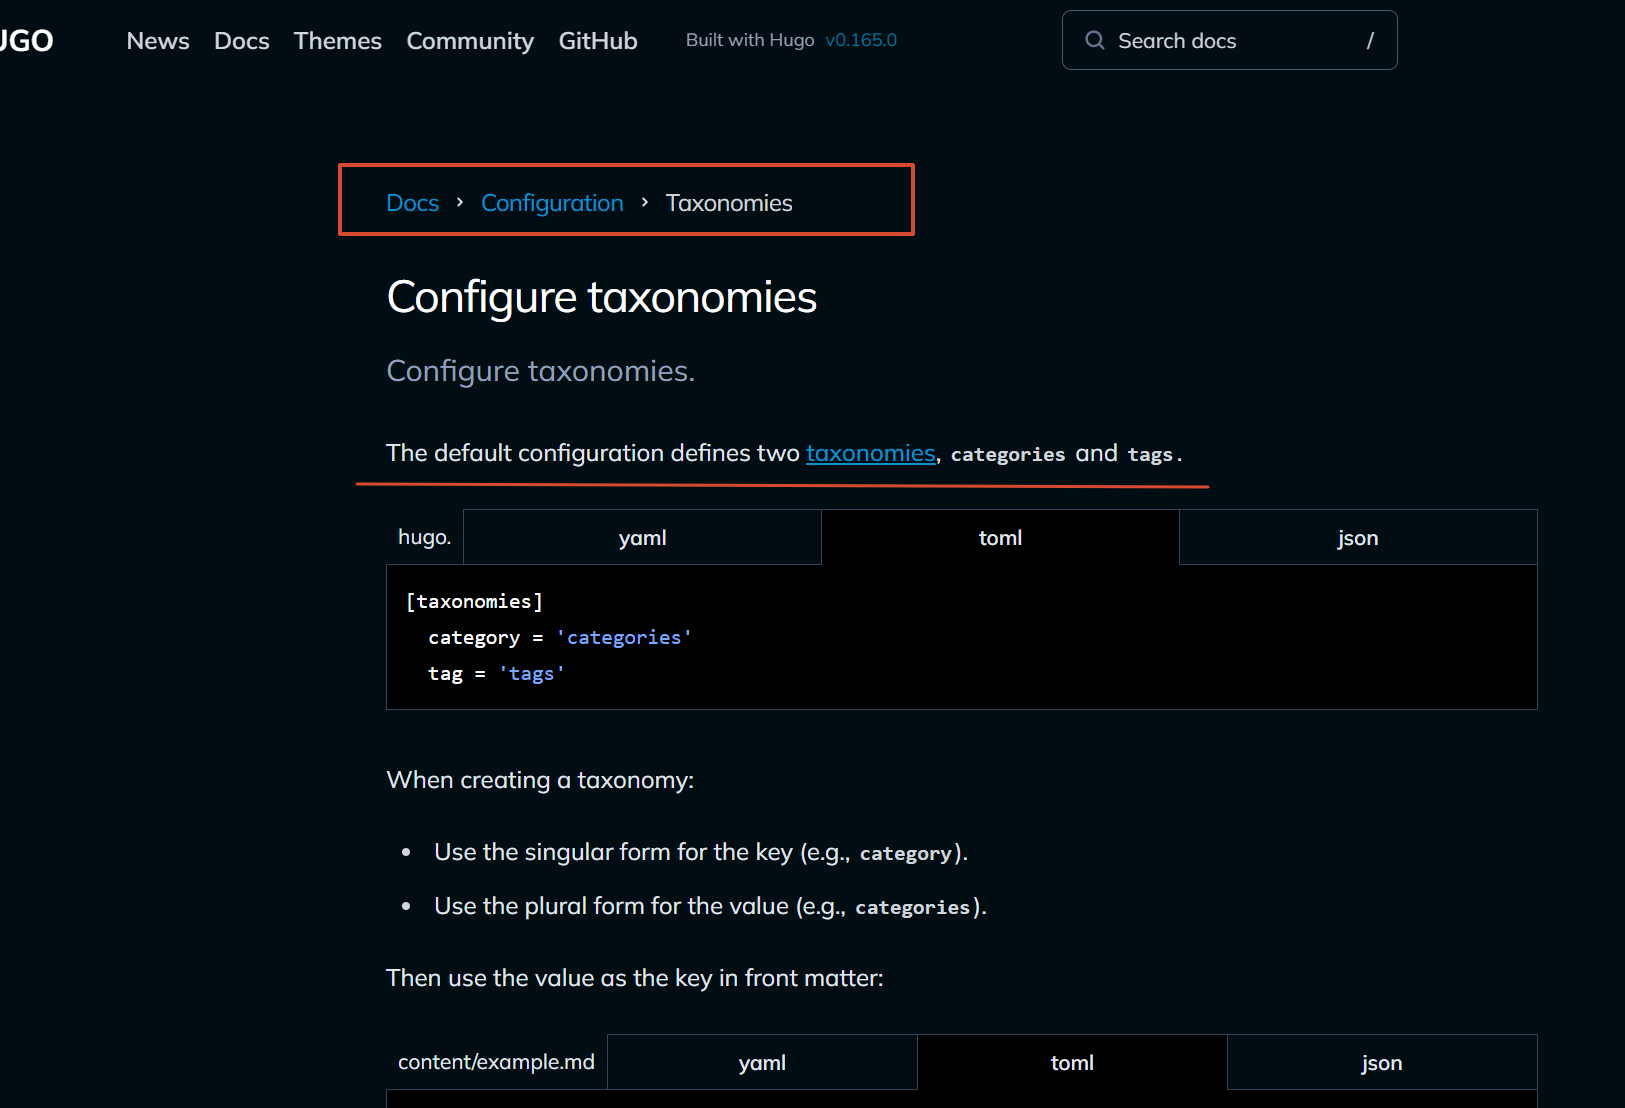
我个人不习惯用categories分类,这个词就好像是要对所有的文章进行区分一样
所以我选择自定义合集series,可以用来定义一系列的教程、文章之类的
hugo.toml
自定义配置了,就会覆盖默认配置,所以默认的tags会失效,所以要重新配置
[taxonomies]
tag = "tags"
series = "series"
之后写文章的时候就能自带series了,比如:
+++
date = '2026-08-13T09:03:47+08:00'
title = '如何配置博客1'
series = ["配置博客"]
+++
...
关于页面#
在添加归档页面和搜索页面的时候,直接在 Front Matter 中写上 layout: "archives" 或 layout: "search" 就可以了,但是关于页面不行。
因为 layout 的本质是告诉 Hugo:“去查找一个叫 xxx.html 的自定义模板来渲染当前页面”。但 PaperMod 主题并未内置专属于关于页的 about.html 模板。
制作关于页面主要有两种方案:
1.直接当普通文章写:
直接在 content/ 下创建 about.md
缺点:会默认带上左上角嵌套面包屑导航(如 首页 » 关于)、发布日期与阅读时长、上一篇/下一篇翻页按钮,本质上看起来依然像一篇普通博文
2.自定义独立模板:在 layouts/_default/about.html 创建独立模板
我直接创建独立模板
layouts/_default/about.html
1
2
3
4
5
6
7
8
9
10
11
12
13
14
15
16
17
18
19
20
21
22
23
24
25
26
27
28
| {{- define "main" }}
<article class="post-single">
<header class="post-header">
<h1 class="post-title">
{{ .Title }}
</h1>
{{- if .Description }}
<div class="post-description">
{{ .Description }}
</div>
{{- end }}
</header>
<!-- 必须包含 md-content 类名,否则 Markdown 样式(段落与标题间距)将失效 -->
<div class="post-content md-content">
{{- if not (.Param "disableAnchoredHeadings") }}
{{- partial "anchored_headings.html" .Content -}}
{{- else }}{{ .Content }}{{ end }}
</div>
<!-- 可选:支持评论区(如 Giscus) -->
{{- if (.Param "comments") }}
{{- partial "comments.html" . }}
{{- end }}
</article>
{{- end }}
|
content/about.md
1
2
3
4
5
6
| ---
title: "关于"
layout: "about"
---
这里书写关于你的介绍信息
|
更好看(视觉美化)#
字体 (霞鹜文楷 + JetBrains Mono)#
中文使用霞鹜文楷
官方仓库:
lxgw/LxgwWenKai
因为官方仓库没有woff2字体。所以使用cdn引入,从ZSFT搜索ZeoSeven Fonts(ZSFT)是开源免费商用字体聚合站点
霞鹜文楷 | 霞鶩文楷 | LXGW WenKai | ZeoSeven Fonts (ZSFT)
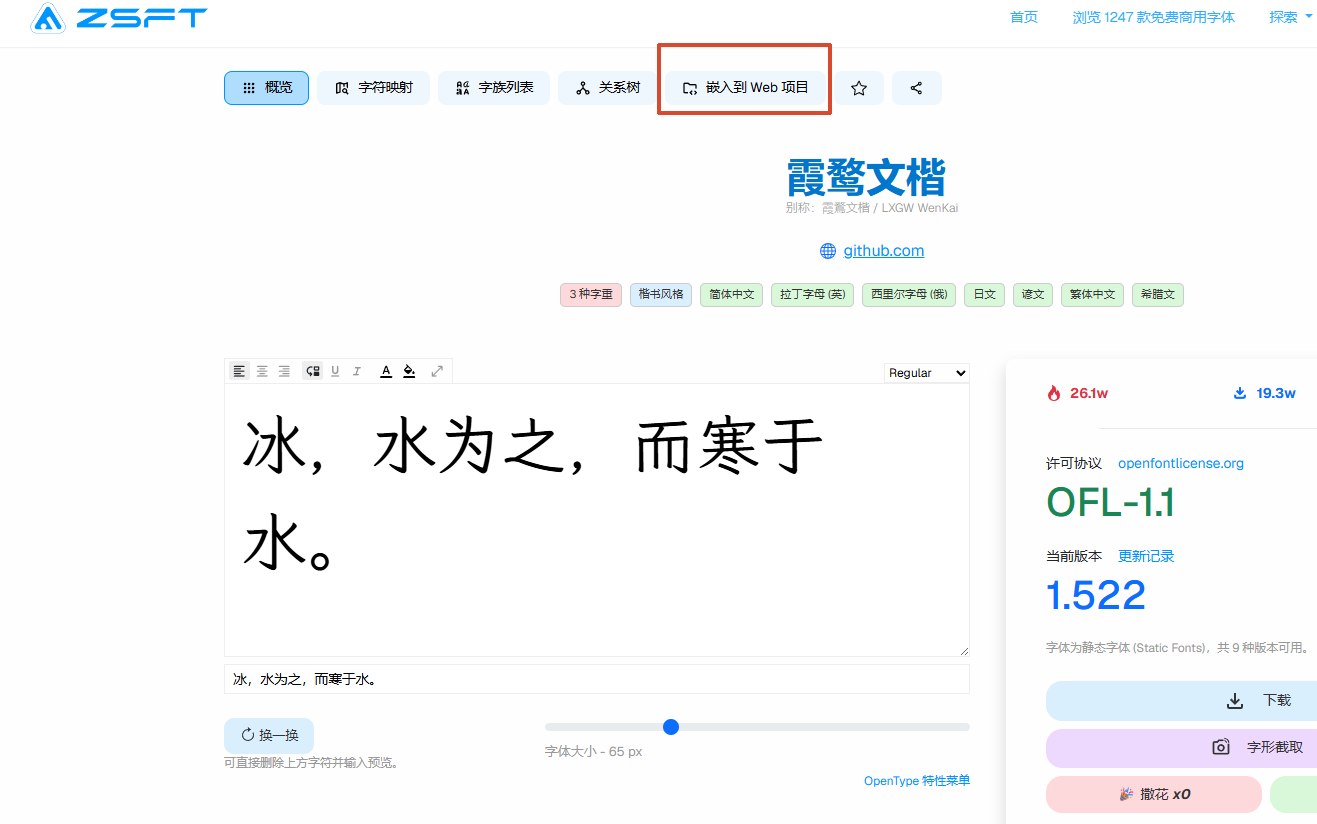
layouts/partials/extend_head.html
1
2
| <!-- 引入 霞鹜文楷 (LXGW WenKai) CDN 字体 -->
<link rel="stylesheet" href="https://fontsapi.zeoseven.com/292/main/result.css">
|
英文字体使用JetBrains Mono
Hugo + PaperMod + Github Pages 搭建一个完善的个人博客(以 Windows11 为例) | SonnyCalcr’s Blog
这个博客也使用JetBrainsMono字体,但是对方是在Google Fonts搜索之后,通过CDN引入
我选择下载文件
JetBrains/JetBrainsMono: JetBrains Mono – the free and open-source typeface for developers
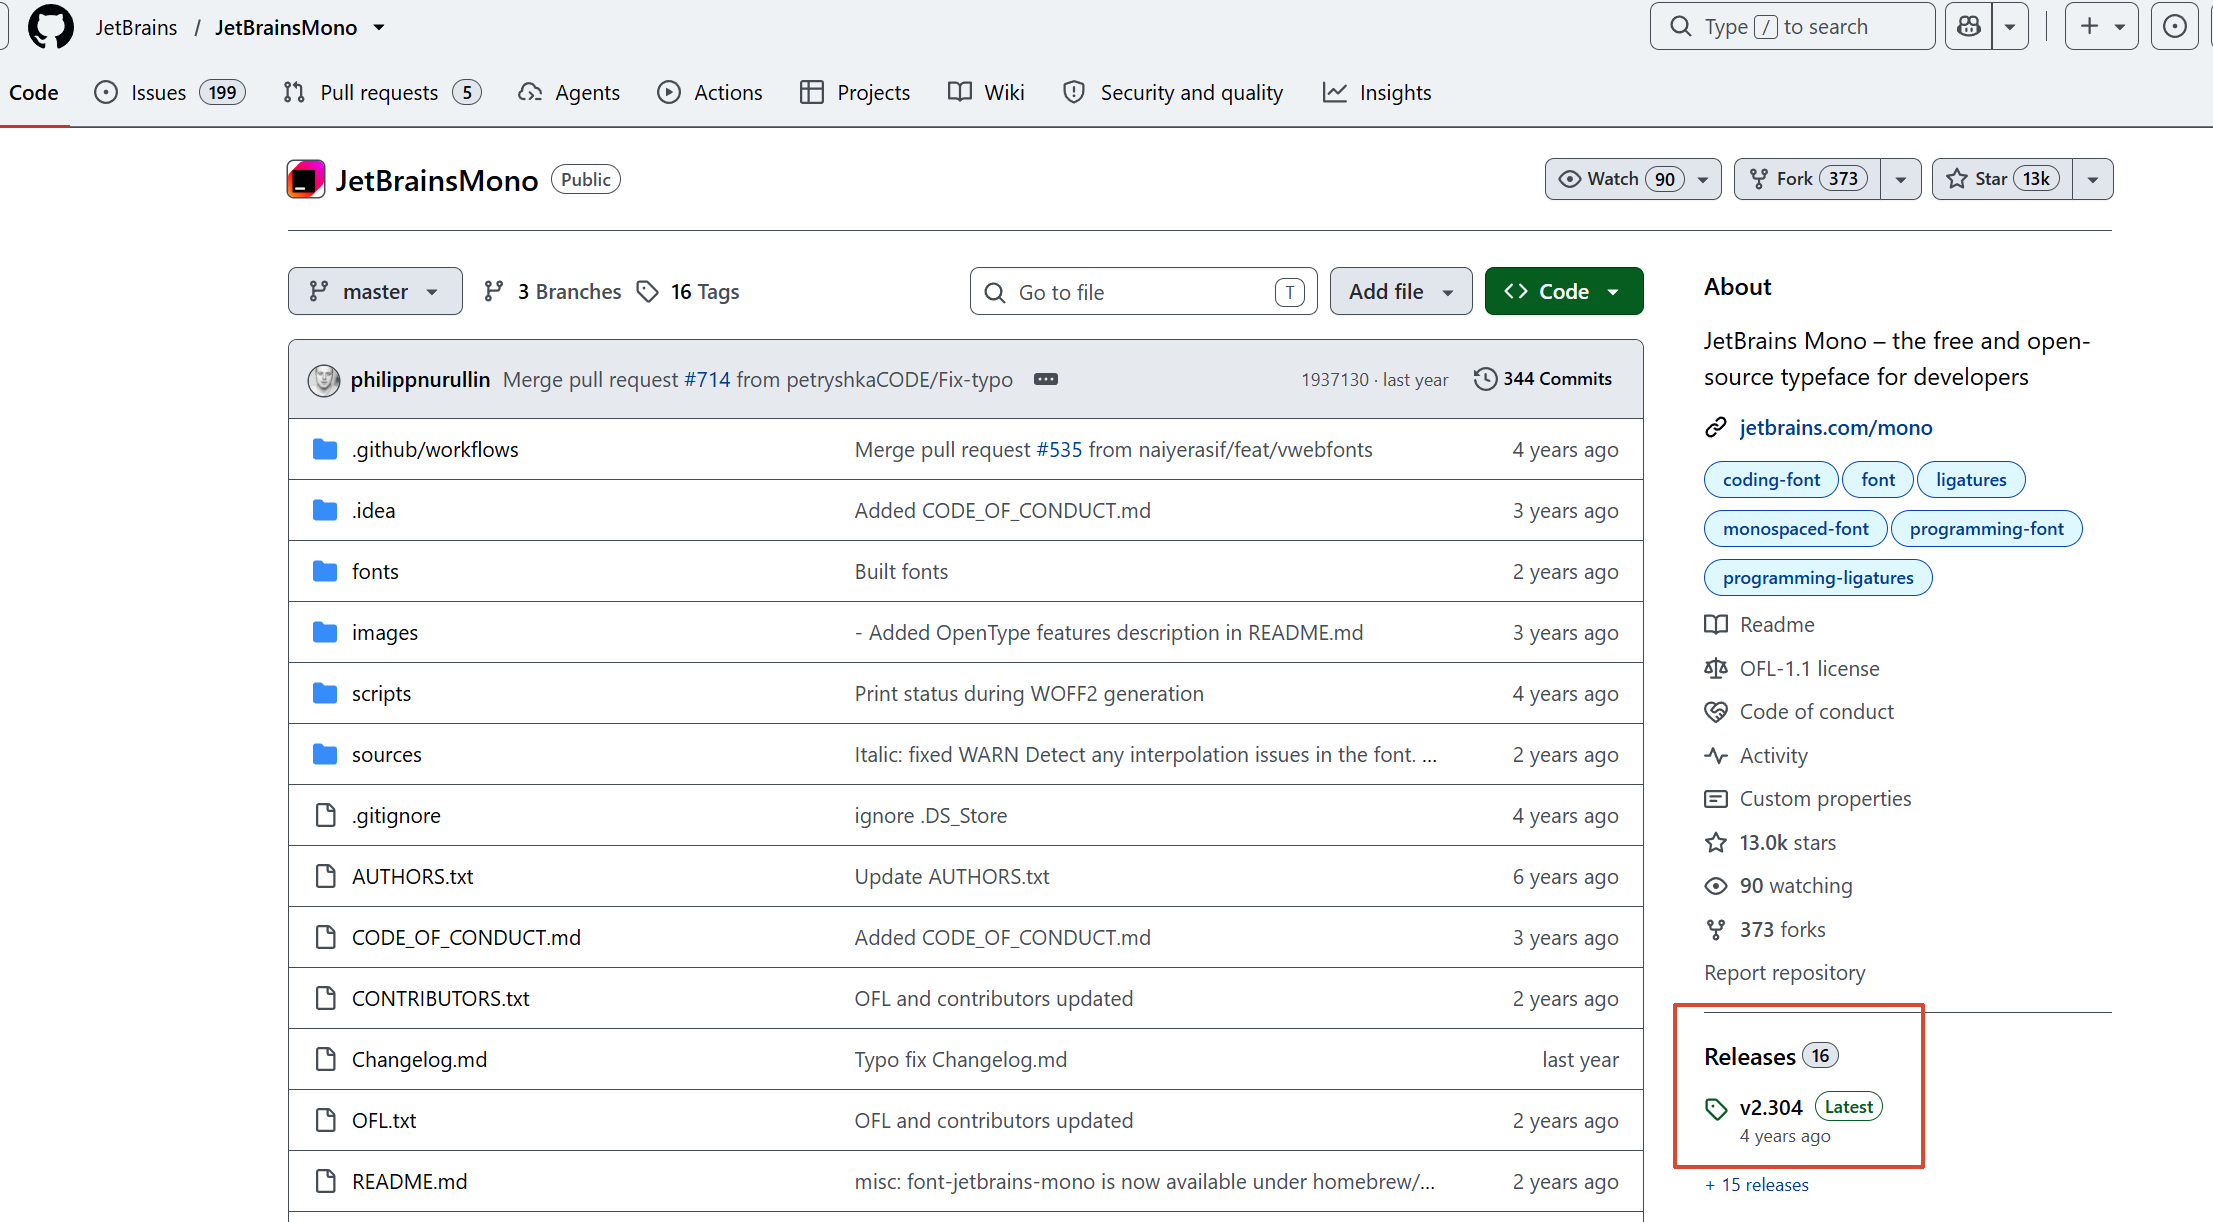
将 JetBrains Mono 的 .woff2 字体文件JetBrainsMono-Regular.woff2放入static/fonts
assets/css/extended/blank.css
1
2
3
4
5
6
7
8
9
10
11
12
13
14
15
16
17
18
19
20
21
22
23
24
25
26
27
28
29
30
| /* ==========================================
本地 JetBrains Mono 字体声明
========================================== */
@font-face {
font-family: 'JetBrains Mono';
src: url('/fonts/JetBrainsMono-Regular.woff2') format('woff2');
font-weight: 400;
font-style: normal;
font-display: swap;
}
/* ==========================================
全局应用:英文/数字用 JetBrains Mono,中文用 霞鹜文楷
========================================== */
body {
font-family: 'JetBrains Mono', 'LXGW WenKai', -apple-system, BlinkMacSystemFont, "Segoe UI", Roboto, sans-serif;
font-weight: normal;
}
/* ==========================================
代码块样式微调
========================================== */
.post-content pre,
.post-content code,
.chroma,
.chroma * {
font-family: 'JetBrains Mono', 'LXGW WenKai', monospace !important;
font-size: 1rem;
line-height: 1.2;
}
|
盘古之白#
参考:
Hugo PaperMod 主题精装修 | Tai’s Blog
中文和英文以及数字之间有空格会更加便于阅读,使用盘古之白解决2026/8/14 尝试过
CSS text-autospace与中文排版的圣杯时刻
,但目前效果不理想且编辑器有警告,故转而继续使用盘古之白。
。
如果你没加空格,它会自动帮你加。如果你已经手动加了空格,就会直接跳过,什么都不做
vinta/pangu.js: Opinionated paranoid text spacing in JavaScript
这是官方文档的使用说明,使用包管理工具,这是现代前端项目的使用,在代码演示中也使用import
<scrpit>这是CDN 外部引用
再下面就是展示各种高级功能
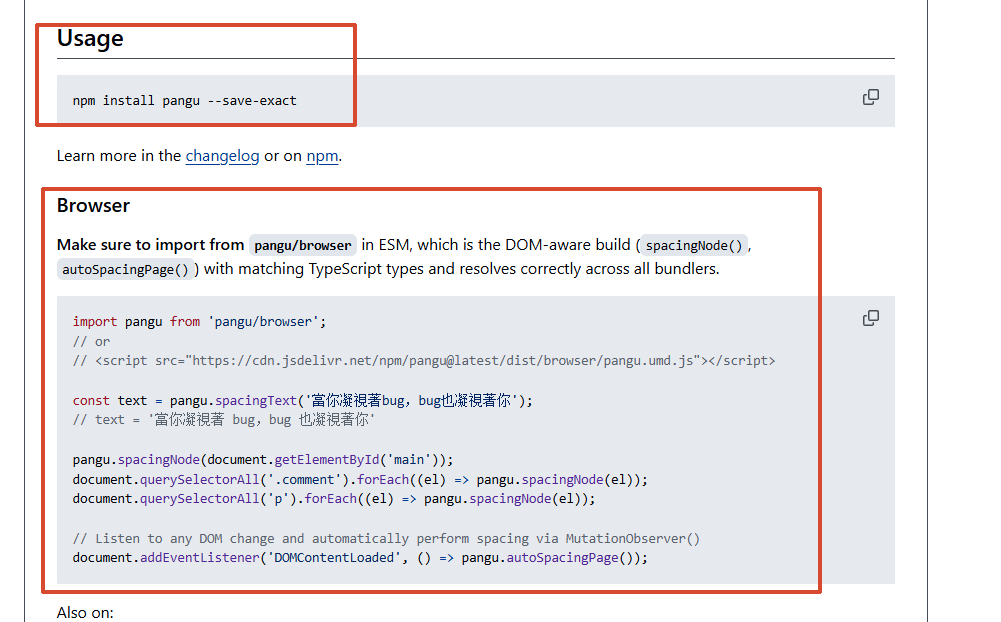
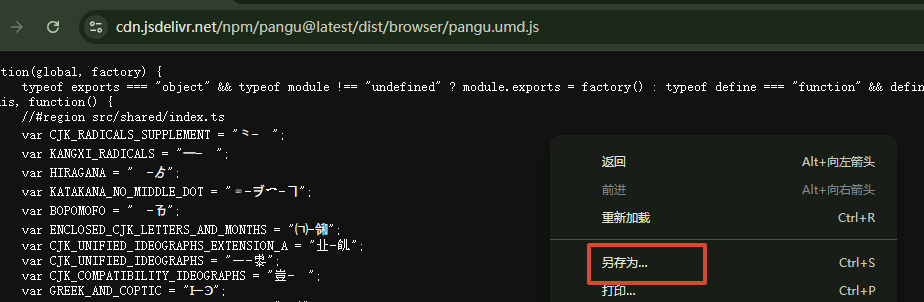
我的做法是下载到本地使用,根据CDN文件的链接(就是演示里src后面的内容),直接把文件下载到assets/js/
在layouts/partials/extend_head.html中添加以下代码:
1
2
3
4
5
6
7
8
9
10
11
12
13
14
15
16
17
18
19
20
21
22
23
| <!-- 盘古之白:同步加载 + 隐藏页面直到格式化完成,彻底消除布局抖动 -->
{{- $pangu := resources.Get "js/pangu.umd.js" -}}
{{- if $pangu -}}
<style>body { opacity: 0; }</style>
<script src="{{ $pangu.RelPermalink }}"></script>
<script>
(function () {
var revealed = false;
function reveal() {
if (revealed) return;
revealed = true;
document.body.style.transition = "opacity 0.15s ease";
document.body.style.opacity = "1";
}
document.addEventListener("DOMContentLoaded", function () {
pangu.spacingPage();
reveal();
});
// 兜底:即使 pangu 出错也确保页面可见
setTimeout(function () { if (document.body) reveal(); }, 300);
})();
</script>
{{- end -}}
|
站点图标#
图片放在static/
1
2
3
4
5
6
| [params]
[params.assets]
favicon = "/favicon.jpg"
favicon16x16 = "/favicon.jpg"
favicon32x32 = "/favicon.jpg"
apple_touch_icon = "/favicon.jpg"
|
优化主页个人信息展示#
参考:
折腾 Hugo PaperMod 主题 - 她和她的猫
演示:
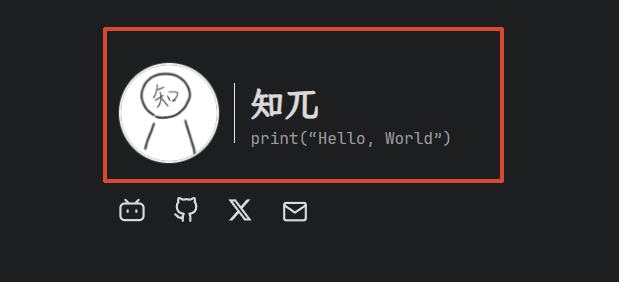
layouts/partials/home_info.html
1
2
3
4
5
6
7
8
9
10
11
12
13
14
15
16
17
18
19
20
21
22
23
24
25
26
27
28
29
30
31
32
33
34
35
36
37
38
39
| {{- with site.Params.homeInfoParams }}
<article class="first-entry home-info">
<div class="home-info-container home-info-main-container">
<div class="home-info-content-wrapper">
{{- with site.Params.homeInfoParams }}
<div class="home-info-avatar home-info-avatar-container">
{{- if .ImageUrl -}}
{{- $imgSrc := .ImageUrl | absURL }}
{{- $img := resources.Get .ImageUrl }}
{{- if $img }}
{{- $size := printf "%dx%d" (.ImageWidth | default 100) (.ImageHeight | default 100) }}
{{- $img = $img.Resize $size }}
{{- $imgSrc = $img.Permalink }}
{{- end }}
<img id="home-info-avatar"
draggable="false"
src="{{ $imgSrc }}"
alt="{{ .Title | default "profile image" }}"
height="{{ .ImageHeight | default 100 }}"
width="{{ .ImageWidth | default 100 }}"
class="home-info-avatar-img" />
{{- end }}
</div>
{{- end }}
<div class="entry-main home-info-text-content">
<header class="entry-header">
<h1>{{ .Title | markdownify }}</h1>
</header>
<div class="entry-content">
{{ .Content | markdownify }}
</div>
</div>
</div>
<footer class="entry-footer">
{{ partial "social_icons.html" (dict "align" site.Params.homeInfoParams.AlignSocialIconsTo) }}
</footer>
</div>
</article>
{{- end -}}
|
assets/extended/css
1
2
3
4
5
6
7
8
9
10
11
12
13
14
15
16
17
18
19
20
21
22
23
24
25
26
27
28
29
30
31
32
33
34
35
36
37
38
39
40
41
42
43
44
45
46
47
48
49
50
51
52
53
54
55
56
57
58
59
60
61
62
63
64
65
66
67
68
69
70
71
72
73
74
75
76
77
78
79
80
81
82
83
84
85
86
87
88
89
90
91
92
| /* Home Info Layout Styles */
.home-info-main-container {
display: flex;
flex-direction: column;
gap: 24px;
max-width: 100%;
}
.home-info-content-wrapper {
display: flex;
align-items: center;
gap: 32px;
}
.home-info-avatar-container {
display: flex;
align-items: center;
justify-content: center;
flex-shrink: 0;
position: relative;
}
.home-info-avatar-container::after {
content: '';
position: absolute;
right: -16px;
top: 50%;
transform: translateY(-50%);
width: 1px;
height: 60px;
background-color: #e5e5e5;
}
.home-info-text-content {
flex: 1;
display: flex;
flex-direction: column;
justify-content: center;
margin-top: 8px;
}
.home-info-avatar-img {
border-radius: 50% !important;
border: 2px solid #f0f0f0;
transition: transform 0.2s ease;
}
.home-info-avatar-img:hover {
transform: scale(1.02);
}
/* 响应式设计 */
@media (max-width: 768px) {
.home-info-content-wrapper {
flex-direction: column;
gap: 20px;
text-align: center;
}
.home-info-text-content {
margin-top: 0;
}
/* 移动端隐藏分隔线 */
.home-info-avatar-container::after {
display: none;
}
/* 移动端社交图标居中 */
.home-info .entry-footer {
display: flex;
justify-content: center;
align-items: center;
}
}
/* 图标悬浮高亮 */
.social-icons svg:hover {
transition: 0.15s;
}
.social-icons a[href*='mailto']:hover svg {
color: #ea4335 !important;
}
.social-icons a[href*='github']:hover svg {
color: #7c3aed !important;
}
.social-icons a[href*='index.xml']:hover svg {
color: #ff6600 !important;
}
|
在 hugo.toml 中配置头像地址
图片放在static/
1
2
| [params.homeInfoParams]
ImageUrl = "/avatar.jpg"
|
消除html代码块误判#
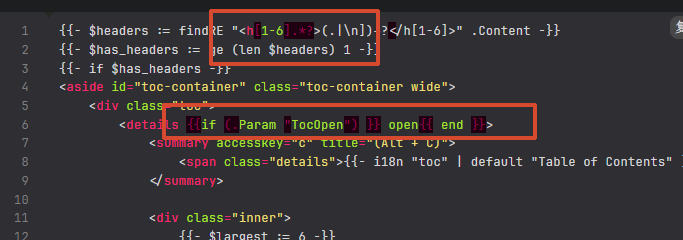
Hugo 自带的配色方案是 Chroma,PaperMod 用的 highlight.js,我继续用Chroma
Hugo 内置的 Chroma 高亮引擎在解析包含 HTML 模板标签(如 {{ if ... }})或正则匹配式时,纯 HTML 解析器会将其误判为语法错误,如图:
assets/css/extended/blank.css
1
2
3
4
5
6
7
| /* 消除 Hugo Chroma 代码块高亮误判的语法错误红底警告(兼顾内联 style 与 CSS Class) */
.post-content span[style*="background-color:#1e0010"],
.post-content span[style*="background-color: #1e0010"],
.chroma .err {
background-color: transparent !important;
color: inherit !important;
}
|
hugo.toml
1
2
3
| [markup.highlight]
# 使用 CSS 类名控制代码高亮(避免硬编码内联样式 style="background-color:...")
noClasses = false
|
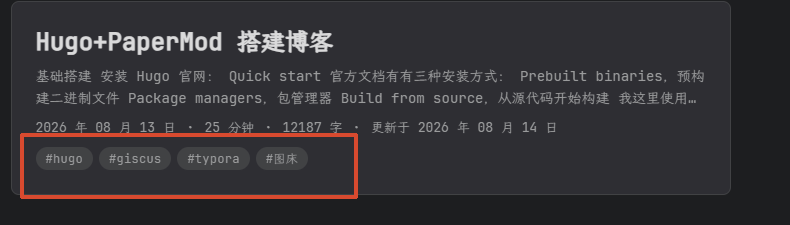
文章列表卡片增加独立 Tag 胶囊#
演示:
layouts/_default/list.html
1
2
3
4
5
6
7
8
9
10
11
12
13
14
15
16
17
18
19
20
21
22
23
24
25
26
27
28
29
30
31
32
33
34
35
36
37
38
39
40
41
42
43
44
45
46
47
48
49
50
51
52
53
54
55
56
57
58
59
60
61
62
63
64
65
66
67
68
69
70
71
72
73
74
75
76
77
78
79
80
81
82
83
84
85
86
87
88
89
90
91
92
93
94
95
96
97
98
99
100
101
102
103
104
105
106
107
108
109
110
111
112
113
114
115
116
117
118
119
120
121
122
123
124
125
126
127
128
| {{- define "main" }}
{{- if (and site.Params.profileMode.enabled .IsHome) }}
{{- partial "index_profile.html" . }}
{{- else }} {{/* if not profileMode */}}
{{- if not .IsHome | and .Title }}
<header class="page-header">
{{- partial "breadcrumbs.html" . }}
<h1>
{{ .Title }}
{{- if and (or (eq .Kind `term`) (eq .Kind `section`)) (.Param "ShowRssButtonInSectionTermList") }}
{{- with .OutputFormats.Get "rss" }}
<a href="{{ .RelPermalink }}" title="RSS" aria-label="RSS">
<svg xmlns="http://www.w3.org/2000/svg" viewBox="0 0 24 24" fill="none" stroke="currentColor" stroke-width="2"
stroke-linecap="round" stroke-linejoin="round" height="23">
<path d="M4 11a9 9 0 0 1 9 9" />
<path d="M4 4a16 16 0 0 1 16 16" />
<circle cx="5" cy="19" r="1" />
</svg>
</a>
{{- end }}
{{- end }}
</h1>
{{- if .Description }}
<div class="post-description">
{{ .Description | markdownify }}
</div>
{{- end }}
</header>
{{- end }}
{{- if .Content }}
<div class="post-content md-content">
{{- if not (.Param "disableAnchoredHeadings") }}
{{- partial "anchored_headings.html" .Content -}}
{{- else }}{{ .Content }}{{ end }}
</div>
{{- end }}
{{- $pages := union .RegularPages .Sections }}
{{- if .IsHome }}
{{- $pages = where site.RegularPages "Type" "in" site.Params.mainSections }}
{{- $pages = where $pages "Params.hiddenInHomeList" "!=" "true" }}
{{- end }}
{{- $paginator := .Paginate $pages }}
{{- if and .IsHome site.Params.homeInfoParams (eq $paginator.PageNumber 1) }}
{{- partial "home_info.html" . }}
{{- end }}
{{- $term := .Data.Term }}
{{- range $index, $page := $paginator.Pages }}
{{- $class := "post-entry" }}
{{- $user_preferred := or site.Params.disableSpecial1stPost site.Params.homeInfoParams }}
{{- if (and $.IsHome (eq $paginator.PageNumber 1) (eq $index 0) (not $user_preferred)) }}
{{- $class = "first-entry" }}
{{- else if $term }}
{{- $class = "post-entry tag-entry" }}
{{- end }}
<article class="{{ $class }}">
{{- $isHidden := (.Param "cover.hiddenInList") | default (.Param "cover.hidden") | default false }}
{{- partial "cover.html" (dict "cxt" . "IsSingle" false "isHidden" $isHidden) }}
<header class="entry-header">
<h2 class="entry-hint-parent">
{{- .Title }}
{{- if .Draft }}
<span class="entry-hint" title="Draft">
<svg xmlns="http://www.w3.org/2000/svg" height="20" viewBox="0 -960 960 960" fill="currentColor">
<path
d="M160-410v-60h300v60H160Zm0-165v-60h470v60H160Zm0-165v-60h470v60H160Zm360 580v-123l221-220q9-9 20-13t22-4q12 0 23 4.5t20 13.5l37 37q9 9 13 20t4 22q0 11-4.5 22.5T862.09-380L643-160H520Zm300-263-37-37 37 37ZM580-220h38l121-122-18-19-19-18-122 121v38Zm141-141-19-18 37 37-18-19Z" />
</svg>
</span>
{{- end }}
</h2>
</header>
{{- if (ne (.Param "hideSummary") true) }}
<div class="entry-content">
<p>{{ .Summary | plainify | htmlUnescape }}{{ if .Truncated }}...{{ end }}</p>
</div>
{{- end }}
{{- if not (.Param "hideMeta") }}
<footer class="entry-footer">
{{- partial "post_meta.html" . -}}
</footer>
{{- end }}
{{- if .Params.tags }}
<div class="entry-tags">
{{- range .Params.tags }}
<a href="{{ "tags/" | relLangURL }}{{ . | urlize }}/" class="post-tag-badge">#{{ . }}</a>
{{- end }}
</div>
{{- end }}
<a class="entry-link" aria-label="post link to {{ .Title | plainify }}" href="{{ .Permalink }}"></a>
</article>
{{- end }}
{{- if gt $paginator.TotalPages 1 }}
<footer class="page-footer">
<nav class="pagination">
{{- if $paginator.HasPrev }}
<a class="prev" href="{{ $paginator.Prev.URL | absURL }}">
« {{ i18n "prev_page" }}
{{- if (.Param "ShowPageNums") }}
{{- sub $paginator.PageNumber 1 }}/{{ $paginator.TotalPages }}
{{- end }}
</a>
{{- end }}
{{- if $paginator.HasNext }}
<a class="next" href="{{ $paginator.Next.URL | absURL }}">
{{- i18n "next_page" }}
{{- if (.Param "ShowPageNums") }}
{{- add 1 $paginator.PageNumber }}/{{ $paginator.TotalPages }}
{{- end }} »
</a>
{{- end }}
</nav>
</footer>
{{- end }}
{{- end }}{{/* end profileMode */}}
{{- end }}{{- /* end main */ -}}
|
assets/css/extended/blank.css
1
2
3
4
5
6
7
8
9
10
11
12
13
14
15
16
17
18
19
20
21
22
23
24
25
26
27
28
29
30
| /* ==========================================
文章列表页标签胶囊 (Tag Badges) 样式
========================================== */
.entry-tags {
display: flex;
flex-wrap: wrap;
gap: 6px;
margin-top: 8px;
position: relative;
z-index: 2;
}
.post-tag-badge {
display: inline-flex;
align-items: center;
padding: 2px 10px;
font-size: 0.78rem;
font-weight: 500;
border-radius: 12px;
background-color: var(--tertiary);
color: var(--secondary) !important;
text-decoration: none !important;
transition: all 0.2s ease;
}
.post-tag-badge:hover {
background-color: var(--primary);
color: var(--theme) !important;
transform: translateY(-1px);
}
|
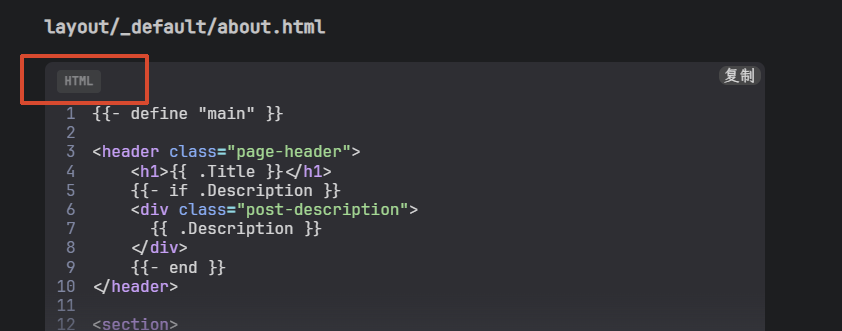
代码块语言标签#
展示:
layouts/_default/_markup/render-codeblock.html
1
2
3
4
5
6
7
8
| {{- $lang := .Type -}}
{{- $attrs := .Attributes -}}
<div class="code-block-wrapper" {{ if $lang }}data-lang="{{ $lang }}"{{ end }}>
{{- highlight .Inner $lang (transform.Remarshal "TOML" $attrs) -}}
{{- if $lang -}}
<span class="code-lang-badge">{{ $lang }}</span>
{{- end -}}
</div>
|
assets/css/extended/blank.css
1
2
3
4
5
6
7
8
9
10
11
12
13
14
15
16
17
18
19
20
21
22
23
24
25
26
27
28
| /* ==========================================
代码块语言标签 (Language Badge)
========================================== */
/* 代码块外层容器 */
.code-block-wrapper {
position: relative;
margin-bottom: var(--content-gap);
}
/* 标签样式绝对定位 */
.code-lang-badge {
position: absolute;
top: 8px;
left: 12px; /* 放在左上角,避免与原生右侧复制按钮冲突 */
font-size: 12px;
font-weight: bold;
color: var(--secondary);
background: var(--tertiary);
padding: 2px 8px;
border-radius: 4px;
text-transform: uppercase; /* 转大写字母 */
user-select: none;
pointer-events: none;
opacity: 0.8;
}
/* 动态内边距:仅当容器存在 data-lang 属性时才下压空间,防止纯文本代码块顶部多出空白 */
.code-block-wrapper[data-lang] .highlight pre {
padding-top: 34px !important;
}
|
更便于阅读#
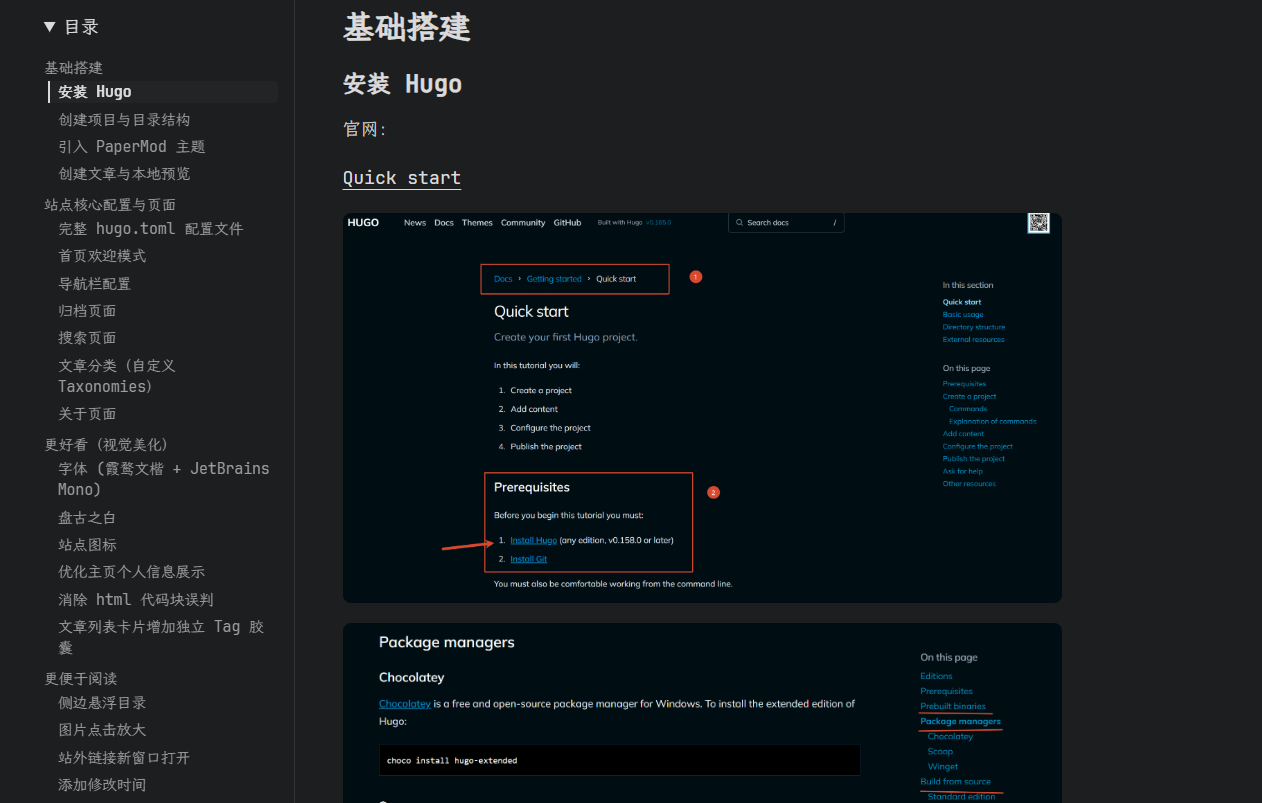
侧边悬浮目录#
参考:
在PaperMod中引入侧边目录和阅读进度显示 | 周鑫的个人博客
原代码如果目录太长会出现滚动条,而且当页面滚动到某标题时,该目录项的字体瞬间放大 1.1 倍,导致布局抖动
演示:
layouts/partials/toc.html
  1
  2
  3
  4
  5
  6
  7
  8
  9
 10
 11
 12
 13
 14
 15
 16
 17
 18
 19
 20
 21
 22
 23
 24
 25
 26
 27
 28
 29
 30
 31
 32
 33
 34
 35
 36
 37
 38
 39
 40
 41
 42
 43
 44
 45
 46
 47
 48
 49
 50
 51
 52
 53
 54
 55
 56
 57
 58
 59
 60
 61
 62
 63
 64
 65
 66
 67
 68
 69
 70
 71
 72
 73
 74
 75
 76
 77
 78
 79
 80
 81
 82
 83
 84
 85
 86
 87
 88
 89
 90
 91
 92
 93
 94
 95
 96
 97
 98
 99
100
101
102
103
104
105
106
107
108
109
110
111
112
113
114
115
116
117
118
119
120
121
122
123
124
125
126
127
128
129
130
131
132
133
134
135
136
137
138
139
140
141
142
143
144
145
146
147
148
149
150
151
152
153
154
155
156
157
158
159
160
161
162
163
164
165
166
167
168
169
170
171
172
173
174
175
176
177
178
179
180
181
182
183
184
185
186
187
188
189
190
191
192
| {{- $headers := findRE "<h[1-6].*?>(.|\n])+?</h[1-6]>" .Content -}}
{{- $has_headers := ge (len $headers) 1 -}}
{{- if $has_headers -}}
<aside id="toc-container" class="toc-container wide">
<div class="toc">
<details {{if (.Param "TocOpen") }} open{{ end }}>
<summary accesskey="c" title="(Alt + C)">
<span class="details">{{- i18n "toc" | default "Table of Contents" }}</span>
</summary>
<div class="inner">
{{- $largest := 6 -}}
{{- range $headers -}}
{{- $headerLevel := index (findRE "[1-6]" . 1) 0 -}}
{{- $headerLevel := len (seq $headerLevel) -}}
{{- if lt $headerLevel $largest -}}
{{- $largest = $headerLevel -}}
{{- end -}}
{{- end -}}
{{- $firstHeaderLevel := len (seq (index (findRE "[1-6]" (index $headers 0) 1) 0)) -}}
{{- $.Scratch.Set "bareul" slice -}}
<ul>
{{- range seq (sub $firstHeaderLevel $largest) -}}
<ul>
{{- $.Scratch.Add "bareul" (sub (add $largest .) 1) -}}
{{- end -}}
{{- range $i, $header := $headers -}}
{{- $headerLevel := index (findRE "[1-6]" . 1) 0 -}}
{{- $headerLevel := len (seq $headerLevel) -}}
{{/* get id="xyz" */}}
{{- $id := index (findRE "(id=\"(.*?)\")" $header 9) 0 }}
{{- /* strip id="" to leave xyz, no way to get regex capturing groups in hugo */ -}}
{{- $cleanedID := replace (replace $id "id=\"" "") "\"" "" }}
{{- $header := replaceRE "<h[1-6].*?>((.|\n])+?)</h[1-6]>" "$1" $header -}}
{{- if ne $i 0 -}}
{{- $prevHeaderLevel := index (findRE "[1-6]" (index $headers (sub $i 1)) 1) 0 -}}
{{- $prevHeaderLevel := len (seq $prevHeaderLevel) -}}
{{- if gt $headerLevel $prevHeaderLevel -}}
{{- range seq $prevHeaderLevel (sub $headerLevel 1) -}}
<ul>
{{/* the first should not be recorded */}}
{{- if ne $prevHeaderLevel . -}}
{{- $.Scratch.Add "bareul" . -}}
{{- end -}}
{{- end -}}
{{- else -}}
</li>
{{- if lt $headerLevel $prevHeaderLevel -}}
{{- range seq (sub $prevHeaderLevel 1) -1 $headerLevel -}}
{{- if in ($.Scratch.Get "bareul") . -}}
</ul>
{{/* manually do pop item */}}
{{- $tmp := $.Scratch.Get "bareul" -}}
{{- $.Scratch.Delete "bareul" -}}
{{- $.Scratch.Set "bareul" slice}}
{{- range seq (sub (len $tmp) 1) -}}
{{- $.Scratch.Add "bareul" (index $tmp (sub . 1)) -}}
{{- end -}}
{{- else -}}
</ul>
</li>
{{- end -}}
{{- end -}}
{{- end -}}
{{- end }}
<li>
<a href="#{{- $cleanedID -}}" aria-label="{{- $header | plainify -}}">{{- $header | safeHTML -}}</a>
{{- else }}
<li>
<a href="#{{- $cleanedID -}}" aria-label="{{- $header | plainify -}}">{{- $header | safeHTML -}}</a>
{{- end -}}
{{- end -}}
<!-- {{- $firstHeaderLevel := len (seq (index (findRE "[1-6]" (index $headers 0) 1) 0)) -}} -->
{{- $firstHeaderLevel := $largest }}
{{- $lastHeaderLevel := len (seq (index (findRE "[1-6]" (index $headers (sub (len $headers) 1)) 1) 0)) }}
</li>
{{- range seq (sub $lastHeaderLevel $firstHeaderLevel) -}}
{{- if in ($.Scratch.Get "bareul") (add . $firstHeaderLevel) }}
</ul>
{{- else }}
</ul>
</li>
{{- end -}}
{{- end }}
</ul>
</div>
</details>
</div>
</aside>
<script>
let activeElement;
let elements;
document.addEventListener('DOMContentLoaded', function (event) {
checkTocPosition();
elements = document.querySelectorAll('h1[id],h2[id],h3[id],h4[id],h5[id],h6[id]');
if (elements.length > 0) {
// Make the first header active
activeElement = elements[0];
const id = encodeURI(activeElement.getAttribute('id')).toLowerCase();
document.querySelector(`.inner ul li a[href="#${id}"]`).classList.add('active');
}
// Add event listener for the "back to top" link
const topLink = document.getElementById('top-link');
if (topLink) {
topLink.addEventListener('click', (event) => {
// Prevent the default action
event.preventDefault();
// Smooth scroll to the top
window.scrollTo({ top: 0, behavior: 'smooth' });
});
}
}, false);
window.addEventListener('resize', function(event) {
checkTocPosition();
}, false);
window.addEventListener('scroll', () => {
// Get the current scroll position
const scrollPosition = window.pageYOffset || document.documentElement.scrollTop;
// Check if the scroll position is at the top of the page
if (scrollPosition === 0) {
return;
}
// Ensure elements is a valid NodeList
if (elements && elements.length > 0) {
// Check if there is an object in the top half of the screen or keep the last item active
activeElement = Array.from(elements).find((element) => {
if ((getOffsetTop(element) - scrollPosition) > 0 &&
(getOffsetTop(element) - scrollPosition) < window.innerHeight / 2) {
return element;
}
}) || activeElement;
elements.forEach(element => {
const id = encodeURI(element.getAttribute('id')).toLowerCase();
const tocLink = document.querySelector(`.inner ul li a[href="#${id}"]`);
if (element === activeElement){
tocLink.classList.add('active');
// Ensure the active element is in view within the .inner container
const tocContainer = document.querySelector('.toc .inner');
const linkOffsetTop = tocLink.offsetTop;
const containerHeight = tocContainer.clientHeight;
const linkHeight = tocLink.clientHeight;
// Calculate the scroll position to center the active link
const scrollPosition = linkOffsetTop - (containerHeight / 2) + (linkHeight / 2);
tocContainer.scrollTo({ top: scrollPosition, behavior: 'smooth' });
} else {
tocLink.classList.remove('active');
}
});
}
}, false);
const main = parseInt(getComputedStyle(document.body).getPropertyValue('--article-width'), 10);
const toc = parseInt(getComputedStyle(document.body).getPropertyValue('--toc-width'), 10);
const gap = parseInt(getComputedStyle(document.body).getPropertyValue('--gap'), 10);
function checkTocPosition() {
const width = document.body.scrollWidth;
if (width - main - (toc * 2) - (gap * 4) > 0) {
document.getElementById("toc-container").classList.add("wide");
} else {
document.getElementById("toc-container").classList.remove("wide");
}
}
function getOffsetTop(element) {
if (!element.getClientRects().length) {
return 0;
}
let rect = element.getBoundingClientRect();
let win = element.ownerDocument.defaultView;
return rect.top + win.pageYOffset;
}
</script>
{{- end }}
|
/assets/css/extended/toc.css
 1
 2
 3
 4
 5
 6
 7
 8
 9
10
11
12
13
14
15
16
17
18
19
20
21
22
23
24
25
26
27
28
29
30
31
32
33
34
35
36
37
38
39
40
41
42
43
44
45
46
47
48
49
50
51
52
53
54
55
56
57
58
59
60
61
62
63
64
65
66
67
68
69
70
71
72
73
74
75
76
77
78
79
80
81
82
83
84
85
86
| :root {
--nav-width: 1380px;
--article-width: 650px;
--toc-width: 300px;
}
.toc {
margin: 0 2px 40px 2px;
border: 1px solid var(--border);
background: var(--entry);
border-radius: var(--radius);
padding: 0.4em;
}
.toc-container.wide {
position: absolute;
height: 100%;
border-right: 1px solid var(--border);
left: calc((var(--toc-width) + var(--gap)) * -1);
top: calc(var(--gap) * 2);
width: var(--toc-width);
}
.wide .toc {
position: sticky;
top: var(--gap);
border: unset;
background: unset;
border-radius: unset;
width: 100%;
margin: 0 2px 40px 2px;
}
.toc details summary {
cursor: default;
margin-inline-start: 20px;
padding: 12px 0;
}
.toc details[open] summary {
font-weight: 500;
}
.toc-container.wide .toc .inner {
margin: 0;
}
.active {
font-size: 110%;
font-weight: 600;
}
.toc ul {
list-style-type: circle;
}
.toc .inner {
margin: 0 0 0 20px;
padding: 0px 15px 15px 20px;
font-size: 16px;
/*目录显示高度*/
max-height: 83vh;
overflow-y: auto;
}
.toc .inner::-webkit-scrollbar-thumb { /*滚动条*/
background: var(--border);
border: 7px solid var(--theme);
border-radius: var(--radius);
}
.toc li ul {
margin-inline-start: calc(var(--gap) * 0.5);
list-style-type: none;
}
.toc li {
list-style: none;
font-size: 0.95rem;
padding-bottom: 5px;
}
.toc li a:hover {
color: var(--secondary);
}
|
图片点击放大#
参考:在
Hugo+PaperMod搭建博客_哔哩哔哩_bilibili
这个视频的1:09:00看到的效果,但是up没有详细说明,所以我从
他的github仓库
抄的使用叫做 medium-zoom 的 JavaScript 库,—点击后在原地放大背景变白,再点一下就缩小,我比较喜欢这个精简的功能
我还看了
这个博客
,通过引入Fancybox这个提供“放大、拖拽、左右滑动”等特效的 JavaScript 库 来实现图片放大和拖拽,不过是使用Hugo的Shortcode(短代码) 实现的,插入图片时不能用md原生的语法
blank.css
1
2
3
4
5
6
7
8
9
10
11
12
13
14
15
16
17
18
19
20
21
22
23
24
25
| /* medium-zoom 图片放大的样式 (全平台通用层级) */
.medium-zoom-overlay {
background: rgba(255, 255, 255, 0.7) !important;
z-index: 99999 !important;
}
.dark .medium-zoom-overlay {
background: rgba(0, 0, 0, 0.7) !important;
}
/* 放大后的图片层级必须高于遮罩层 (z-index: 100000),确保手机与桌面端均不会被遮挡 */
.medium-zoom-image--opened {
z-index: 100000 !important;
position: relative;
}
/* Windows 系统专属自定义放大/缩小光标 */
.win11 .medium-zoom-image {
cursor: url(/cursors/zoom-in.svg), default !important;
}
.win11 .medium-zoom--opened .medium-zoom-overlay {
cursor: url(/cursors/zoom-out.svg), default !important;
}
.win11 .medium-zoom-image--opened {
cursor: url(/cursors/zoom-out.svg), default !important;
}
|
layouts/partials
 1
 2
 3
 4
 5
 6
 7
 8
 9
10
11
12
13
14
15
16
17
18
19
20
21
22
23
24
25
26
27
28
29
30
31
32
33
34
35
| <script src="https://cdnjs.cloudflare.com/ajax/libs/medium-zoom/1.1.0/medium-zoom.min.js"
integrity="sha512-9ZKhgaFdKlsELap/dGw3Iaz5Bj+Las0XXZiRKYZaN9QArg6FtkD5rULNmNH4rTCTFxjPiBGr3MX8smRADRorDA=="
crossorigin="anonymous" referrerpolicy="no-referrer"></script>
<script>
var OSName = "unknown";
var navApp = navigator.userAgent.toLowerCase();
switch (true) {
case (navApp.indexOf("win") != -1):
OSName = "windows";
break;
case (navApp.indexOf("mac") != -1):
OSName = "apple";
break;
case (navApp.indexOf("linux") != -1):
OSName = "linux";
break;
case (navApp.indexOf("x11") != -1):
OSName = "unix";
break;
}
const images = Array.from(document.querySelectorAll(".post-content img"));
images.forEach(img => {
mediumZoom(img, {
margin: 1, /* 1px 边距 */
container: null,
template: null,
});
});
if (OSName == "windows") {
document.body.className += ' win11'
}
</script>
|
static/cursors
存放放大和缩小的svg图标
官网:
SVG Mac cursor downloads
我直接从作者的仓库复制粘贴的
站外链接新窗口打开#
参考:
魔改PaperMod主题和博客改动 | 梓言堂 - Yuk’s Blog
默认站外链接都是当前页打开,使用体验不好
layouts/default/_markup/render-link.html
1
2
3
4
5
6
7
| <!-- 让站外链接统统是新窗口打开 -->
<a href="{{ .Destination | safeURL }}"
{{- with .Title }} title="{{ . }}"{{ end -}}
{{- if not (in .Destination "yuk7.com") }} target="_blank"{{ end -}}
>
{{- with .Text | safeHTML }}{{ . }}{{ end -}}
</a>
|
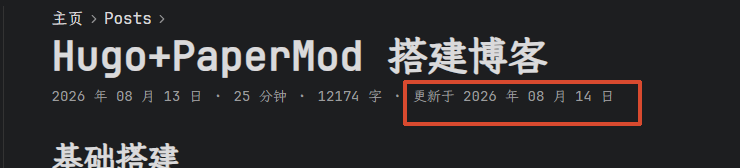
添加修改时间#
参考:
Hugo PaperMod 主题精装修 | Tai’s Blog
但对方的代码存在一些问题,更新时间是需要自己手动设置的,不合理
演示:
参数说明:
Docs->Configuration->All settings
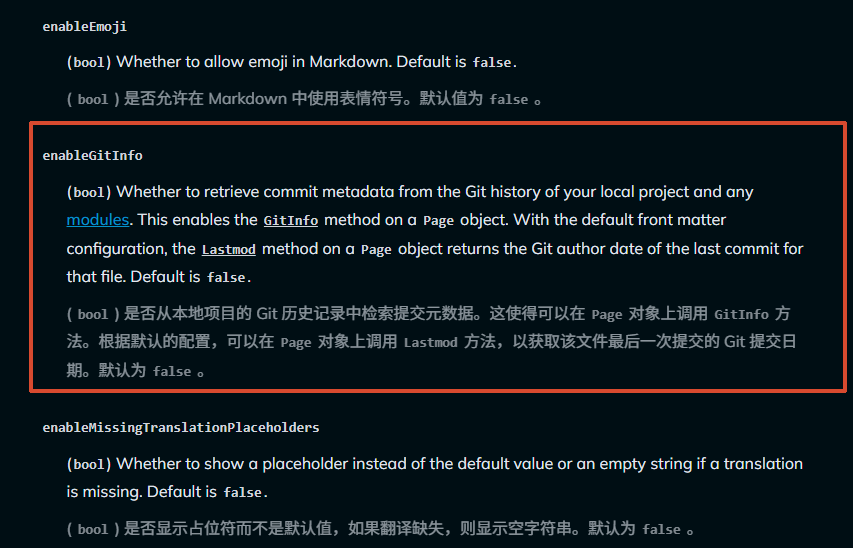
默认配置:Hugo 会从左向右依次检查,一旦在某一项找到了有效的时间,就立刻停下来,把这个时间作为文章的“最后修改时间
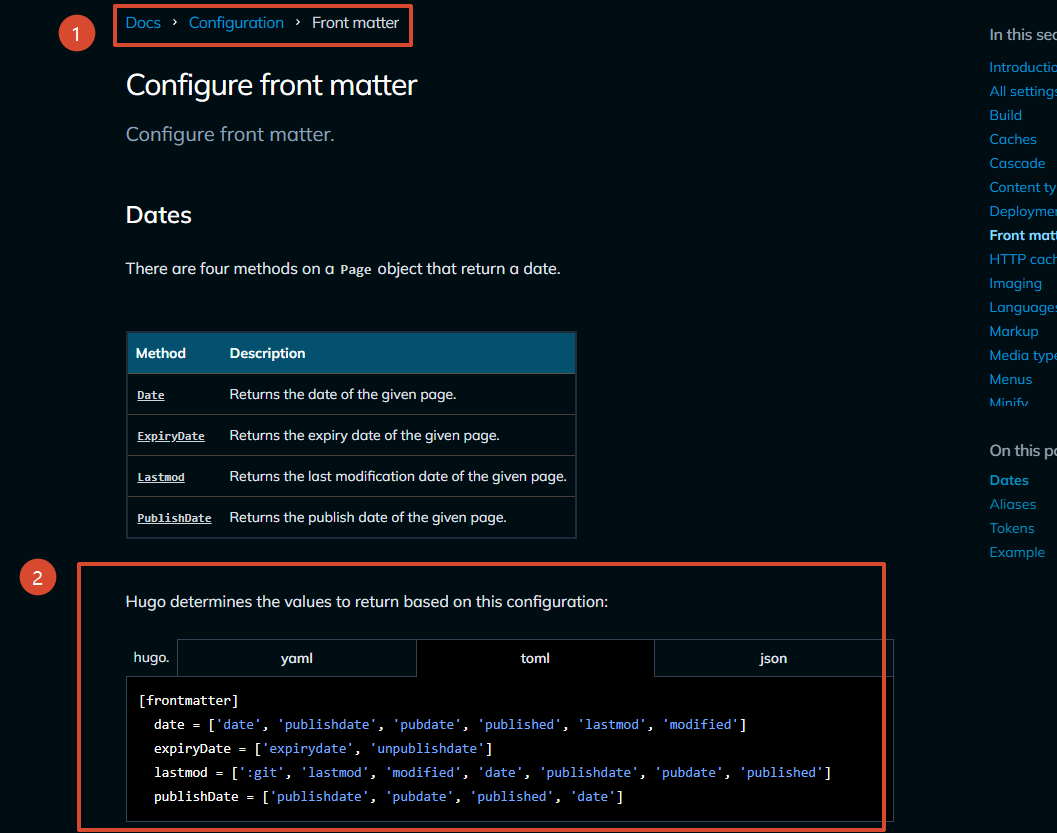
hugo.toml
手动设置了:fileModTime,方便在本地运行的时候查看
1
2
3
4
5
6
| # 开启 Git 信息读取 (用于自动获取文章最后更新时间)
enableGitInfo = true
# 配置 Frontmatter 获取时间的优先级(支持本地文件实时修改预览)
[frontmatter]
lastmod = [":git", ":fileModTime", "lastmod", "date"]
|
layouts/partials/post_meta.html
1
2
3
4
5
6
7
8
9
10
11
12
13
14
15
16
17
18
19
20
21
22
23
24
| {{- $scratch := newScratch }}
{{- if not .Date.IsZero -}}
{{- $scratch.Add "meta" (slice (printf "<span title='%s'>%s</span>" (.Date) (.Date.Format (default "January 2, 2006" .Site.Params.DateFormat)))) }}
{{- end -}}
{{- if (.Param "ShowReadingTime") -}}
{{- $scratch.Add "meta" (slice (i18n "read_time" .ReadingTime | default (printf "%d min" .ReadingTime))) }}
{{- end -}}
{{- if (.Param "ShowWordCount") -}}
{{- $scratch.Add "meta" (slice (i18n "words" .WordCount | default (printf "%d words" .WordCount))) }}
{{- end -}}
{{- /* 自动判断:如果最后修改时间(Lastmod) 不等于 发布时间(Date),就显示“最后更新于” */ -}}
{{- if and (not .Lastmod.IsZero) (not .Date.IsZero) -}}
{{- if ne (.Lastmod.Format "2006-01-02") (.Date.Format "2006-01-02") -}}
{{- $scratch.Add "meta" (slice (printf "更新于 %s" (.Lastmod.Format (default "2006年01月02日" .Site.Params.DateFormat)))) }}
{{- end -}}
{{- end -}}
{{- with ($scratch.Get "meta") -}}
{{- delimit . " · " | safeHTML -}}
{{- end -}}
|
MarginNote旁注#
参考:
Hugo PaperMod 主题精装修 | Tai’s Blog
演示:
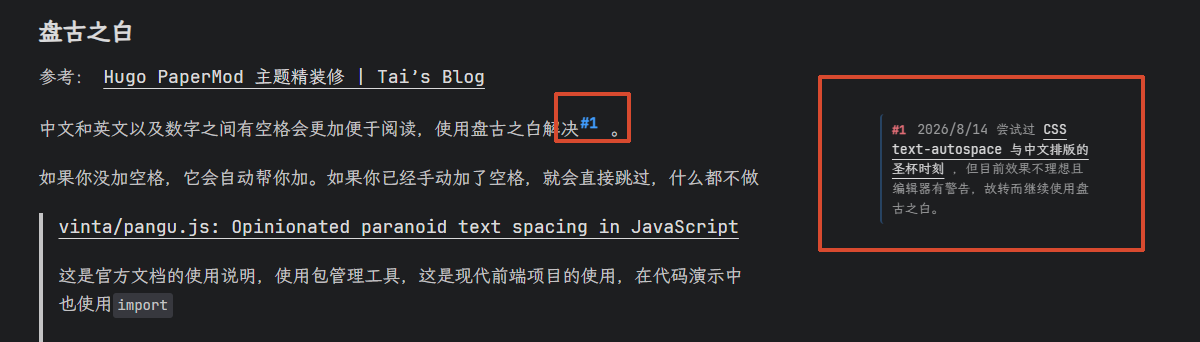
layouts/shortcodes/marginnote.html
1
| <span class="sidenote-number"><small class="sidenote">{{ .Inner | replaceRE "(?m)^\\s*>\\s?" "" | markdownify | replaceRE "(?s)<p>(.*?)</p>" "<span class=\"sidenote-block\">$1</span>" | safeHTML }}</small></span>
|
assets/css/extended/marginnote.css
 1
 2
 3
 4
 5
 6
 7
 8
 9
10
11
12
13
14
15
16
17
18
19
20
21
22
23
24
25
26
27
28
29
30
31
32
33
34
35
36
37
38
39
40
41
42
43
44
45
46
47
48
49
50
51
52
53
54
55
56
57
58
59
60
61
62
63
64
65
66
67
68
69
70
71
72
73
74
75
76
77
78
79
80
81
82
83
84
85
86
87
88
89
90
91
92
93
94
95
96
97
98
99
100
101
102
103
104
105
106
107
108
109
110
111
112
113
114
115
116
| /* ==========================================
Sidenote / Marginnote 边注样式
========================================== */
:root {
--sidenote-bg: rgba(64, 157, 255, 0.08);
--sidenote-color: var(--secondary);
--sidenote-accent: #409dff;
--sidenote-prefix: #e06c75;
}
.dark {
--sidenote-bg: rgba(64, 157, 255, 0.15);
--sidenote-color: #abb2bf;
--sidenote-accent: #61afef;
--sidenote-prefix: #e06c75;
}
/* 计数器初始化:在文章主体或 body 重置计数器 */
body, .post-single {
counter-reset: sidenote-counter;
}
/* 正文中的上标编号 */
.sidenote-number {
counter-increment: sidenote-counter;
position: relative;
cursor: pointer;
user-select: none;
}
.sidenote-number::after {
content: "#" counter(sidenote-counter);
vertical-align: super;
font-size: 0.8em;
font-weight: 700;
color: var(--sidenote-accent);
padding: 0 2px;
transition: all 0.2s ease;
}
.sidenote-number:hover::after {
color: var(--sidenote-prefix);
text-decoration: underline;
}
/* 侧边注本体(在大屏幕上浮动在右侧留白区域) */
.sidenote {
float: right;
clear: right;
position: relative;
margin-right: -18vw;
width: 16vw;
max-width: 220px;
min-width: 140px;
padding: 6px 10px;
margin-top: 0.2em;
margin-bottom: 0.8em;
font-size: 0.82rem;
line-height: 1.5;
color: var(--sidenote-color);
background-color: transparent;
border-left: 2px solid rgba(64, 157, 255, 0.3);
border-radius: 4px;
transition: background-color 0.25s ease, border-color 0.25s ease, transform 0.2s ease;
text-align: left;
box-sizing: border-box;
}
.sidenote code {
font-size: 0.85em !important;
}
.sidenote-block {
display: block;
margin-bottom: 0.5em;
}
.sidenote-block:last-child {
margin-bottom: 0;
}
/* 侧边注前缀标记(自动带上序号) */
.sidenote::before {
content: "#" counter(sidenote-counter) " ";
position: relative;
font-size: 0.9em;
font-weight: 700;
color: var(--sidenote-prefix);
margin-right: 4px;
}
/* 鼠标悬停正文编号或悬停边注时高亮 */
.sidenote-number:hover .sidenote,
.sidenote:hover {
background-color: var(--sidenote-bg);
border-left-color: var(--sidenote-accent);
}
/* ==========================================
移动端与窄屏自适应响应式处理
当屏幕宽度不足以在右侧展示边注时优雅内嵌
========================================== */
@media (max-width: 1280px) {
.sidenote {
float: none;
display: block;
margin-right: 0;
width: 100%;
max-width: 100%;
margin: 8px 0;
padding: 8px 12px;
background-color: var(--sidenote-bg);
border-left: 3px solid var(--sidenote-accent);
}
}
|
使用说明
1
| 这里是正文内容{{< marginnote >}}这里是侧边边注说明,支持 **加粗** 等 Markdown 语法。{{< /marginnote >}},接下来继续正常书写。
|
代码块折叠:底部渐变遮罩 + 一键展开/收起代码块#
这个博客
展开按钮和限制代码块大小
比较符合我的偏好,但还是不够好,这个博客
用短代码
导致代码全部隐藏,体验不好
所以我编写了底部渐变遮罩 + 一键展开/收起代码块
演示:
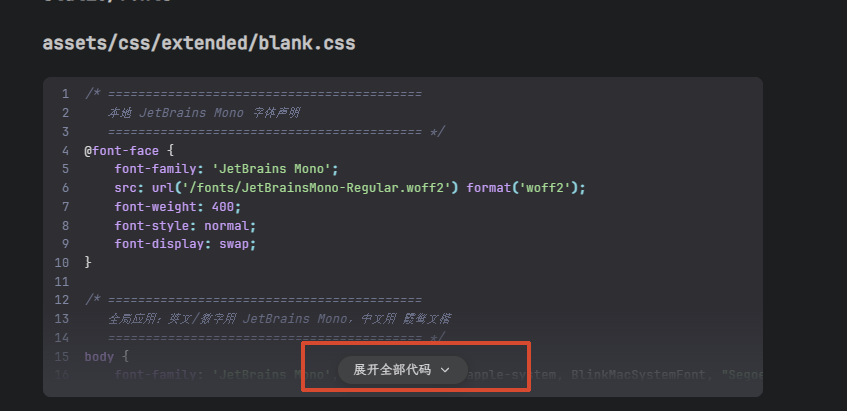
extend_footer.html
 1
 2
 3
 4
 5
 6
 7
 8
 9
10
11
12
13
14
15
16
17
18
19
20
21
22
23
24
25
26
27
28
29
30
31
32
33
34
35
36
37
38
39
40
41
42
43
44
45
46
47
48
49
50
51
52
53
54
55
56
57
58
59
60
61
62
|
<!-- 超长代码块渐变遮罩与一键展开/收起 -->
<script>
document.addEventListener('DOMContentLoaded', () => {
const CODE_MAX_HEIGHT = 320; // 超过 320px 视为超长代码块
document.querySelectorAll('.post-content .highlight').forEach((container) => {
if (container.querySelector('.code-mask-layer')) return;
// 此时尚未添加 code-collapsible 限高类,scrollHeight 即为真实内容高度
if (container.scrollHeight > CODE_MAX_HEIGHT + 20) {
container.classList.add('code-collapsible');
const maskLayer = document.createElement('div');
maskLayer.className = 'code-mask-layer';
const expandBtn = document.createElement('button');
expandBtn.type = 'button';
expandBtn.className = 'code-expand-btn';
expandBtn.setAttribute('aria-label', '展开全部代码');
expandBtn.innerHTML = `
<span class="code-btn-text">展开全部代码</span>
<svg class="code-btn-icon" width="14" height="14" viewBox="0 0 24 24" fill="none" stroke="currentColor" stroke-width="2" stroke-linecap="round" stroke-linejoin="round">
<polyline points="6 9 12 15 18 9"></polyline>
</svg>
`;
const btnText = expandBtn.querySelector('.code-btn-text');
const btnIcon = expandBtn.querySelector('.code-btn-icon');
expandBtn.addEventListener('click', (e) => {
e.preventDefault();
const willCollapse = container.classList.contains('is-expanded');
if (willCollapse) {
container.classList.remove('is-expanded');
btnText.textContent = '展开全部代码';
btnIcon.innerHTML = '<polyline points="6 9 12 15 18 9"></polyline>';
expandBtn.setAttribute('aria-label', '展开全部代码');
// 收起后:如果代码块顶部已滚出视口上方,瞬间回到代码块位置
const rect = container.getBoundingClientRect();
if (rect.top < 0) {
window.scrollTo({
top: window.scrollY + rect.top - 16,
behavior: 'instant'
});
}
} else {
container.classList.add('is-expanded');
btnText.textContent = '收起代码';
btnIcon.innerHTML = '<polyline points="18 15 12 9 6 15"></polyline>';
expandBtn.setAttribute('aria-label', '收起代码');
}
});
maskLayer.appendChild(expandBtn);
container.appendChild(maskLayer);
}
});
});
</script>
|
assets/css/extended/blank.css
1
2
3
4
5
6
7
8
9
10
11
12
13
14
15
16
17
18
19
20
21
22
23
24
25
26
27
28
29
30
31
32
33
34
35
36
37
38
39
40
41
42
43
44
45
46
47
48
49
50
51
52
53
54
55
56
57
58
59
60
61
62
63
64
65
66
67
68
69
70
71
72
73
74
75
76
77
78
79
80
81
82
83
84
85
86
|
/* ==========================================
长代码块限高 + 底部渐变遮罩 + 展开/收起按钮
========================================== */
/* 处于可折叠状态的代码块容器(限高在容器本身,兼容 table 行号布局) */
.post-content .highlight.code-collapsible {
position: relative;
max-height: 320px;
overflow: hidden;
padding-bottom: 0;
transition: max-height 0.3s cubic-bezier(0.4, 0, 0.2, 1);
}
/* 展开状态:移除高度限制 */
.post-content .highlight.code-collapsible.is-expanded {
max-height: none;
overflow: visible;
}
/* 底部渐变遮罩层 (未展开状态) */
.post-content .highlight.code-collapsible .code-mask-layer {
position: absolute;
bottom: 0;
left: 0;
right: 0;
height: 90px;
background: linear-gradient(to bottom, transparent 0%, var(--code-bg, #2e2e33) 85%);
display: flex;
align-items: flex-end;
justify-content: center;
padding-bottom: 12px;
z-index: 10;
pointer-events: none;
border-bottom-left-radius: var(--radius);
border-bottom-right-radius: var(--radius);
}
/* 展开状态下的遮罩层 (变为底部操作栏) */
.post-content .highlight.code-collapsible.is-expanded .code-mask-layer {
position: relative;
height: auto;
background: transparent;
padding: 8px 0 12px 0;
}
/* 展开/收起胶囊按钮样式 */
.code-expand-btn {
pointer-events: auto;
display: inline-flex;
align-items: center;
gap: 6px;
padding: 4px 16px;
font-size: 13px;
font-weight: 500;
color: var(--primary);
background: var(--tertiary);
border: 1px solid var(--border);
border-radius: 20px;
cursor: pointer;
box-shadow: 0 4px 12px rgba(0, 0, 0, 0.15);
backdrop-filter: blur(8px);
-webkit-backdrop-filter: blur(8px);
user-select: none;
transition: all 0.2s ease;
}
.code-expand-btn:hover {
background: var(--primary);
color: var(--theme);
border-color: var(--primary);
transform: translateY(-1px);
box-shadow: 0 6px 16px rgba(0, 0, 0, 0.25);
}
.code-expand-btn .code-btn-icon {
transition: transform 0.2s ease;
}
.code-expand-btn:hover .code-btn-icon {
transform: translateY(1px);
}
.is-expanded .code-expand-btn:hover .code-btn-icon {
transform: translateY(-1px);
}
|
Giscus 评论系统#
参考:
Hugo + PaperMod + Github Pages 搭建一个完善的个人博客(以 Windows11 为例) | SonnyCalcr’s Blog
Hugo 博客引入 Giscus 评论系统 - 探索云原生
Giscus是由 GitHub Discussions 驱动的评论系统,因为它完全免费,而且部署方便,所以用这个
仓库开启Discussions
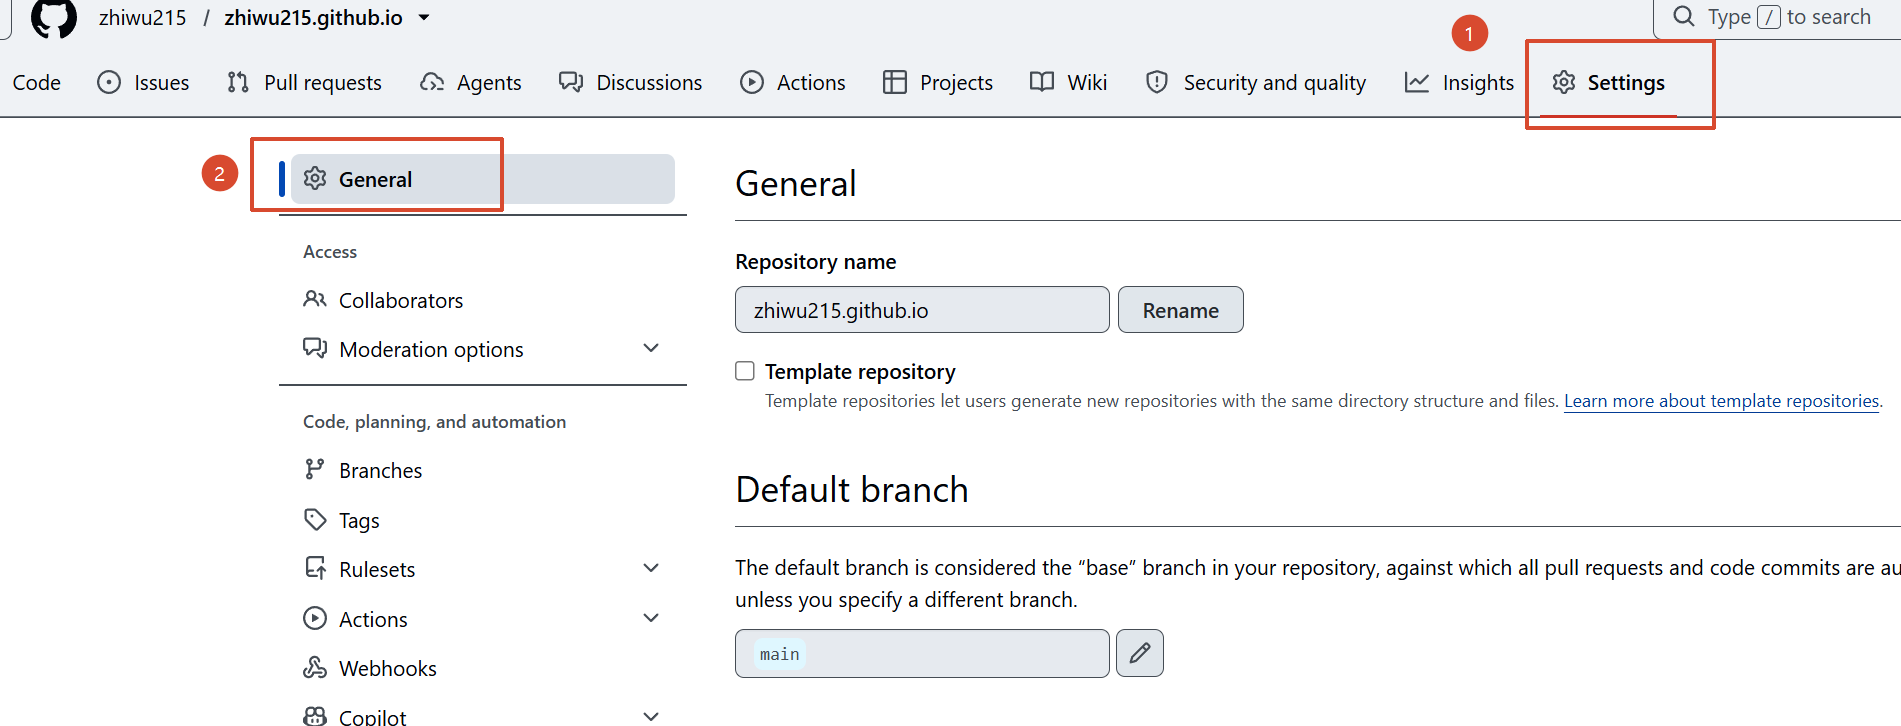
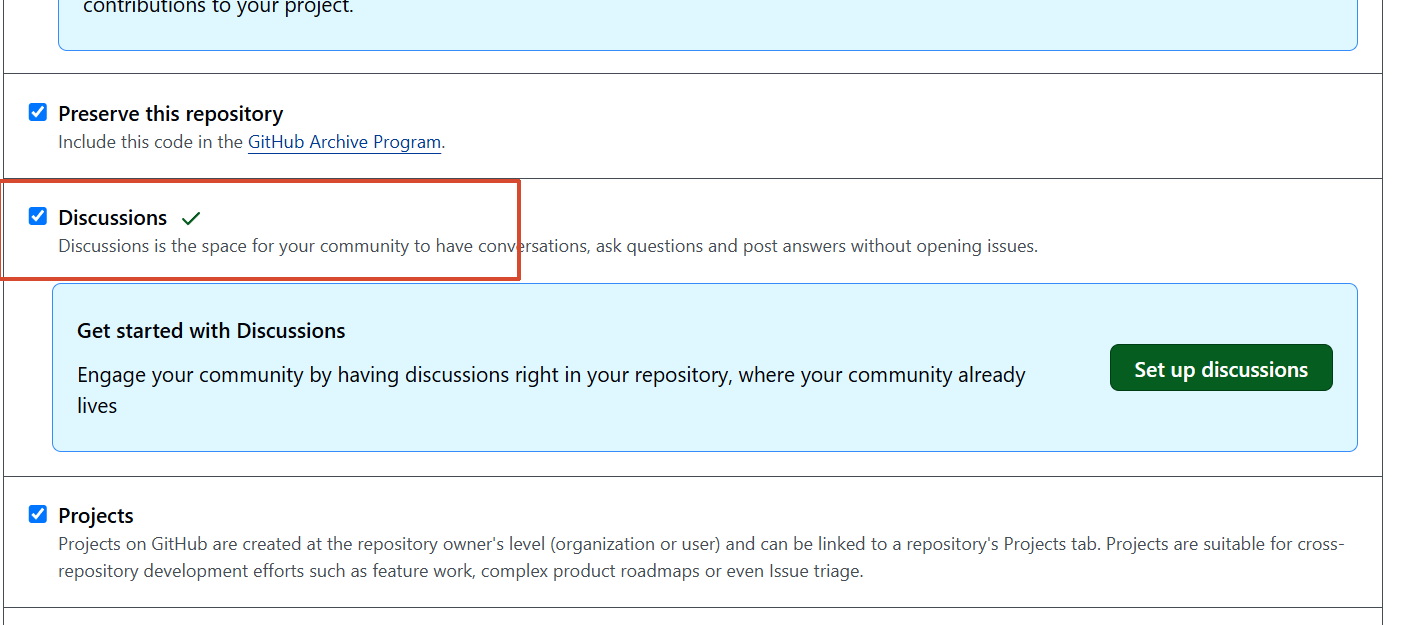
安装gitcus
GitHub Apps - giscus
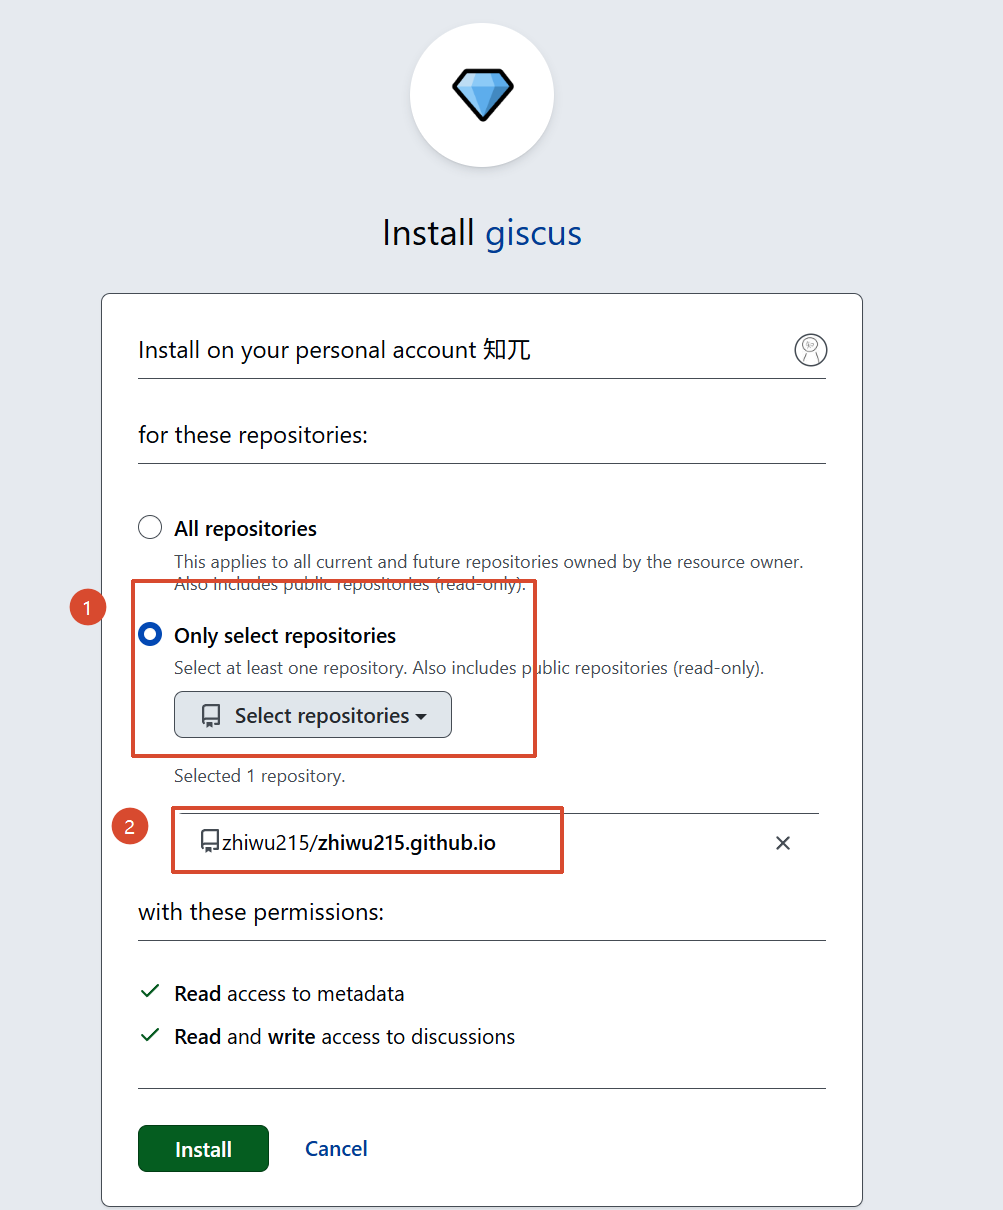
从官网获取配置信息
giscus
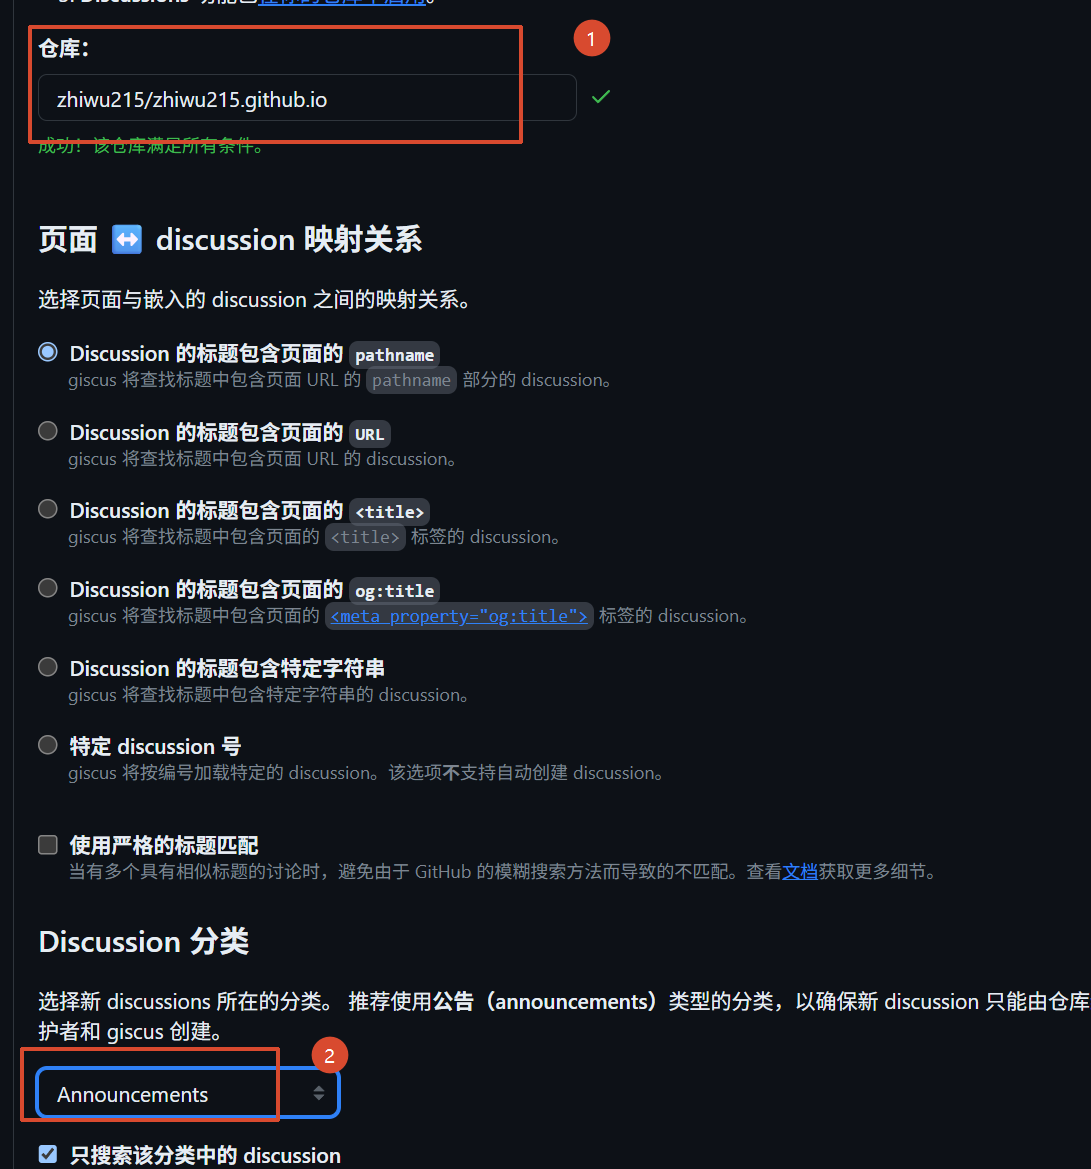
选好后往下滑会有配置文件
虽然说暴露了你的仓库地址 + 讨论分类,别人知道了可以往你的 Discussions 里发评论,但这些本来就是公开的,我就不隐藏了
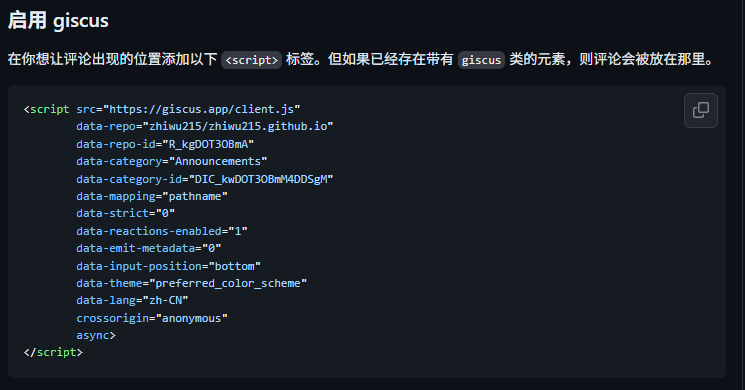
配置到hugo.toml
1
2
3
4
5
6
7
8
9
10
11
12
13
14
15
16
17
18
19
20
21
| [params]
# 全局开启文章评论功能
comments = true
# ==========================================
# Giscus 评论系统配置
# ==========================================
[params.giscus]
repo = "zhiwu215/zhiwu215.github.io" # GitHub 存储 Discussion 的仓库名
repoId = "<你的仓库id>" # 在 giscus.app 自动生成的仓库 ID
category = "Announcements" # Discussion 的分类名称
categoryId = "<你的分类id>" # 在 giscus.app 自动生成的分类 ID
mapping = "pathname" # 文章与 Discussion 的映射规则(推荐 pathname)
strict = "0"
reactionsEnabled = "1" # 是否开启文章/评论的 Emoji 表情回应
emitMetadata = "0"
inputPosition = "top"
lightTheme = "light" # 浅色模式对应的 Giscus 主题
darkTheme = "dark" # 深色模式对应的 Giscus 主题
lang = "zh-CN" # 评论组件界面语言
loading = "lazy" # 懒加载策略
|
layouts/partials/comments.html
让评论能和主题一样明暗切换
 1
 2
 3
 4
 5
 6
 7
 8
 9
10
11
12
13
14
15
16
17
18
19
20
21
22
23
24
25
26
27
28
29
30
31
32
33
34
35
36
37
38
39
40
41
42
43
44
45
46
47
48
49
| <div id="tw-comment"></div>
<script>
// 默认是暗色,根目录下的配置中的主题默认也是暗色
const getStoredTheme = () => localStorage.getItem("pref-theme") === "light" ? "{{ .Site.Params.giscus.lightTheme }}" : "{{ .Site.Params.giscus.darkTheme }}";
const setGiscusTheme = () => {
const sendMessage = (message) => {
const iframe = document.querySelector('iframe.giscus-frame');
if (iframe) {
iframe.contentWindow.postMessage({giscus: message}, 'https://giscus.app');
}
}
sendMessage({setConfig: {theme: getStoredTheme()}})
}
document.addEventListener("DOMContentLoaded", () => {
const giscusAttributes = {
"src": "https://giscus.app/client.js",
"data-repo": "{{ .Site.Params.giscus.repo }}",
"data-repo-id": "{{ .Site.Params.giscus.repoId }}",
"data-category": "{{ .Site.Params.giscus.category }}",
"data-category-id": "{{ .Site.Params.giscus.categoryId }}",
"data-mapping": "{{ .Site.Params.giscus.mapping }}",
"data-strict": "{{ .Site.Params.giscus.strict }}",
"data-reactions-enabled": "{{ .Site.Params.giscus.reactionsEnabled }}",
"data-emit-metadata": "{{ .Site.Params.giscus.emitMetadata }}",
"data-input-position": "{{ .Site.Params.giscus.inputPosition }}",
"data-theme": getStoredTheme(),
"data-lang": "{{ .Site.Params.giscus.lang }}",
"data-loading": "lazy",
"crossorigin": "anonymous",
};
// 动态创建 giscus script
const giscusScript = document.createElement("script");
Object.entries(giscusAttributes).forEach(
([key, value]) => giscusScript.setAttribute(key, value));
document.querySelector("#tw-comment").appendChild(giscusScript);
// 页面主题变更后,变更 giscus 主题
const themeSwitcher = document.querySelector("#theme-toggle");
if (themeSwitcher) {
themeSwitcher.addEventListener("click", setGiscusTheme);
}
const themeFloatSwitcher = document.querySelector("#theme-toggle-float");
if (themeFloatSwitcher) {
themeFloatSwitcher.addEventListener("click", setGiscusTheme);
}
});
</script>
|
访问量统计#
演示:

看了很多别人的博客,很多人都用
不蒜子
我是从
魔改PaperMod主题和博客改动 | 梓言堂 - Yuk’s Blog
了解到的Umami,但这是一个网站分析工具,它可以分析出一个网站的详细访问数据,包括请求PV、UV、国家来源、来源于哪个网站、用户的操作系统、浏览器等等,不过对我没什么用
然后我看到
Vercount: 一个比不蒜子更好的网站计数器 | EvanNotFound’s Blog
,Vercount比不蒜子更好,比如更稳定什么的
layouts/partials/extend_head.html
1
2
| <!-- Vercount 访问量统计 -->
<script defer src="https://vercount.one/js"></script>
|
layouts/partials/extend_footer.html
1
2
3
4
5
6
| <!-- Vercount 站点底部总访问量与访客数统计 -->
<div class="site-footer-stats" style="text-align: center; padding: 4px 0; color: var(--secondary); font-size: 14px; margin-top: 2px;">
<span>本站总访问量 <span id="busuanzi_value_site_pv"></span> 次</span>
<span style="margin: 0 4px;">·</span>
<span>本站总访客数 <span id="busuanzi_value_site_uv"></span> 人</span>
</div>
|
Github自动部署#
部署在github page的教程:
Host on GitHub Pages
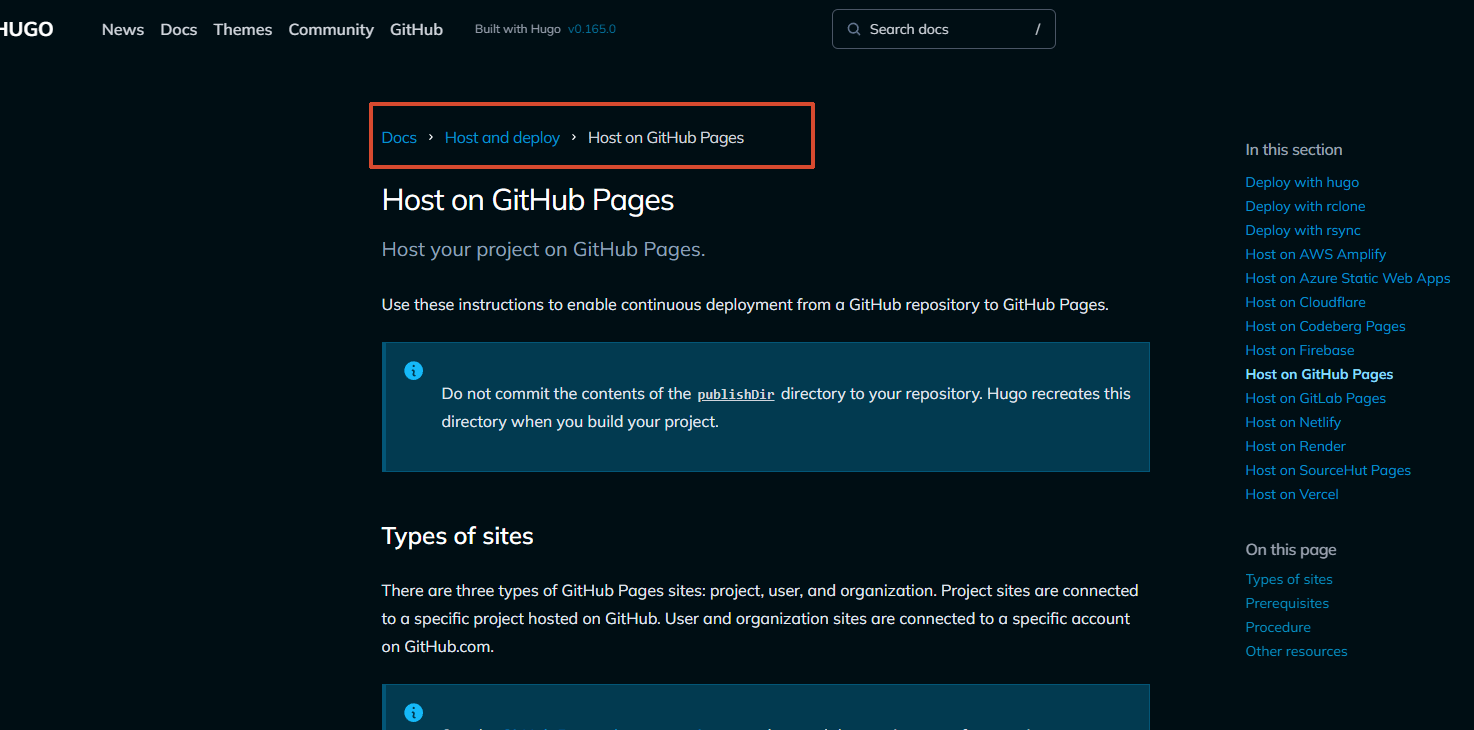
我看
【大学生提高课】3 hexo与hugo博客搭建与github自动化推送和服务器推送_哔哩哔哩_bilibili
20:47说,创建privete仓库存放博客源码,创建public存放构建后的public文件
我觉得博客的源码没有隐藏的必要,所以我就直接创建public仓库了
完全可以看官方文档完成,
Hugo+PaperMod搭建博客_哔哩哔哩_bilibili
这个视频最后的部署阶段也是创建public仓库,然后按照官方文档来,可以参考一下
创建github仓库
github仓库名必须是<你的用户名>.github.io
步骤1
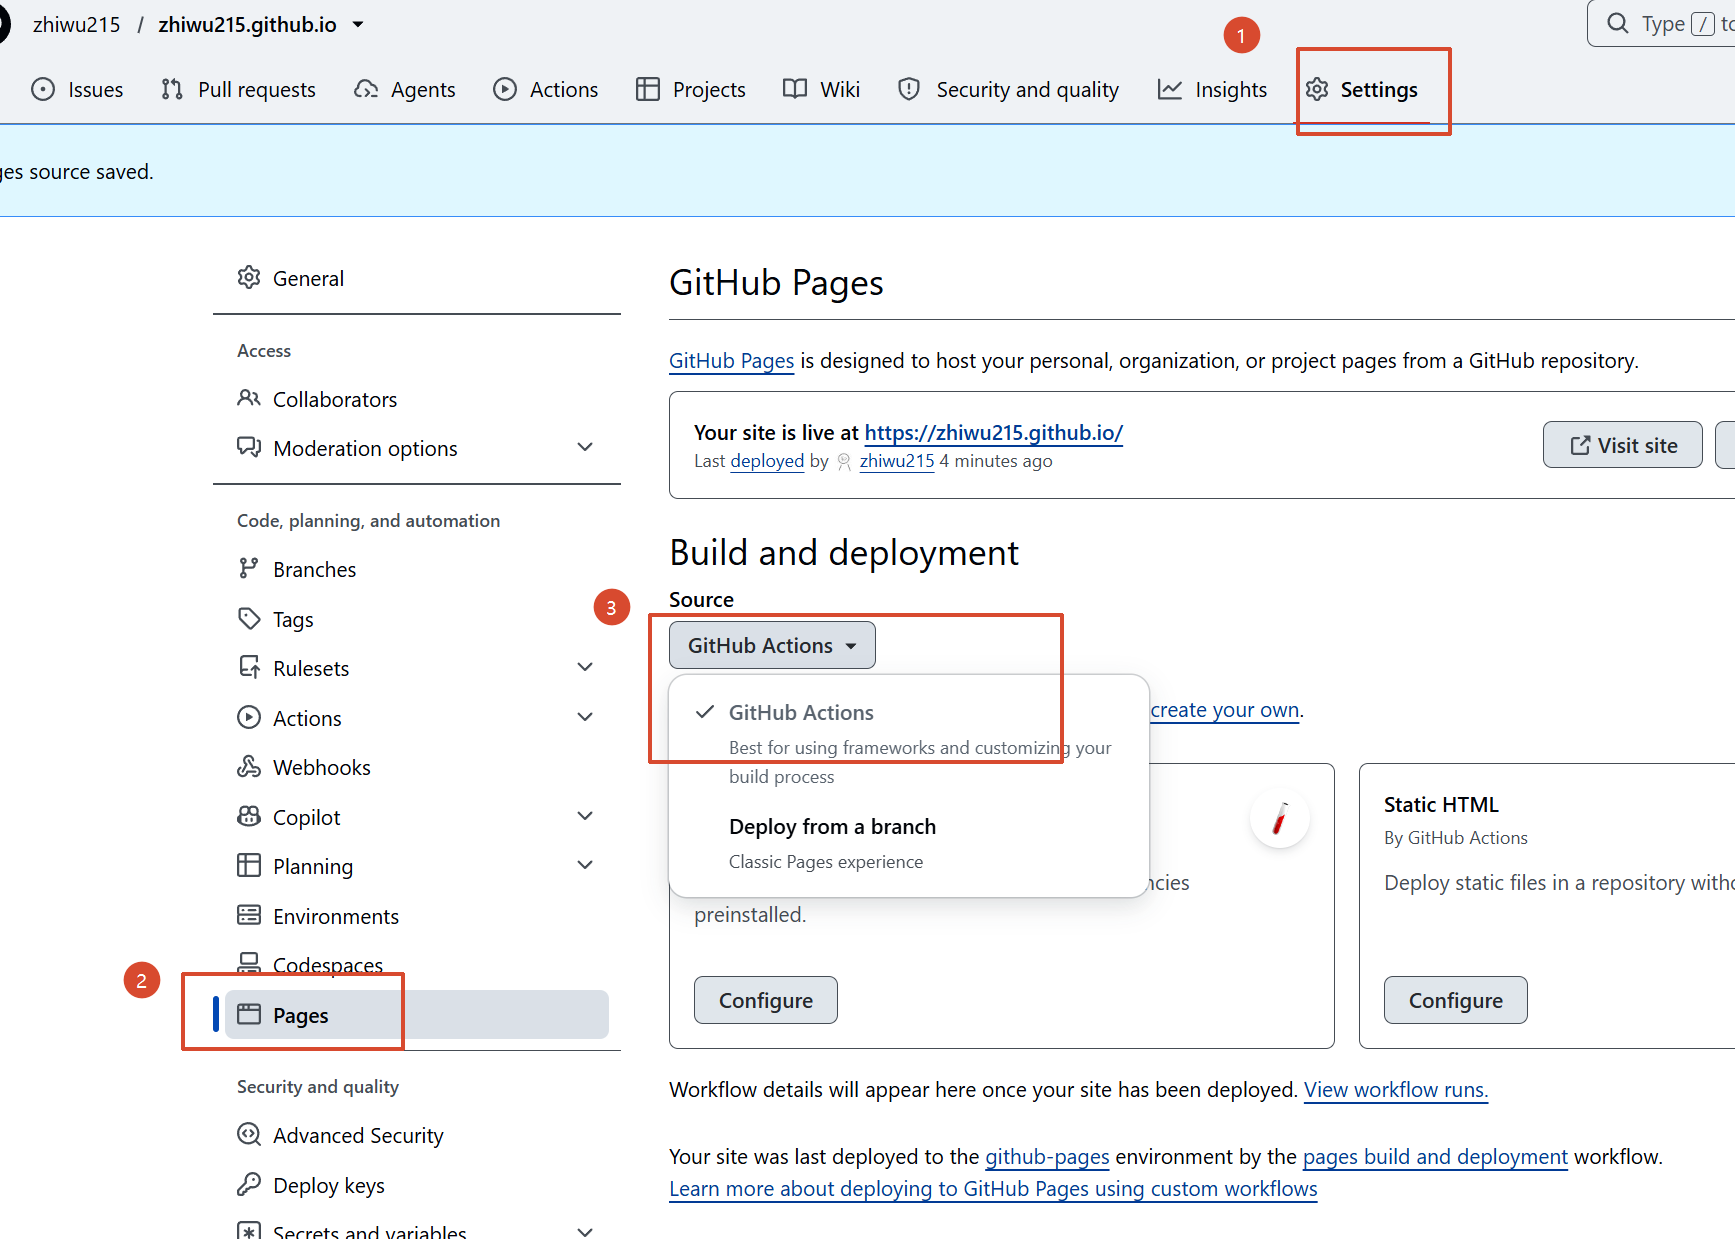
步骤2
在 .github/workflows 目录下创建一个名为 hugo.yaml 的文件
从官网复制
注意这三个对不对
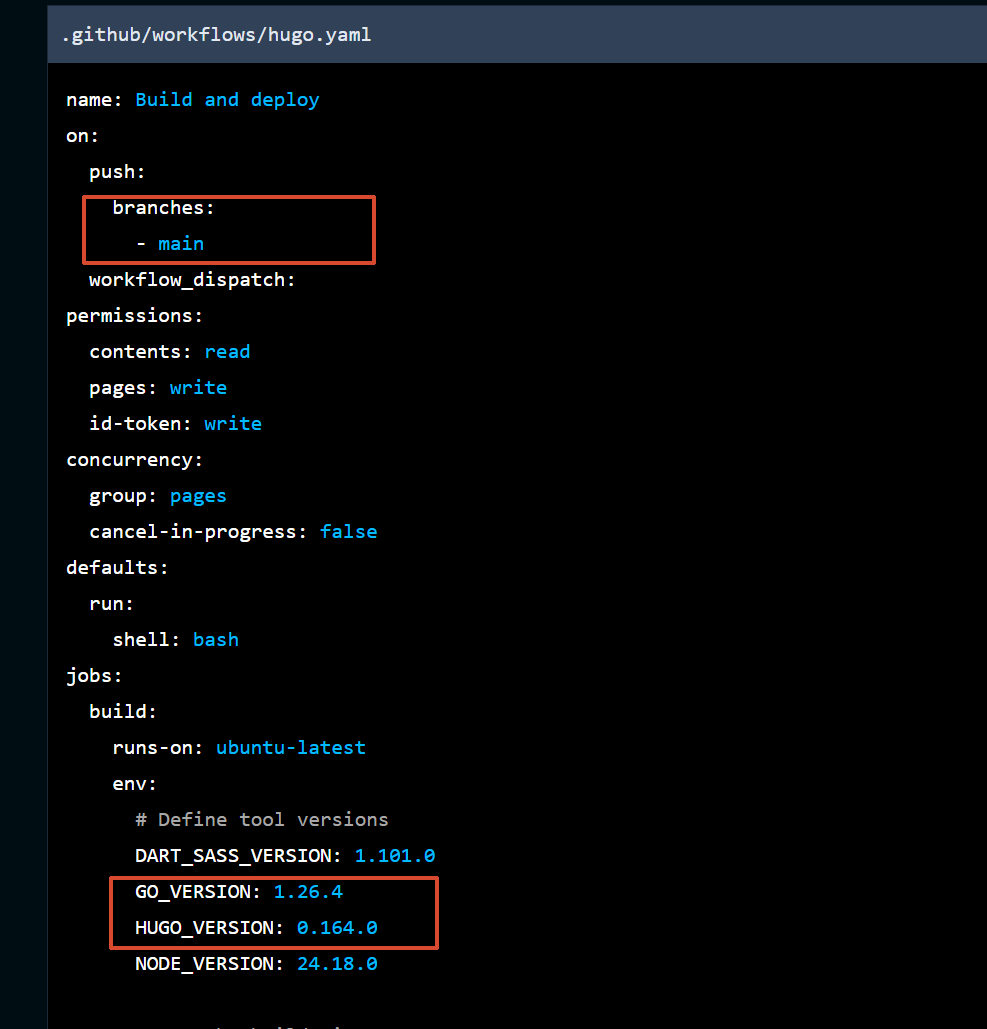
部署成功后,就可以访问网站:<你的用户名>.github.io
PicGo+Github图床#
PicGo是图片上传工具,Github充当图床
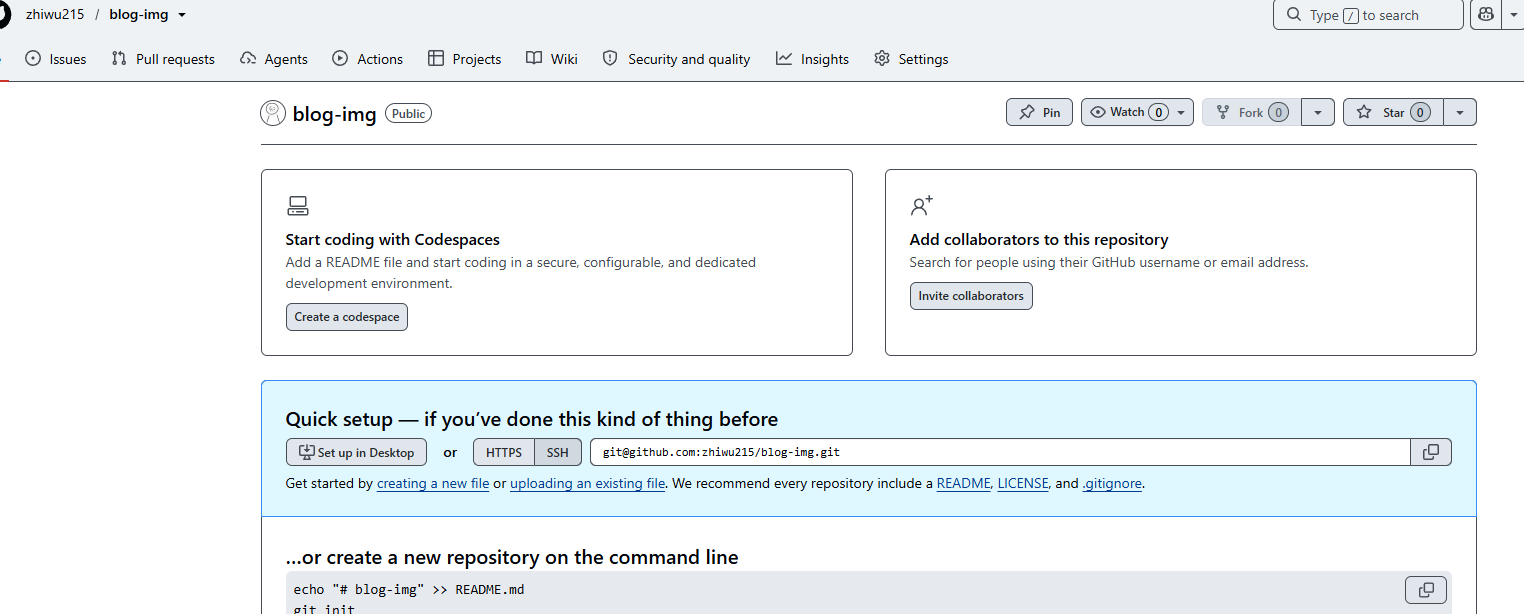
创建公开图片仓库
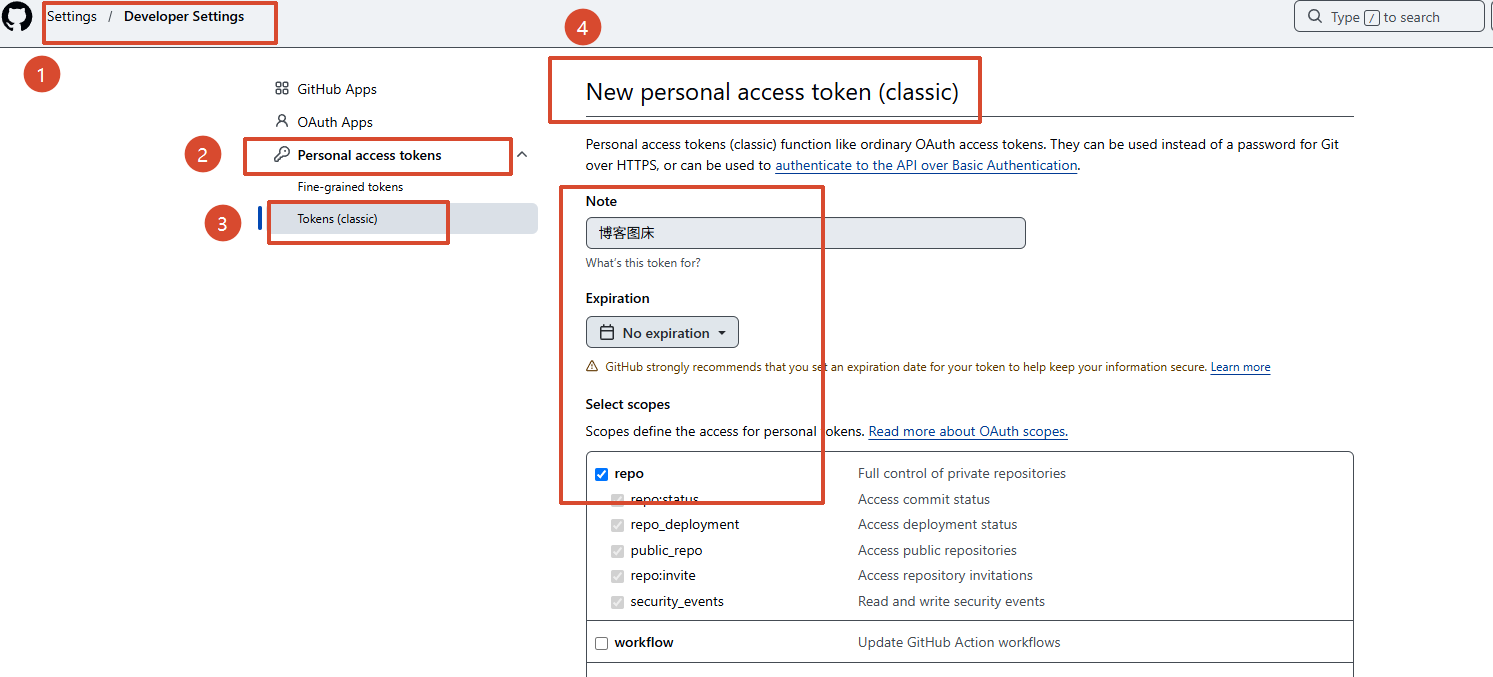
生成 GitHub Personal Access Token(访问密钥)
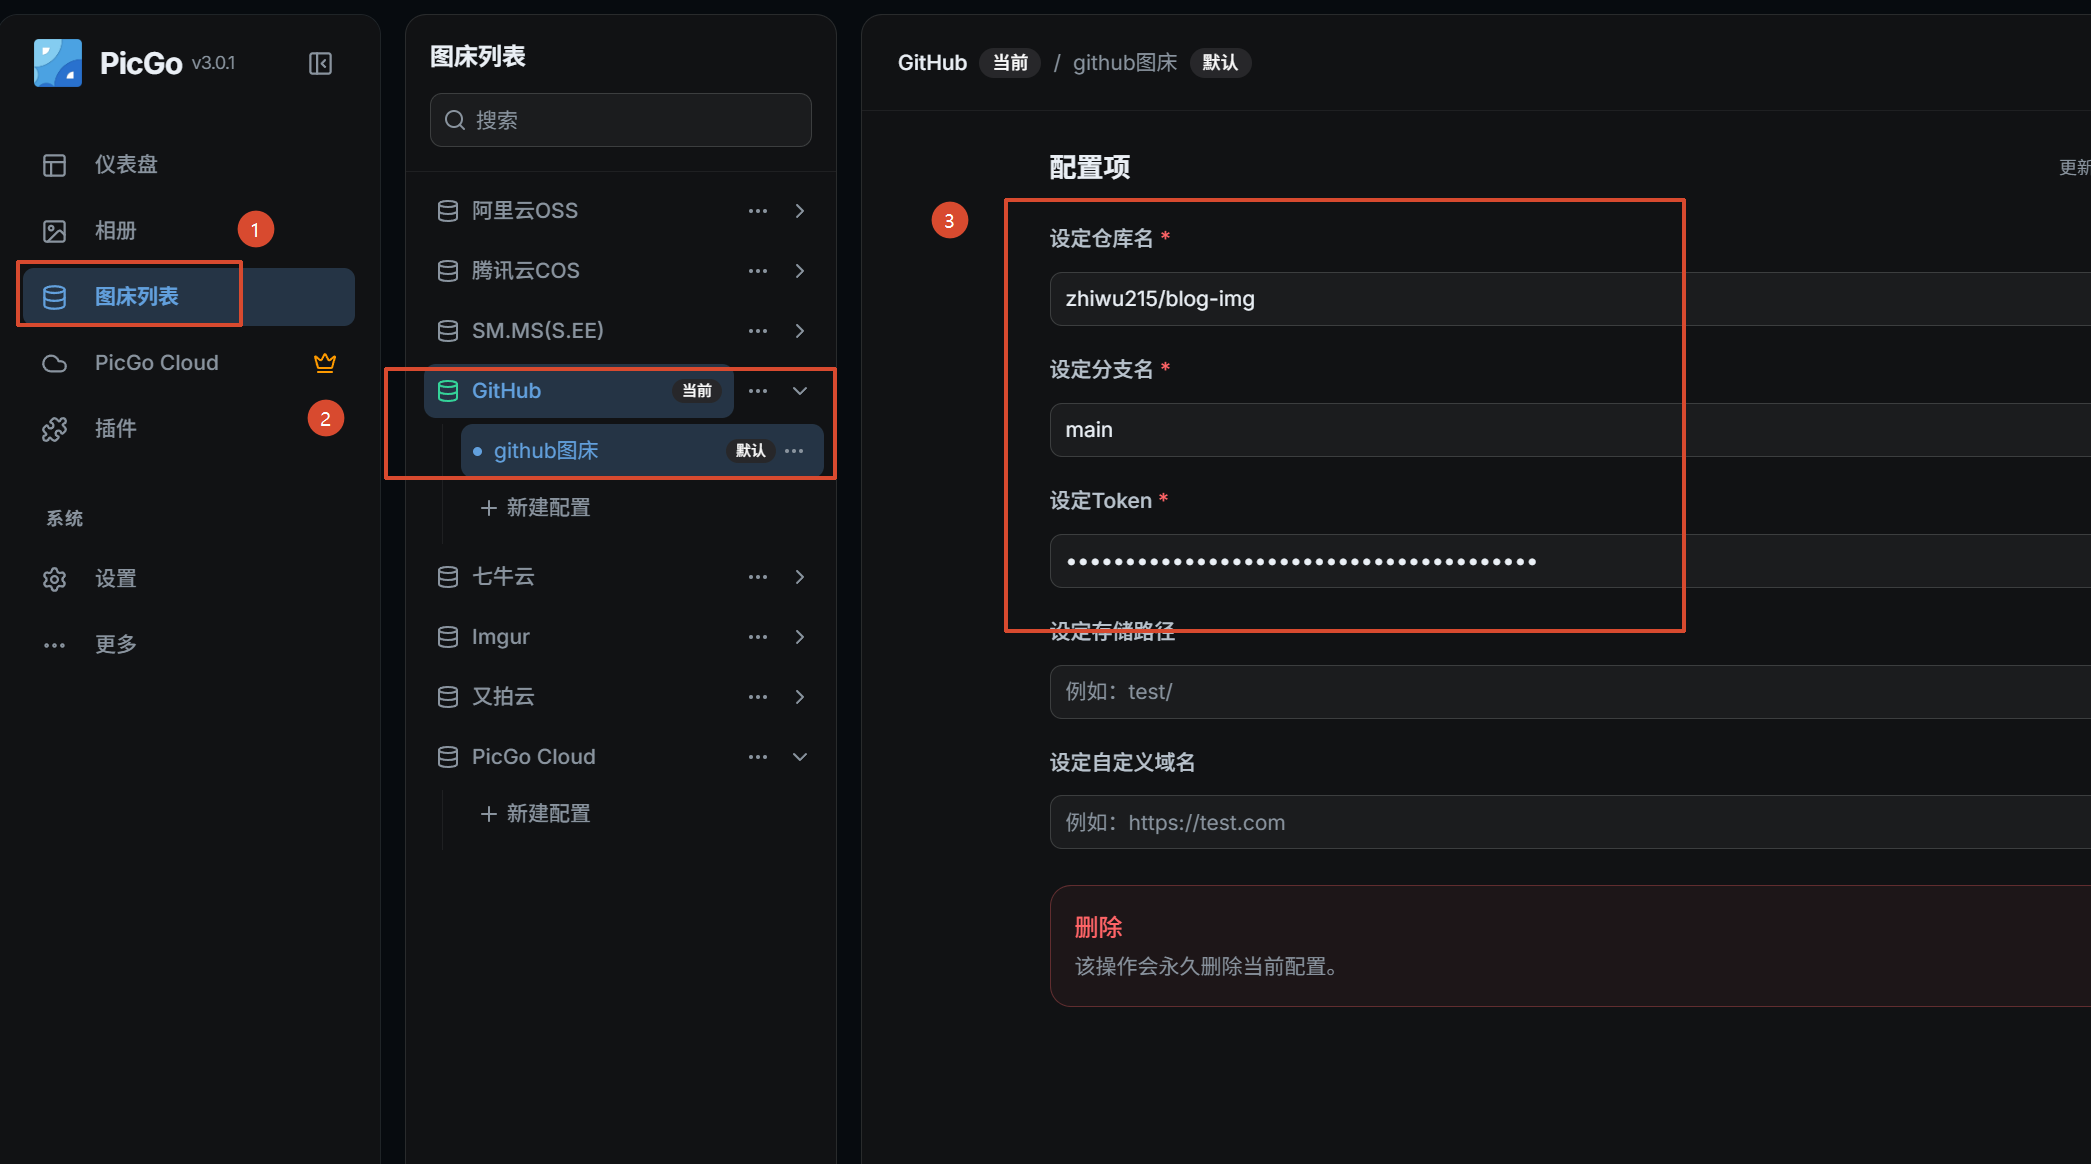
配置PicGo
图床使用jsdelivr作为CDN加速#
我配置完之后试了一下,感觉是github更快,配置这个cdn加速反而更慢了,不知道是不是我的错觉
参考:
GitHub + jsDelivr + PicGo + Imagine 打造稳定快速、高效免费图床GitHub+jsDe - 掘金
设定自定义域名
它的的作用是,在图片上传后,PicGo 会按照自定义域名+上传的图片名的方式生成访问链接,放到粘贴板上,因为我们要使用 jsDelivr 加速访问,所以可以设置为:
https://cdn.jsdelivr.net/gh/用户名/图床仓库名

Typora配置#
手动上传图片,再粘贴链接太麻烦
所以使用typora在里面配置
我并没有配直接上传图片,因为一篇博客不是立刻完成的,图片不一定适合,可能会多次修改,如果直接上传,会导致一些图片用不到却依旧被存入github
先选择保存在本地特定目录,再配置PicGo
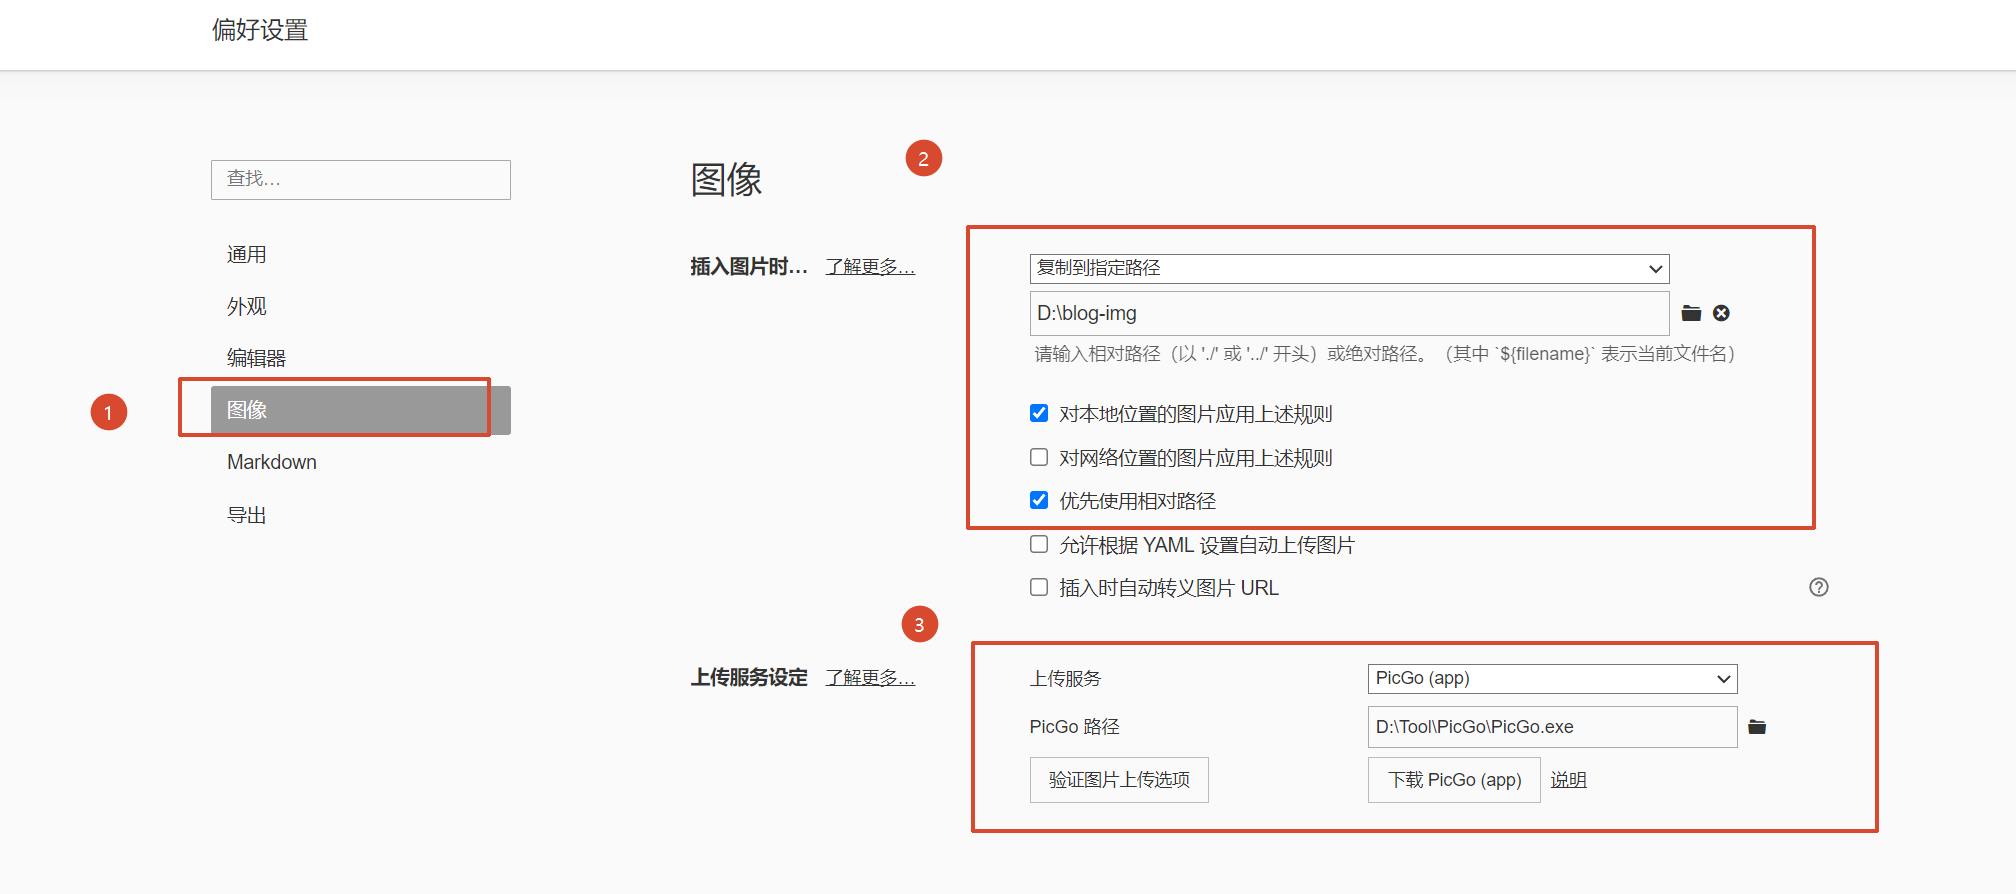
注意:
编写文章的时候,明明可以在Typora里查看到图片的内容
但是运行博客后,却发现显示不出来是正常的
Hugo 在执行构建时,会把 static/ 目录下的所有文件和子目录原样复制到 public/ 目录下。图片不在public/ 目录,浏览器在加载页面时找不到图片

写完博客再一键上传图片
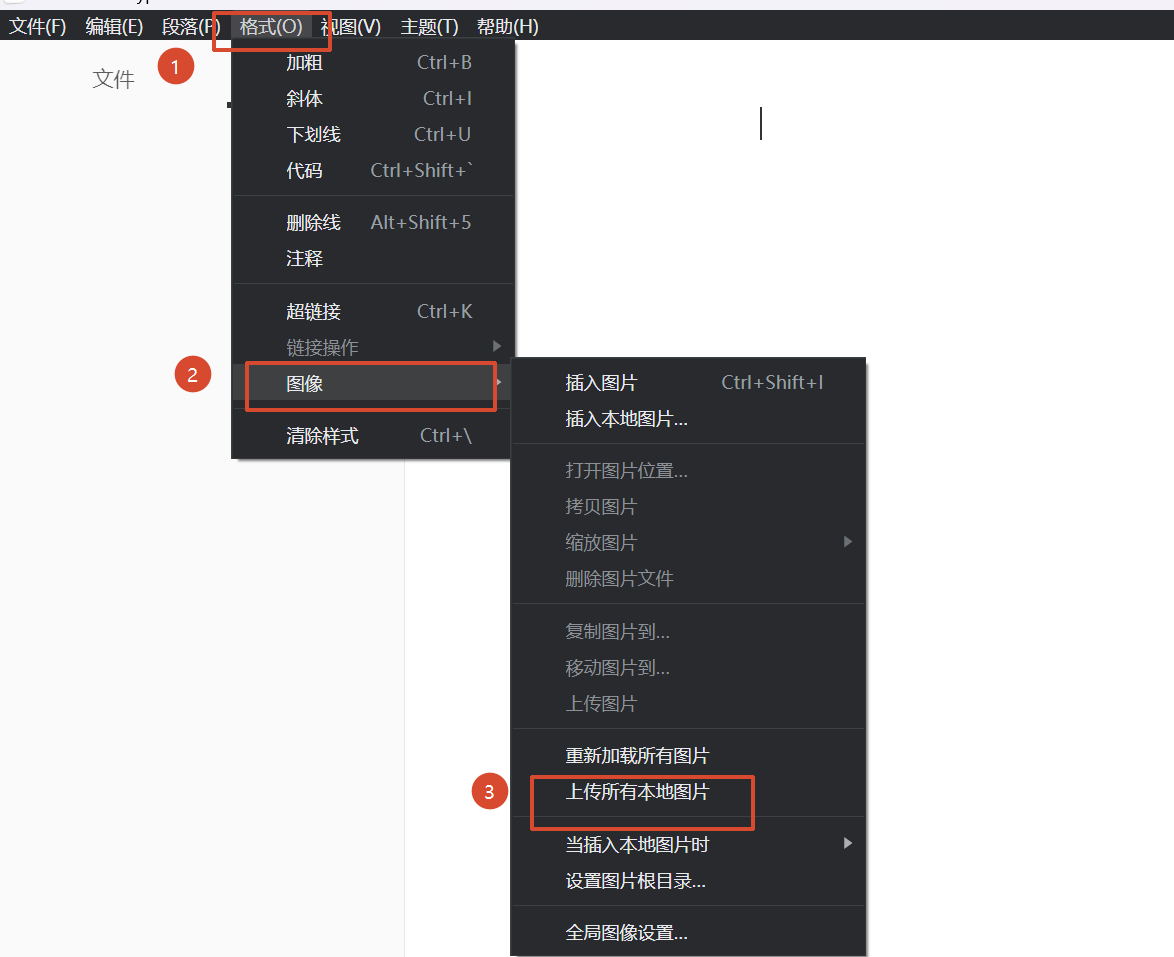
GitHub Actions 清理孤儿图片#
后续修改/删改文章依旧导致的“孤儿图片”,所以可以在GitHub Actions 中设置自动化清理
在你的博客仓库,添加你的图床仓库的token
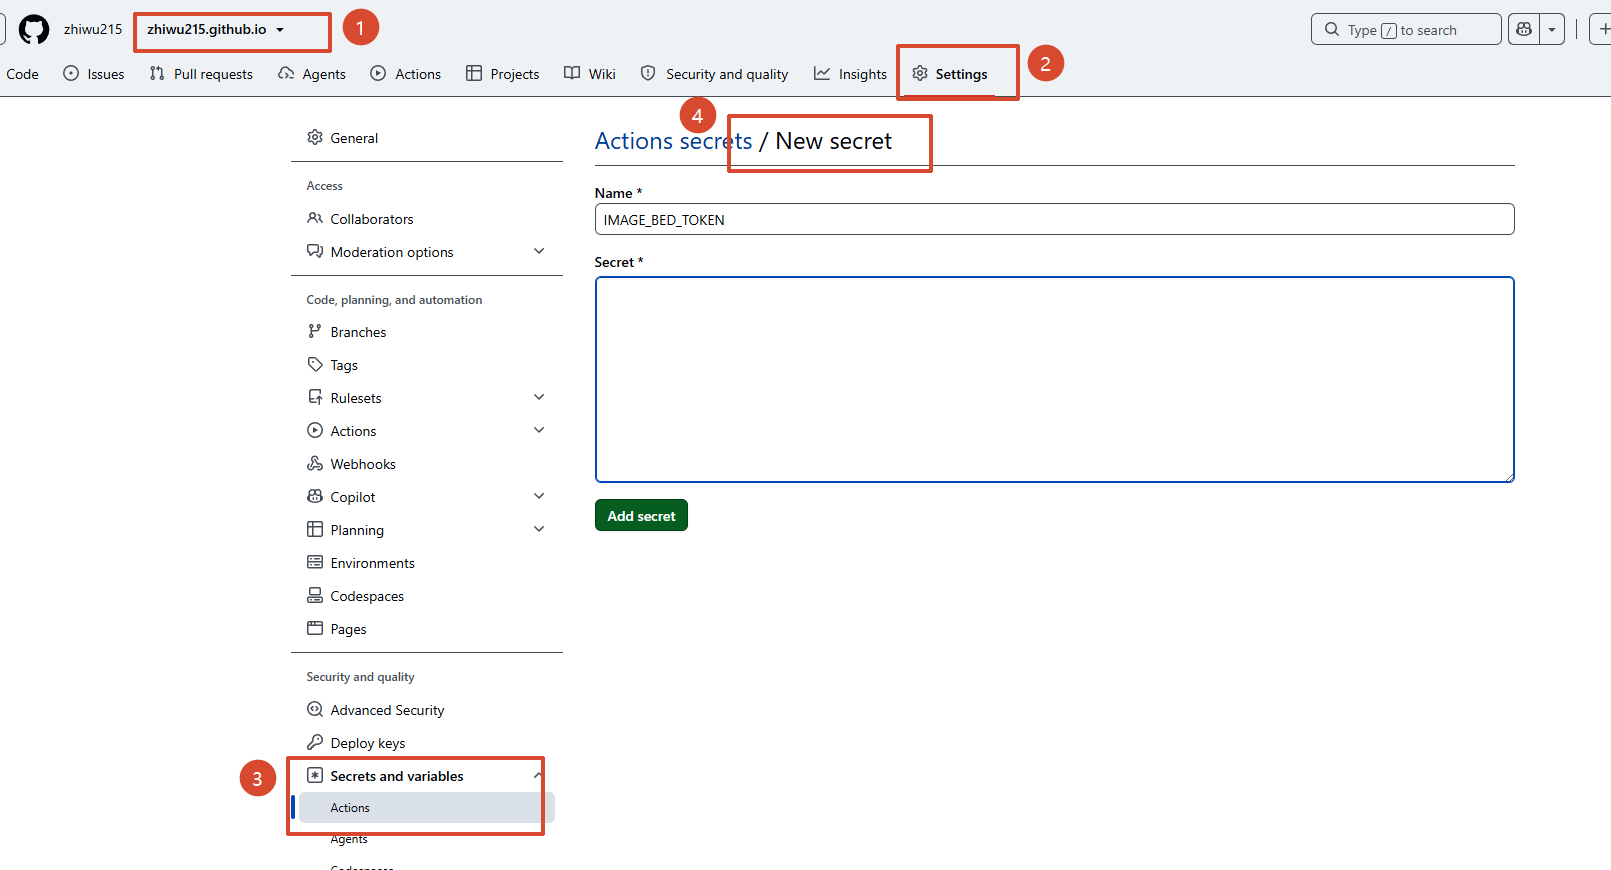
添加脚本
.github/scripts/clean_images.py
需要手动填写
 1
 2
 3
 4
 5
 6
 7
 8
 9
10
11
12
13
14
15
16
17
18
19
20
21
22
23
24
25
26
27
28
29
30
31
32
33
34
35
36
37
38
39
40
41
42
43
44
45
46
47
48
49
50
51
52
53
54
55
56
57
58
59
60
61
62
63
64
65
66
67
68
69
70
71
72
73
74
75
76
77
78
79
80
81
82
83
84
85
86
87
88
89
90
91
92
93
94
95
| import os
import re
import requests
# ==================== 配置区 ====================
# 1. 你的 GitHub 图床仓库 (格式: 用户名/图床仓库名)
IMAGE_REPO = "zhiwu215/blog-img"
# 2. 图片在图床仓库里的存储子目录 (例如 "posts" 或 "img")
# 如果在 PicGo 中未设置子目录,留空字符串 "" 即可
IMAGE_DIR = ""
# 3. 博客文章所在目录
CONTENT_DIR = "content"
# ================================================
GITHUB_TOKEN = os.getenv("IMAGE_BED_TOKEN")
HEADERS = {
"Authorization": f"token {GITHUB_TOKEN}",
"Accept": "application/vnd.github.v3+json"
}
def get_used_images():
"""遍历 content 目录下所有 .md 文件,提取出文章中引用的所有图片文件名"""
used_images = set()
# 正则匹配形如 filename.png / filename.jpg 等图片文件名
pattern = re.compile(r'\/([^\/\s\)"\']+\.(?:png|jpg|jpeg|gif|webp|svg))', re.IGNORECASE)
for root, _, files in os.walk(CONTENT_DIR):
for file in files:
if file.endswith(".md"):
file_path = os.path.join(root, file)
with open(file_path, "r", encoding="utf-8", errors="ignore") as f:
content = f.read()
matches = pattern.findall(content)
for match in matches:
used_images.add(match)
print(f"✅ 在博客 Markdown 文章中共扫描到 {len(used_images)} 张在用图片。")
return used_images
def get_remote_images():
"""通过 GitHub API 获取图床仓库目录下的所有图片文件"""
path_suffix = f"/{IMAGE_DIR}" if IMAGE_DIR else ""
url = f"https://api.github.com/repos/{IMAGE_REPO}/contents{path_suffix}"
res = requests.get(url, headers=HEADERS)
if res.status_code != 200:
print(f"❌ 获取图床文件列表失败,HTTP 状态码: {res.status_code}")
print(res.json())
return []
files = res.json()
images = []
for item in files:
if item["type"] == "file":
images.append({
"name": item["name"],
"path": item["path"],
"sha": item["sha"]
})
print(f"📦 从 GitHub 图床仓库拉取到 {len(images)} 个图片文件。")
return images
def delete_remote_image(file_info):
"""调用 API 删除图床仓库中的孤儿图片"""
url = f"https://api.github.com/repos/{IMAGE_REPO}/contents/{file_info['path']}"
data = {
"message": f"chore: auto delete orphan image {file_info['name']}",
"sha": file_info["sha"]
}
res = requests.delete(url, headers=HEADERS, json=data)
if res.status_code == 200:
print(f"🗑️ 成功删除孤儿图片: {file_info['name']}")
else:
print(f"❌ 删除失败: {file_info['name']}, 错误: {res.text}")
def main():
if not GITHUB_TOKEN:
print("❌ 未检测到 IMAGE_BED_TOKEN 环境变量,脚本退出。")
return
used_images = get_used_images()
remote_images = get_remote_images()
orphan_count = 0
for img in remote_images:
# 如果图床里的图片文件名没有在任何 Markdown 中引用过,即判定为孤儿图片
if img["name"] not in used_images:
print(f"🔍 发现孤儿图片: {img['name']}")
delete_remote_image(img)
orphan_count += 1
print(f"🎉 清理完成!共删除 {orphan_count} 张孤儿图片。")
if __name__ == "__main__":
main()
|
.github/workflows/clean-images.yaml
每周一运行
1
2
3
4
5
6
7
8
9
10
11
12
13
14
15
16
17
18
19
20
21
22
23
24
25
26
27
28
29
30
31
32
33
| name: 清理图床孤儿图片
on:
# 定时任务:每周一 UTC 时间 0:00 (北京时间早上 8:00) 自动运行
schedule:
- cron: '0 0 * * 1'
# 支持在 GitHub 网页端的 Actions 页面手动点击按钮随时触发
workflow_dispatch:
jobs:
clean-orphan-images:
runs-on: ubuntu-latest
steps:
- name: 检出博客源码
uses: actions/checkout@v4
- name: 配置 Python 环境
uses: actions/setup-python@v5
with:
python-version: '3.x'
- name: 安装依赖
run: |
python -m pip install --upgrade pip
pip install requests
- name: 执行孤儿图片清理脚本
env:
IMAGE_BED_TOKEN: ${{ secrets.IMAGE_BED_TOKEN }}
run: |
python .github/scripts/clean_images.py
|
手动测试是否成功
先往图床的仓库随便上传一张图片,然后运行:
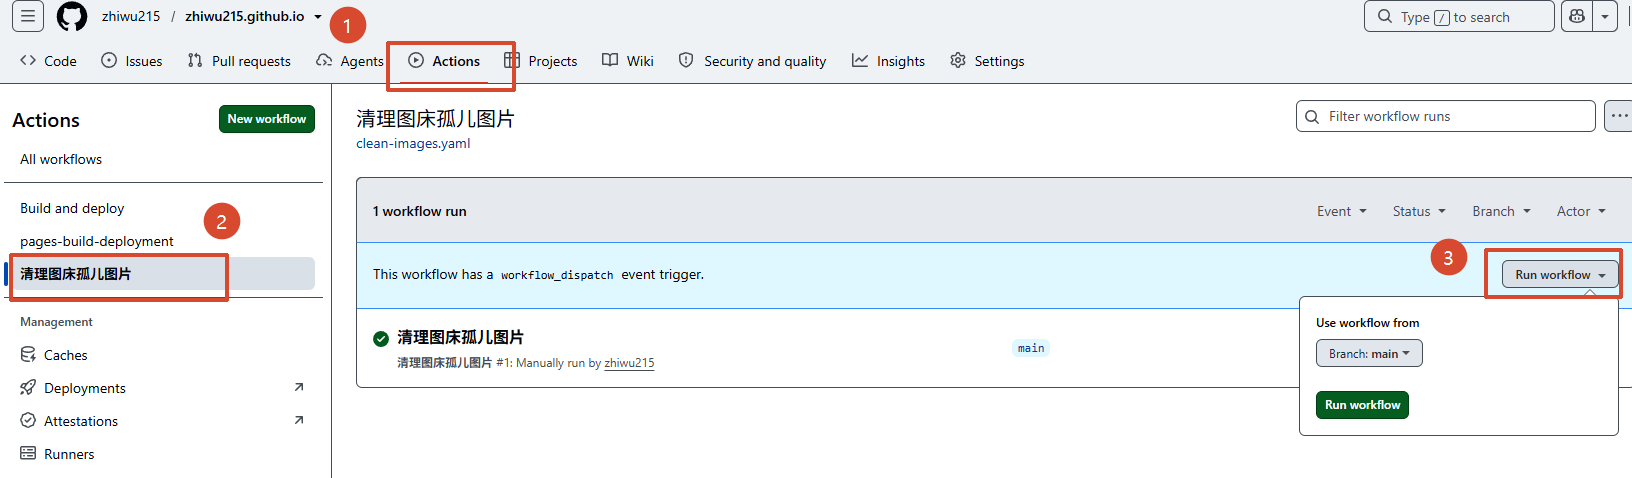
文章模板#
archetypes/default.md
1
2
3
4
5
6
7
| +++
date = '{{ .Date }}'
title = '{{ replace .File.ContentBaseName "-" " " | title }}'
summary = ''
tags = []
draft = true
+++
|
文章封面图#
PaperMod仓库->Wiki->Feature
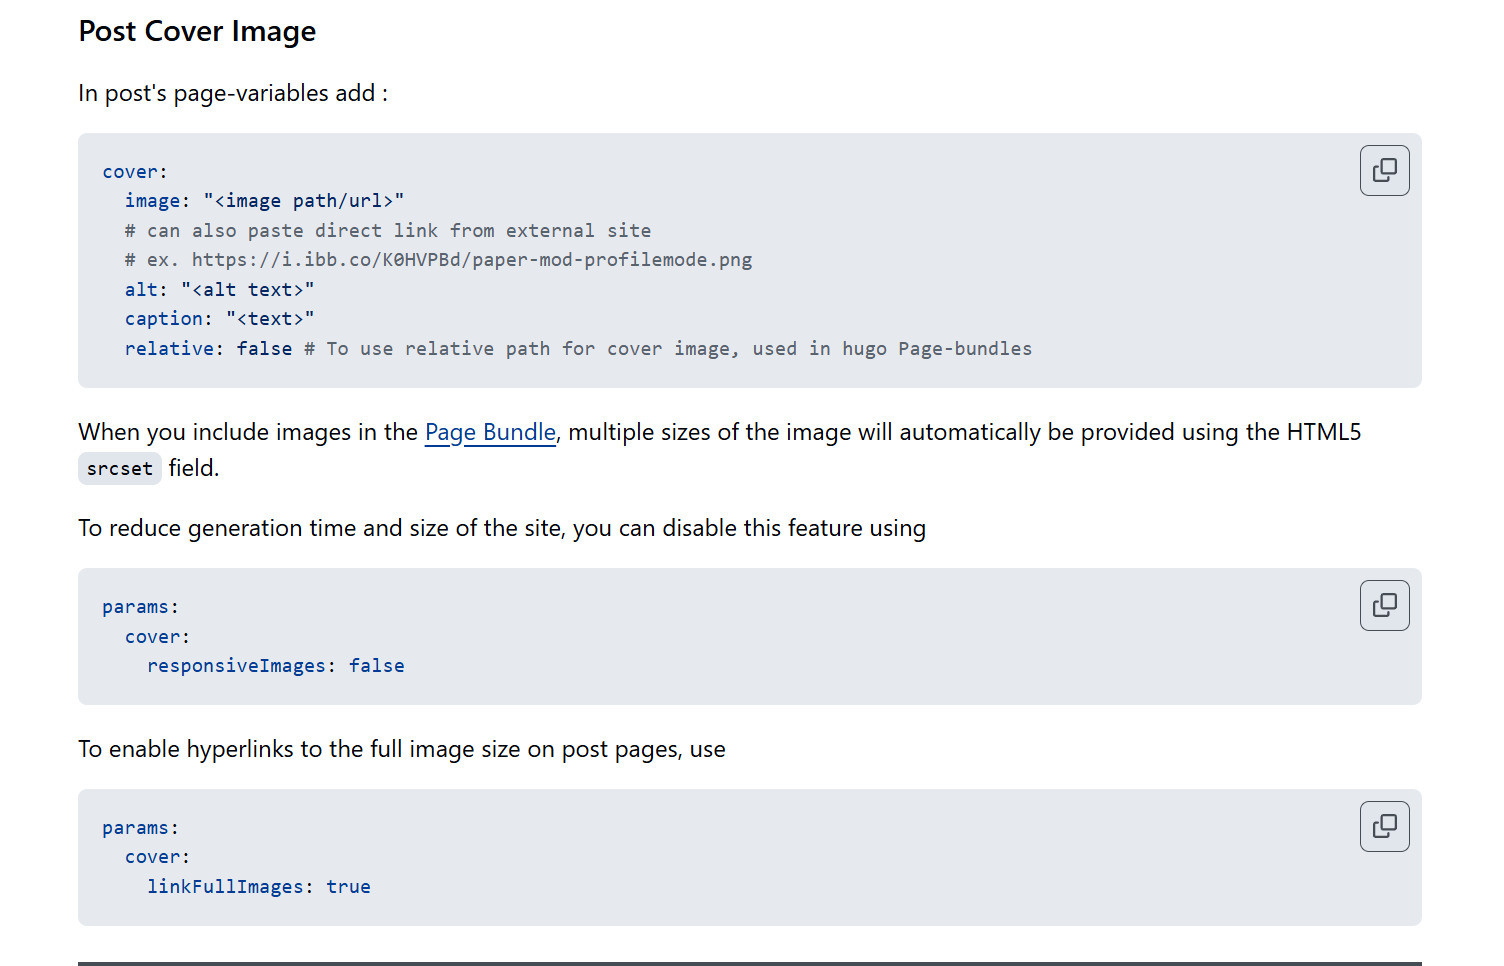
在文章的 Front Matter(文件头部配置区)中添加 [cover] 表格,即可为文章配置封面图。
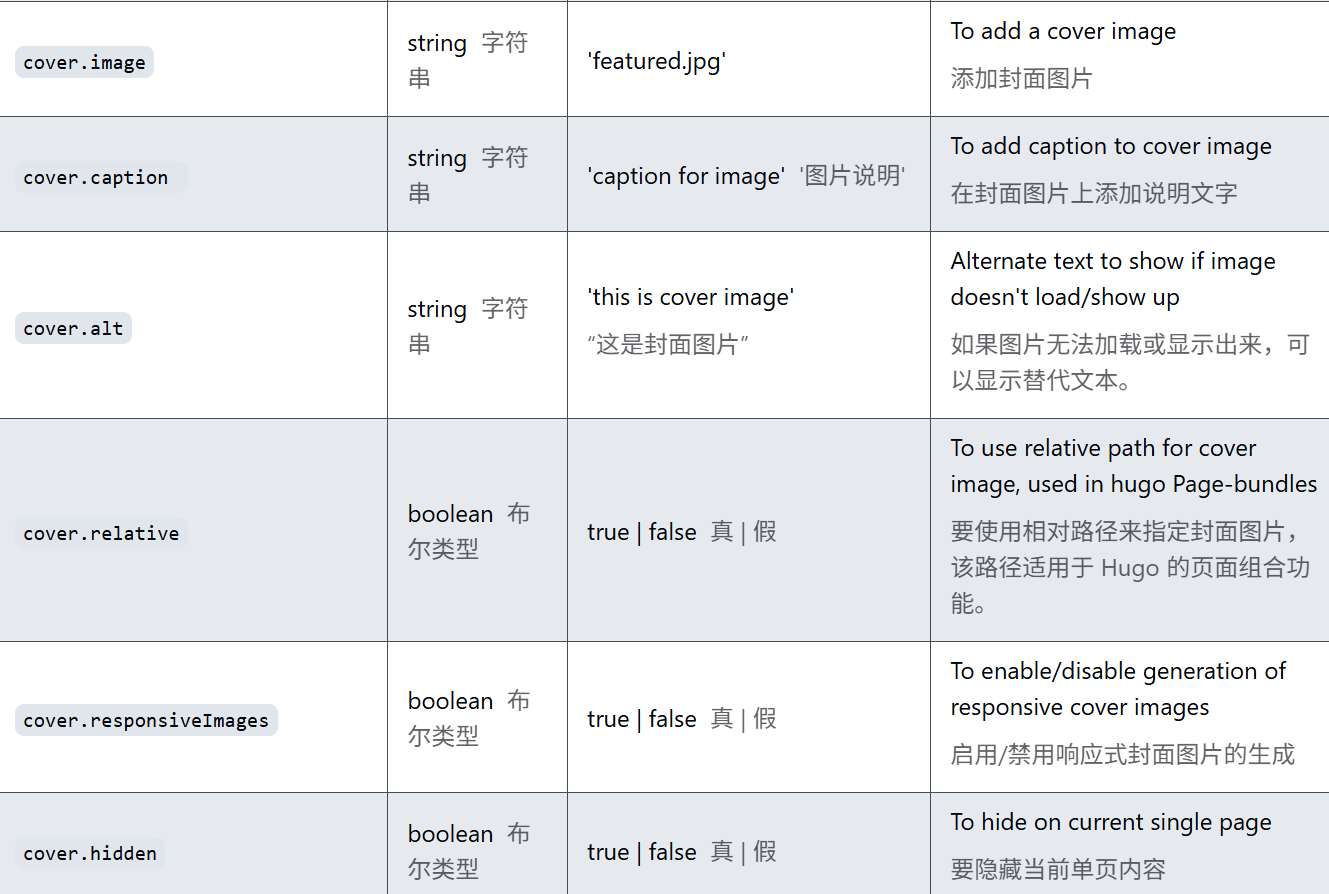
PaperMod仓库->Wiki->Variables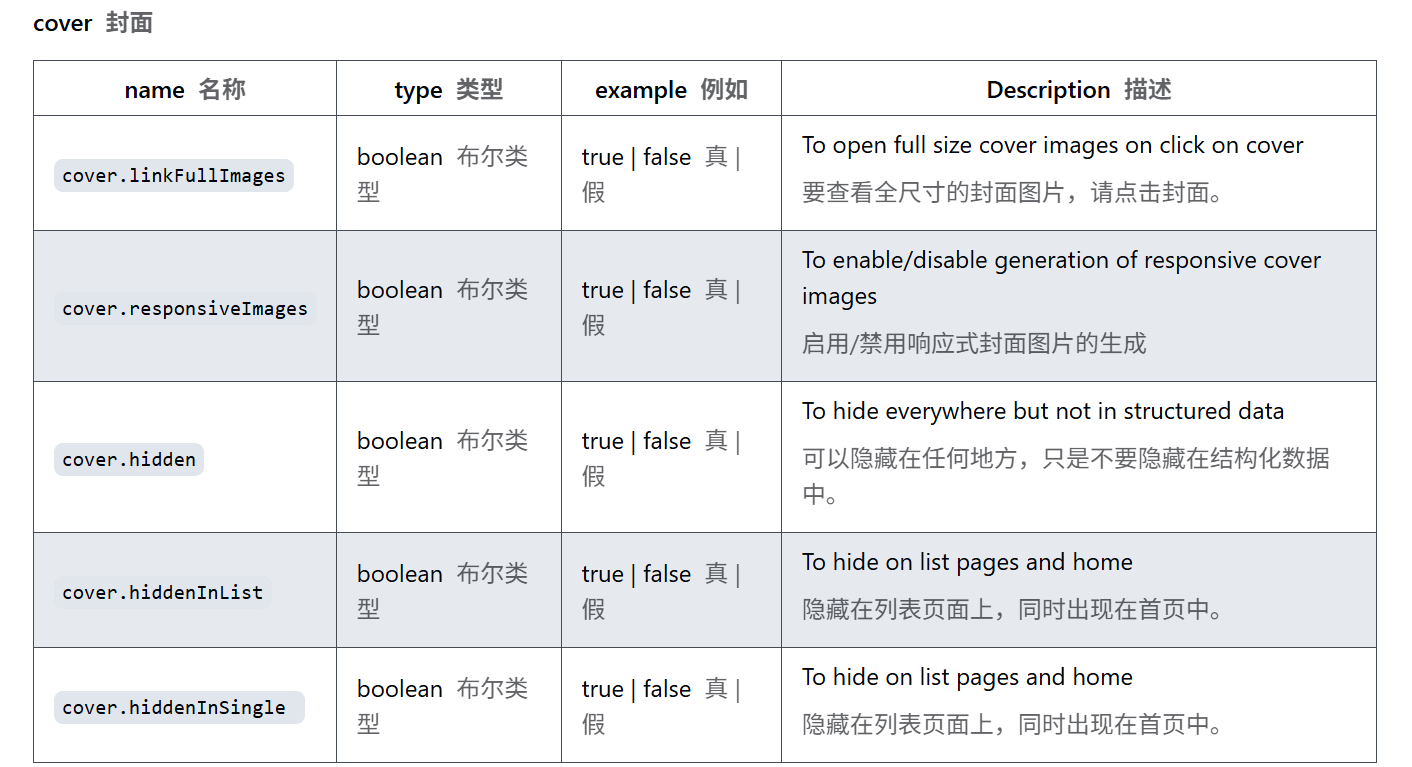
relative:是否使用相对路径。默认false,通常在采用 Hugo Page Bundles 结构普通文章结构content/posts/文章标题.md
Page Bundles(文章包文件结构),就是每篇文章建一个文件夹文章放在:content/posts/文章标题当作文件夹名/index.md
图片放在同一目录下
时设置为 true
hidden:默认文章封面图即显示在文章列表,也会在点进文章后挂在文章标题下方。设置为false,文章章内部不显示
hugo.toml
responsiveImages设为false关闭响应式图片默认情况:如果你使用的是“文章包(Page Bundle)”的结构,Hugo默认会自动帮你处理图片。它会把你的一张封面图,自动裁剪生成好几种不同分辨率的小图和中图,并使用 HTML5 的 srcset 技术来让浏览器根据设备(如手机、电脑)自动加载最合适尺寸的图片
会增加 Hugo 每次生成博客的等待时间
1
2
3
| [params.cover]
responsiveImages = false
linkFullImages = true
|
文章中
1
2
3
4
5
| [cover]
image = "xxx"
alt = "xxx"
caption = "xxx"
hidden = true
|
我很少使用文章封面,所以没什么配置
我看
这个博客
还专门优化了布局,因为PaperMod 的文章列表默认是图片在上、文字在下。这个博客选了文字在左,封面在右的左右布局
文章同步助手#
项目仓库:
wechatsync/Wechatsync: 一键同步文章到多个内容平台,支持今日头条、WordPress、知乎、简书、掘金、CSDN、typecho各大平台,一次发布,多平台同步发布。解放个人生产力
这是浏览器的插件,可以帮你把文章同步到多个平台